# RADIUSaaS Documentation

Certificate-Based Authentication for Wi‑Fi, VPN, and Wired Networks

RADIUSaaS offers easy and secure authentication for accessing network resources. It delivers the comfort, reliability, and scalability of a native cloud SaaS. Supported protocols are RADIUS as well as RadSec. Authentication is based on certificates. RADIUSaaS is generally capable of validating every certificate that can be used for client authentication. However, to be able to lock someone with a revoked certificate out of your network, choose a CA which provides a publicly accessible OCSP or CRL endpoint.

![](https://content.gitbook.com/content/SWU1DQ4UGkqER7uGNUOm/blobs/p3Z2iZSGtK7QmoSnV2VV/radius-aas-flow.png)

These docs cover technical aspects of RADIUSaaS. All other information can be found on the [RADIUSaaS website](https://radius-as-a-service.com/).


# Overview

## What is RADIUS?

Whenever large companies need network authentication, [RADIUS (RFC 2865)](https://tools.ietf.org/html/rfc2865) is the protocol of choice. RADIUS is a AAA protocol which stands for **authentication, authorization and accounting**. It is therefore best suited for controlling access to networks like WiFi, Wired (802.1X, EAP) or VPN. The protocol was developed by Livingston Enterprises, Inc. in 1991 and is now part of the IETF standards.

## What is RadSec?

RADIUS is an efficient protocol for authentication purposes that uses the UDP transport protocol. Nonetheless, some traffic will not be encrypted during transport. This can be avoided by using [RadSec (RFC 6614)](https://tools.ietf.org/html/rfc6614) which is transported over TCP and completely encapsulated within a TLS  tunnel.&#x20;

## Authentication Certificates

The easiest way to push device or user certificates to your clients is [SCEPman](https://www.scepman.com/), as it is super-easy to deploy and integrates seamlessly with Intune and other MDM systems.\
\
You can also use the [Microsoft Cloud PKI](/configuration/get-started/scenario-based-guides/microsoft-cloud-pki), your own on-premise PKI or other compatible CAs.

RADIUSaaS supports multiple CAs in parallel.

#### Online Certificate Verification

To check if a certificate is considered valid by your Certificate Authority (CA) **at authentication time**, RADIUSaaS leverages the Online Certificate Status Protocol (OCSP) or Certificate Revocation Lists (CRLs).

{% hint style="info" %}
To reduce the amount of requests sent to an OCSP responder some certificates states will be [temporarily cached](/other/faqs/log-and-common-errors#certificate-status-was-revoked-previously).
{% endhint %}

## Our Service

### RADIUS

#### Admin Portal

Each customer has access to their own personal instance through their own RADIUSaaS Admin Portal, which can be used for tasks such as [creating users](/admin-portal/users/users#add), changing [allowed certificates](/admin-portal/settings/trusted-roots), [adding proxies](/admin-portal/settings/settings-proxy), creating [rules](/admin-portal/access-and-rules/rules) or performing troubleshooting using RADIUSaaS Insights.&#x20;

#### RADIUS to RadSec Proxy

The service's internal RADIUS server only allows [RadSec](/overview#what-is-radsec) connections. If your WiFi infrastructure does not support RadSec, RADIUSaaS features a [proxy](/admin-portal/settings/settings-proxy) functionality, which will establish a secure tunnel allowing you to use the service with traditional UDP-based RADIUS.

#### Guests, BYOD and IOT Devices&#x20;

Some of your devices may not be able to receive certificates. Reasons could be that they are not managed by any policy provider/MDM system, or they are simply technically not able to work with certificates. \
In those cases, BYOD or guests scenarios, you can [add users](/admin-portal/users/users#add) to your instance and restrict the access to a specific time frame, if needed. This allows you to authenticate printers, TVs or other devices with a single instance of the service while using the same SSID.

### Regions

RADIUSaaS can be used globally.

**RADIUSaaS' core service** can be deployed into datacenters in the following regions and countries:

* Australia
* European Union
* United Kingdom
* United States of America

**RADIUS proxies** can be deployed into datacenters on [all continents](/admin-portal/settings/settings-proxy#regions).&#x20;

## Getting Started

Please follow the steps on the following page to get your clients ready authenticating with RADIUS-as-a-Service!

{% content-ref url="/pages/-Mczun9TRZ6NaGIkRq66" %}
[Getting Started](/configuration/get-started)
{% endcontent-ref %}


# SCEPman Integration

RADIUSaaS integrates with [SCEPman](https://docs.scepman.com/?_gl=1*89r1op*_ga*MTQyOTEzMDY4MS4xNzgzNDA2ODA1*_ga_BRDGXLVK3H*czE3ODM0MDY4MDQkbzEkZzAkdDE3ODM0MDY4MDQkajYwJGwwJGgw) to deliver end-to-end certificate-based network authentication. While SCEPman automates certificate issuance and lifecycle management, RADIUSaaS validates certificates and controls access to Wi‑Fi, VPN, and wired networks. Customers can choose between a self-managed Enterprise Bundle and a fully managed SaaS Bundle based on their deployment and operational needs.

**The following bundle options are available:**

## **RADIUSaaS + SCEPman Enterprise Bundle**

The RADIUSaaS + SCEPman Enterprise Bundle combines the full Enterprise Editions of RADIUSaaS and SCEPman into one integrated solution for certificate-based network access. The bundle includes all enterprise features, product support, and advanced authentication capabilities required for productive environments. It is designed for organizations that want to secure Wi-Fi, VPN, and wired network access using certificates without relying on traditional passwords.

**We recommend the Enterprise Bundle for:**

* Productive environments
* Enterprise-grade network security
* Certificate-based Wi-Fi, VPN, and LAN authentication
* Scalability and high availability
* Organizations requiring support and enterprise features

## **RADIUSaaS + SCEPman SaaS Bundle**

The RADIUSaaS + SCEPman SaaS Bundle provides a fully managed cloud-based solution for certificate issuance and network authentication. By combining RADIUSaaS and SCEPman in a SaaS offering, organizations can deploy secure network access without managing their own PKI or RADIUS infrastructure. The solution integrates with Microsoft Intune and Microsoft Entra ID to enable modern, passwordless network authentication.

**We recommend the SaaS Bundle for:**

* Organizations looking for a fully managed service
* Simplified deployment and operations
* Cloud-first environments
* Certificate-based Wi-Fi and VPN authentication
* Reduced infrastructure and maintenance effort

For both options the [SCEPman Connection](https://docs.radiusaas.com/admin-portal/settings/settings-server#scepman-connection) feature enables automatic issuance and renewal of RADIUSaaS server certificates through SCEPman.

## **RADIUSaaS + SCEPman Bundle Edition Comparison**

<table data-search="false"><thead><tr><th width="241">Capability</th><th width="241" align="center">RADIUSaaS + SCEPman Enterprise Bundle</th><th align="center">RADIUSaaS + SCEPman SaaS Bundle</th></tr></thead><tbody><tr><td><strong>Hosting</strong></td><td align="center">Customer's Azure Tenant</td><td align="center">Vendor's Datacenters</td></tr><tr><td><strong>Infrastructure Cost</strong></td><td align="center">Customer</td><td align="center">Vendor</td></tr><tr><td><strong>Maintenance</strong></td><td align="center">Customer / Azure</td><td align="center">Vendor</td></tr><tr><td><strong>Configuration</strong></td><td align="center">Customer</td><td align="center">Customer</td></tr><tr><td><strong>Geo-Redundancy</strong></td><td align="center">Yes</td><td align="center">Planned</td></tr><tr><td><strong>Certificate Master RBAC</strong></td><td align="center">Yes</td><td align="center">No</td></tr><tr><td><strong>AD Enrollment</strong></td><td align="center">Yes</td><td align="center">Yes</td></tr><tr><td><strong>Enrollment REST API</strong></td><td align="center">Yes</td><td align="center">Yes</td></tr><tr><td><strong>Logging</strong></td><td align="center">Azure Monitor / <br>Log Analytics</td><td align="center">WebConsole</td></tr><tr><td><strong>CA hierarchy</strong></td><td align="center">Yes</td><td align="center">Bring your own Key Vault (BYOK)</td></tr><tr><td><strong>Machine certificates</strong></td><td align="center">Yes</td><td align="center">Yes</td></tr><tr><td><strong>User certificates</strong></td><td align="center">Yes</td><td align="center">Yes</td></tr><tr><td><strong>AD Device Certificates</strong></td><td align="center">Yes</td><td align="center">Yes</td></tr><tr><td><strong>Certificate Management</strong></td><td align="center">Yes</td><td align="center">Yes</td></tr><tr><td><strong>Kerberos Certificates</strong></td><td align="center">Yes</td><td align="center">Yes</td></tr><tr><td><strong>Other MDM Integration</strong></td><td align="center">Yes</td><td align="center">Yes</td></tr><tr><td><strong>Device Compliance Check</strong></td><td align="center">Yes</td><td align="center">Yes</td></tr><tr><td><strong>Support</strong></td><td align="center">Yes</td><td align="center">Yes</td></tr><tr><td><strong>Licensing</strong></td><td align="center"> Subscription-fee</td><td align="center"> Subscription-fee</td></tr></tbody></table>


# Getting Started

Our Getting Started Guides provide step-by-step instructions on how to configure RADIUSaaS for your environment.

## Checklist

Let's start with some essential questions:

* [ ] What PKI(s) are you using to issue the client authentication certificates?
* [ ] Shall device- or user-type client authentication certificates be used for authentication?
* [ ] Which MDM system are you using (e.g. Intune and/or Jamf Pro) and do you have access and rights to create device configuration profiles?
* [ ] Does your networking equipment support RadSec (RADIUS via TCP/TLS) and/or RADIUS (UDP)?&#x20;
* [ ] Do you have access to the management portal of your networking gear?
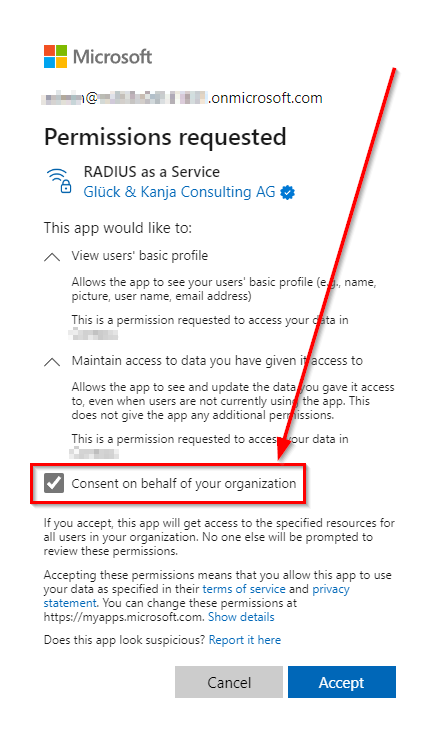
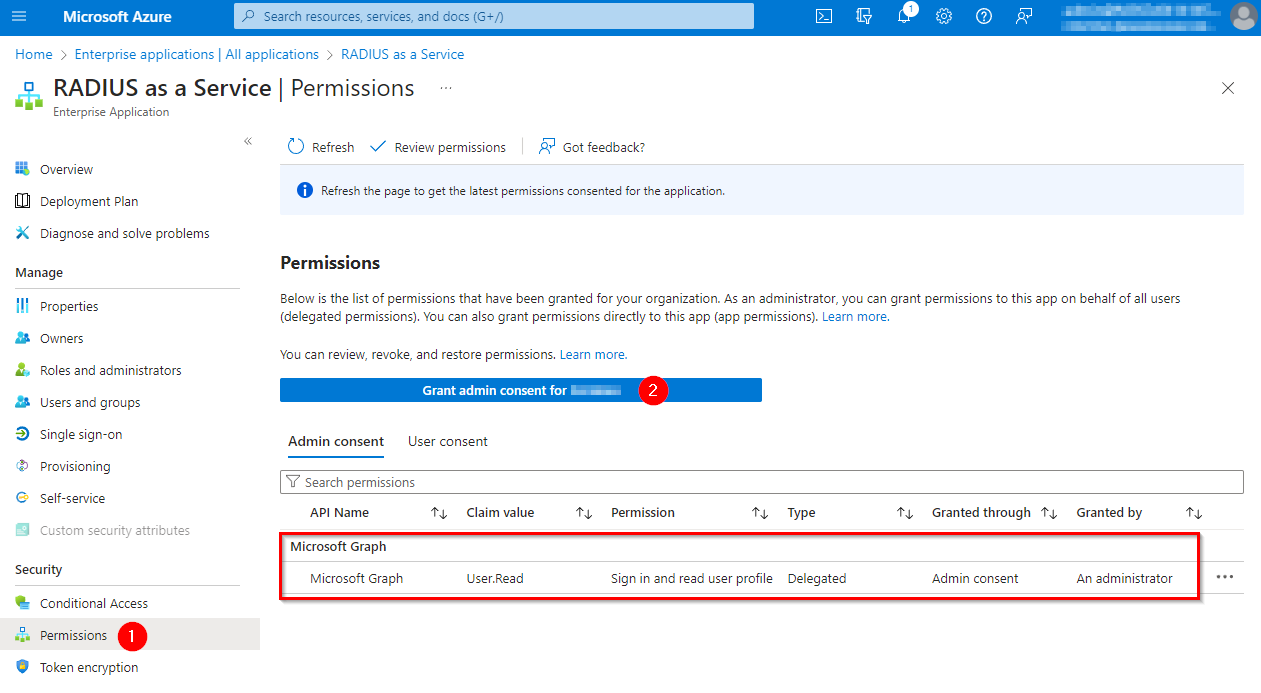
* [ ] Do you have permissions in your Azure tenant to consent the Basic User Profile Read Access? This is needed to access your RADIUSaaS Portal.

## General Structure

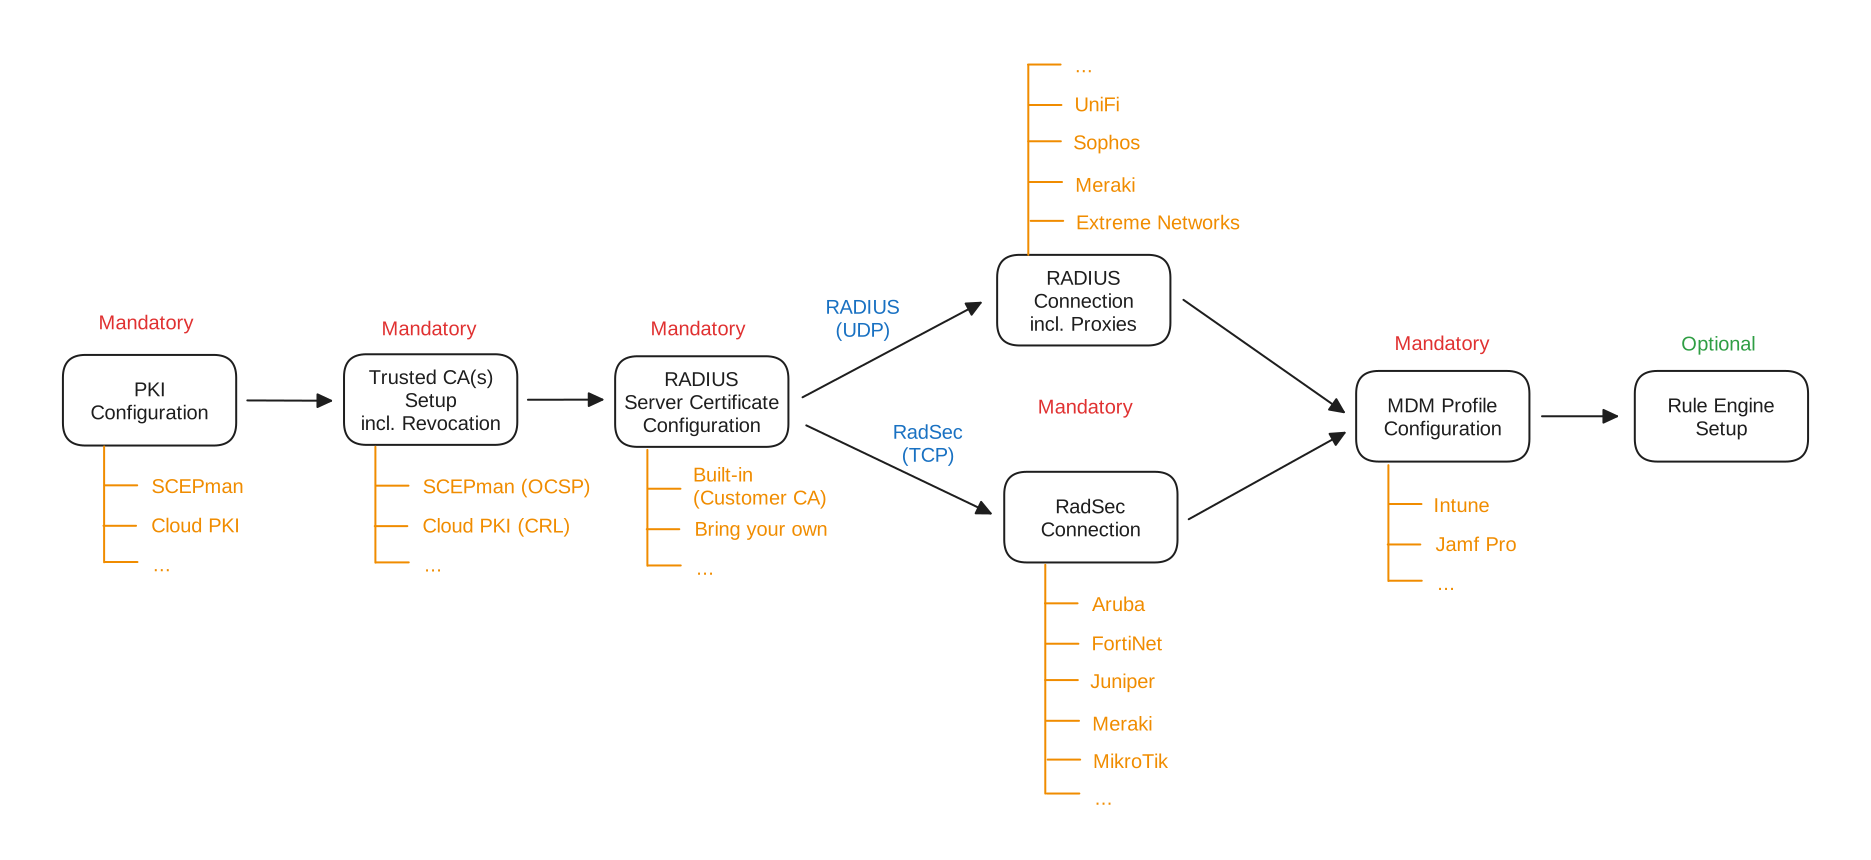
Below diagram details the generic setup procedure as explained in our guides below. The linear procedure forks depending on whether your network equipment supports **RadSec** natively **or** **RADIUS** only. Thus, in case you have requirements for both (e.g. due to a heterogeneous AP and/or switch fleet), both configurations must be completed.

Besides our [Generic Guide](/configuration/get-started/generic-guide), we have prepared [Scenario-based Guides](/configuration/get-started/scenario-based-guides) describing how RADIUSaaS can be configured for certificate-based WiFi authentication together with popular Cloud PKI solutions:

* RADIUSaaS with Microsoft Cloud PKI
* RADIUSaaS with SCEPman

<img src="https://1222554226-files.gitbook.io/~/files/v0/b/gitbook-x-prod.appspot.com/o/spaces%2FSWU1DQ4UGkqER7uGNUOm%2Fuploads%2FdH32DcbY6f0hjWicZdCg%2Ffile.excalidraw.svg?alt=media&amp;token=3e385a9d-082a-43f6-8dff-904658e4bcf7" alt="" class="gitbook-drawing">

## Generic Guide

{% content-ref url="/pages/0MMZ0wJtvDGDEMj8ImYb" %}
[Generic Guide](/configuration/get-started/generic-guide)
{% endcontent-ref %}

## Scenario-based Guides

{% content-ref url="/pages/fTVIdkrigRdMevtt8ck0" %}
[Microsoft Cloud PKI](/configuration/get-started/scenario-based-guides/microsoft-cloud-pki)
{% endcontent-ref %}

{% content-ref url="/pages/BwPUbviKnJuM9kP4ImWe" %}
[SCEPman Enterprise](/configuration/get-started/scenario-based-guides/scepman-enterprise)
{% endcontent-ref %}


# Generic Guide

{% stepper %}
{% step %}

### PKI Setup

{% hint style="warning" %}
This is a **mandatory** step.&#x20;

May be omitted if you are using RADIUSaaS with [username/password-based authentication](/admin-portal/users/users) only.
{% endhint %}

Set up your PKI so that the necessary client authentication certificates are automatically pushed to your endpoint devices.&#x20;

If you are using any of the below PKIs, please follow the relevant guides instead:

{% content-ref url="/pages/fTVIdkrigRdMevtt8ck0" %}
[Microsoft Cloud PKI](/configuration/get-started/scenario-based-guides/microsoft-cloud-pki)
{% endcontent-ref %}
{% endstep %}

{% step %}

### Trusted CA(s) Setup

{% hint style="warning" %}
This is a **mandatory** step.
{% endhint %}

Tell your RADIUSaaS instance which client authentication certificates will be allowed to authenticate and how to check if those certificates are still valid:

{% content-ref url="/pages/-MYxhI9AbkDJoF5kYBBV" %}
[Trusted Certificates](/admin-portal/settings/trusted-roots)
{% endcontent-ref %}
{% endstep %}

{% step %}

### RADIUS Server Certificate Configuration

{% hint style="warning" %}
This is a **mandatory** step.
{% endhint %}

{% hint style="info" %}
For customers that use **SCEPman** as PKI, we recommend to leverage the [SCEPman integration](/admin-portal/settings/settings-server#scepman-connection)  to fully automate the **RADIUS Server Certificate** lifecycle.
{% endhint %}

Since endpoint devices will establish a TLS connection to RADIUSaaS during network authentication, RADIUSaaS must present a server certificate to the client (the **RADIUS Server Certificate**). This certificate can be generated directly from the **RADIUSaaS Admin Portal** or imported if you already own a suitable certificate (**BYO**). The same server certificate is also used to secure the RadSec connection to your authenticator devices (WiFi access points, switches, VPN gateways), if applicable.

In case you are happy to use the **built-in** [**Customer CA**](/admin-portal/settings/settings-server#customer-ca), whose sole purpose it is to issue the **RADIUS Server Certificate**, no further action is required as part of this step.

In case you'd prefer to bring your own TLS server certificate, issued by your preferred CA, please follow [these steps](/admin-portal/settings/settings-server#bring-your-own-certificate).
{% endstep %}

{% step %}

### Network Equipment Configuration

{% hint style="warning" %}
This is a **mandatory** step.
{% endhint %}

### RadSec

If your network equipment supports the **RadSec** protocol, follow below steps:

#### **WiFi Access Points**

For some popular vendors, we have prepared representative step-by-step guides on setting up the RadSec connection [here](/configuration/access-point-setup/radsec-available). While we are not able to provide documentation for every vendor, in general, the following steps apply:

1. Import your active **RADIUS Server Certificate** to your WiFi infrastructure.
2. Add the CA certificate from which your APs have obtained their **RadSec Connection Certificate** to your **Trusted Ceertificates** list as described [here](/admin-portal/settings/trusted-roots#add).
3. Create a new RADIUS profile.
4. Set the IP address and the port of your server in your RADIUS profile. Therefore, use the [public RadSec IP address](/admin-portal/settings/settings-server#properties) and the standard RadSec port (2083).
5. Set the **Shared Secret** to "radsec", if applicable.
6. Assign the created profile to your SSID(s).

#### Wired (LAN) Switches

Currently, we have not prepared sample guides for networking switches yet. However, the configuration steps are similar to the ones for WiFi Access Points. In case you face difficulties, please [reach out to us](https://www.radius-as-a-service.com/help/).

### RADIUS

If your network equipment **does not support RadSec**, you must first deploy proxies that handle the protocol conversion from [RADIUS](/overview#what-is-radius) to [RadSec](/overview#what-is-radsec) :

{% content-ref url="/pages/-MYxgLR1E0hnBt5yqLpf" %}
[Proxy Settings](/admin-portal/settings/settings-proxy)
{% endcontent-ref %}

Next, move on to configuring your equipment:

#### **WiFi Access Points**

For some popular vendors, we have prepared representative step-by-step guides [here](/configuration/access-point-setup/proxy-needed). While we are not able to provide documentation for every vendor, in general, the following steps apply:

1. Create a new RADIUS profile.
2. Configure an external RADIUS server:
   * As server IP address, configure the IP address of your [**proxy**](/admin-portal/settings/settings-server#properties-1)**.**
   * Take the shared secret from your [**Server Settings**](/admin-portal/settings/settings-server#radius-udp) page.
   * Configure the standard ports for RADIUS authentication (1812) and accounting (1813 - optional).
3. Assign the created profile to your SSID(s).

#### **Wired (LAN) Switches**

Currently, we have not prepared sample guides for switch appliances yet. However, the configuration steps are similar to the ones for WiFi Access Points. In case you face difficulties, please [reach out to us](https://www.radius-as-a-service.com/help/).
{% endstep %}

{% step %}

### MDM Profiles

{% hint style="warning" %}
This is a **mandatory** step.
{% endhint %}

{% hint style="success" %}
**For Jamf Pro**

We strongly recommend to configure all 802.1X-relevant payloads in a **single** Configuration Profile in Jamf Pro - and one Configuration Profile per assignment type (Computers, Devices, Users).&#x20;
{% endhint %}

### Server Certificate

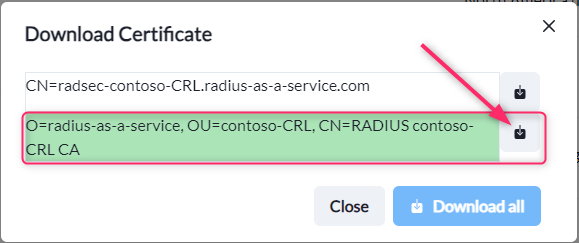
To enable trust between your endpoint devices and the server certificate RADIUSaaS presents upon authentication, configure a trusted certificate profile in your preferred MDM solution. Therefore, first download the Root CA certificate that has issued your currently active **RADIUS Server Certificate** as described [here](/admin-portal/settings/settings-server#download).

{% hint style="danger" %}
When downloading the relevant certificate, ensure to **only** **download** the **Root CA** certificate of your currently active RADIUS Server Certificate (highlighted in green) - not the entire chain or the RADIUS Server Certificate itself!
{% endhint %}

Move on to push out this certificate via MDM:

#### **Microsoft Intune**

{% content-ref url="/pages/-MYxiLd7JIp6ZsqGaDol" %}
[Server Trust](/profile-deployment/microsoft-intune/trusted-root)
{% endcontent-ref %}

#### Jamf Pro

{% content-ref url="/pages/qedLmVD2hg2xuGDaUALd" %}
[Server Trust](/profile-deployment/jamf-pro/server-trust)
{% endcontent-ref %}

### WiFi Profile

To configure a WiFi profile in your preferred MDM solution, follow one of these guides:

#### **Microsoft Intune**

{% content-ref url="/pages/-MYxiZmAIpyMYZXLfOdl" %}
[WiFi Profile](/profile-deployment/microsoft-intune/wifi-profile)
{% endcontent-ref %}

#### **Jamf Pro**

{% content-ref url="/pages/JjbQKqgciZW4eAVVBjtC" %}
[WiFi Profile](/profile-deployment/jamf-pro/wifi-profile)
{% endcontent-ref %}

### Wired (LAN) Profile

To configure a wired (LAN) profile for your stationary devices in your preferred MDM solution, follow one of these guides:

#### **Microsoft Intune**

{% content-ref url="/pages/-MYxvNFJUncToXBdPvsu" %}
[Wired Profile](/profile-deployment/microsoft-intune/wired-profile)
{% endcontent-ref %}

#### **Jamf Pro**

{% content-ref url="/pages/R7rgEshgHnAaJ937nOLg" %}
[Wired Profile](/profile-deployment/jamf-pro/wired-profile)
{% endcontent-ref %}
{% endstep %}

{% step %}

### Permissions and Technical Contacts

{% hint style="warning" %}
This is a **mandatory** step.
{% endhint %}

First, review your [Permissions](/admin-portal/access-and-rules/permissions) to ensure the right persons in your organization have the right level of administrative access to your RADIUSaaS instance.

{% hint style="success" %}
To **prevent yourself from being locked** out of your RADIUSaaS instance, always ensure that either

* at least two user identities or
* one service account

are configured as [Administrators](/admin-portal/access-and-rules/permissions#administrators).
{% endhint %}

Next, ensure that we are able to contact you in case we have important technical information to share by reviewing the [Technical Contacts](/admin-portal/access-and-rules/permissions#technical-contacts) section.

{% hint style="success" %}
For us to **reliably deliver important information** to you via email, always ensure that either

* at least two email addresses of individuals or
* one shared mailbox / distribution list

are configured.
{% endhint %}
{% endstep %}

{% step %}

### Rules

{% hint style="info" %}
This is an **optional** step.
{% endhint %}

If you would like to configure additional rules, for example to assign VLAN IDs or limit authentication requests to certain trusted CAs or WiFi access points, please check out the RADIUSaaS Rule Engine.

{% content-ref url="/pages/Np05pVHXbtrMwBdTDctJ" %}
[Rules](/admin-portal/access-and-rules/rules)
{% endcontent-ref %}
{% endstep %}
{% endstepper %}

{% content-ref url="/pages/Np05pVHXbtrMwBdTDctJ" %}
[Rules](/admin-portal/access-and-rules/rules)
{% endcontent-ref %}


# Scenario-based Guides


# Microsoft Cloud PKI

This document describes the configuration steps necessary to implement certificate-based WiFi authentication using Microsoft Cloud PKI with Intune.

{% hint style="info" %}
It is assumed that the Microsoft Cloud PKI hosts both the Root and Issuing CA. For scenarios involving BYOCAs please refer to Microsoft's online resources or the web.
{% endhint %}

{% stepper %}
{% step %}

### Deploy a Microsoft Cloud PKI

#### Create a Root CA in Intune admin center

Before you can issue certificates to managed devices, you need to create a root CA in your tenant to act as the trust anchor. To create a root CA in Intune admin center, please follow [this ](https://learn.microsoft.com/en-gb/mem/intune/protect/microsoft-cloud-pki-configure-ca#:~:text=an%20admin%20user.-,Step%201%3A%20Create%20root%20CA%20in%20admin%20center,-Before%20you%20can)Microsoft guide.&#x20;

{% hint style="info" %}
Please take note of the CRL distribution point as you will need this later in [Step 2](#step-1-create-root-ca-in-admin-center-2).&#x20;
{% endhint %}

#### Create an Issuing CA in Intune admin center <a href="#step-1-create-root-ca-in-admin-center" id="step-1-create-root-ca-in-admin-center"></a>

An issuing CA is required to issue certificates for Intune-managed devices. Cloud PKI automatically provides a SCEP service that acts as a certificate registration authority. It requests certificates from the issuing CA on behalf of Intune-managed devices using a SCEP profile. To create an issuing CA, please follow [this ](https://learn.microsoft.com/en-gb/mem/intune/protect/microsoft-cloud-pki-configure-ca#step-2-create-issuing-ca-in-admin-center)Microsoft guide.&#x20;

{% hint style="info" %}
Please take note of the CRL distribution point as you will need this later in [Step 2](#step-1-create-root-ca-in-admin-center-2).
{% endhint %}

<figure><img src="https://1222554226-files.gitbook.io/~/files/v0/b/gitbook-x-prod.appspot.com/o/spaces%2FSWU1DQ4UGkqER7uGNUOm%2Fuploads%2F7MCXeAECia7oq6ALrUqH%2Fimage.png?alt=media&amp;token=02f9f0f7-a3da-454b-a5fb-9f0fece04511" alt=""><figcaption><p>Root and Issuing CAs</p></figcaption></figure>
{% endstep %}

{% step %}

### Establish trust between RADIUSaaS and the Microsoft Cloud PKI

Configure RADIUSaaS to trust client authentication certificates issued by the Microsoft Cloud PKI. Since the cloud PKI requires a tiered CA structure, you must upload both, Root CA and Issuing CA (i.e. the complete chain of trust). To achieve this, please follow the steps below:

1. Navigate to [Trusted Certificates](/admin-portal/settings/trusted-roots).
2. [Upload](/admin-portal/settings/trusted-roots#add) the Contoso Cloud PKI **Root CA,** selecting **Client Authentication** in the upload process.
3. As a verification method, select **CRL** along with **DER** encoding.
4. Use the copied CRL distribution point URL of the Root CA in the **CRL Distribution Points** URL input field.\
   ![](https://1222554226-files.gitbook.io/~/files/v0/b/gitbook-x-prod.appspot.com/o/spaces%2FSWU1DQ4UGkqER7uGNUOm%2Fuploads%2FBysDSYfb60HoJYZooFO6%2Fimage.png?alt=media\&token=63bd15fc-04f1-4c0e-b89a-404f6f88dbad)
5. Upload the Contoso Cloud PKI **Issuing CA,** selecting **Client Authentication** in the upload process.
6. Again, select **CRL** as verification method along with **DER** encoding.
7. Use the copied CRL distribution point URL of the Issuing CA in the **CRL Distribution Points** URL input field.\
   ![](https://1222554226-files.gitbook.io/~/files/v0/b/gitbook-x-prod.appspot.com/o/spaces%2FSWU1DQ4UGkqER7uGNUOm%2Fuploads%2F6VLWwSE1UssDpLpY5A0S%2Fimage.png?alt=media\&token=9ecae690-c5ac-4726-9dee-4ae7aa390d56)
   {% endstep %}

{% step %}

### Configure the RADIUS Server Certificate

To establish server trust between your endpoint devices and RADIUSaaS, follow [these instructions](/configuration/get-started/generic-guide#step-3-radius-server-certificate-configuration).
{% endstep %}

{% step %}

### Configure your Networking Equipment

To configure your networking equipment (WiFi access points, switches, or VPN gateways), follow [these steps](/configuration/get-started/generic-guide#step-4-network-equipment-configuration).

After successful completion of Steps 2 - 4, the **Trusted Certificates** page of your RADIUSaaS instance will look similar to the one below. Please note that in our example we have used a RadSec-enabled [MikroTik](/configuration/access-point-setup/radsec-available/mikrotik) access point.

<figure><img src="https://1222554226-files.gitbook.io/~/files/v0/b/gitbook-x-prod.appspot.com/o/spaces%2FSWU1DQ4UGkqER7uGNUOm%2Fuploads%2FBzFU8A0K3XI7VtUEeF2i%2Fimage.png?alt=media&amp;token=43f0cfde-b360-4e17-b3b2-d28198469519" alt=""><figcaption><p>Trusted Certificates Overview required for the Microsoft Cloud PKI.</p></figcaption></figure>
{% endstep %}

{% step %}

### Configure Intune Profiles

To set up certificate-based WiFi authentication, we need to create a number of profiles and deploy them via Intune. These profiles are:

| Profile Type        | Purpose                                                                       |
| ------------------- | ----------------------------------------------------------------------------- |
| Trusted certificate | Deploy the Root CA certificate.                                               |
| Trusted certificate | Deploy the Issuing CA certificate.                                            |
| Trusted certificate | Deploy the Root CA certificate that has issued the RADIUS Server Certificate. |
| SCEP certificate    | Enroll the client authentication certificate.                                 |
| Wi-Fi               | Deploy the wireless network adapter settings.                                 |

<figure><img src="https://1222554226-files.gitbook.io/~/files/v0/b/gitbook-x-prod.appspot.com/o/spaces%2FSWU1DQ4UGkqER7uGNUOm%2Fuploads%2FDckOIIVOYEHGSTmGXy08%2Fimage.png?alt=media&amp;token=87d29b42-78a8-4619-91a8-5f0a359316ff" alt=""><figcaption><p>Relevant Intune Profiles</p></figcaption></figure>

#### Trusted certificate profiles

**Microsoft Cloud PKI**

Deploy the root CA and issuing CA certificates created in [Step 1](#step-1.-deploy-a-microsoft-cloud-pki) via a **Trusted certificate** profile to your devices by navigating to the **Intune admin center** and then to **Home** > **Devices** > **Windows** > **Configuration profiles > Create** > **New Policy** with the following parameters:&#x20;

* Platform = Windows 10 and later
* Profile type = Template
* Template name = Trusted certificate.

Upload the relevant certificate file (\*.cer) in the respective profile:

* Root CA certificate created [here](#step-1-create-root-ca-in-admin-center)
* Issuing CA certificate created [here](#step-1-create-root-ca-in-admin-center-1)

{% hint style="info" %}
Note that you have to use the same group for assigning the Trusted certificate and SCEP profiles. Otherwise, the Intune deployment might fail.
{% endhint %}

This must be repeated for every device platform that shall be using the service (e.g. Windows, macOS, ...)

**RADIUS Server Trust**

Next, push the root CA certificate that has issued your RADIUS Server Certificate as described here:

{% content-ref url="/pages/-MYxiLd7JIp6ZsqGaDol" %}
[Server Trust](/profile-deployment/microsoft-intune/trusted-root)
{% endcontent-ref %}

#### SCEP Certificate Profile

To create a **SCEP certificate** profile in Intune admin center, first take a copy of the SCEP URI from **Home** > **Tenant admin** > **Cloud PKI** > **Contoso Issuing CA** > **Properties** > **SCEP URI.**

Next, go to **Home** > **Devices** > **Windows** > **Configuration profiles > Create** > **New Policy** with the following parameters:&#x20;

* Platform = Windows 10 and later
* Profile type = Template
* Template name = SCEP certificate

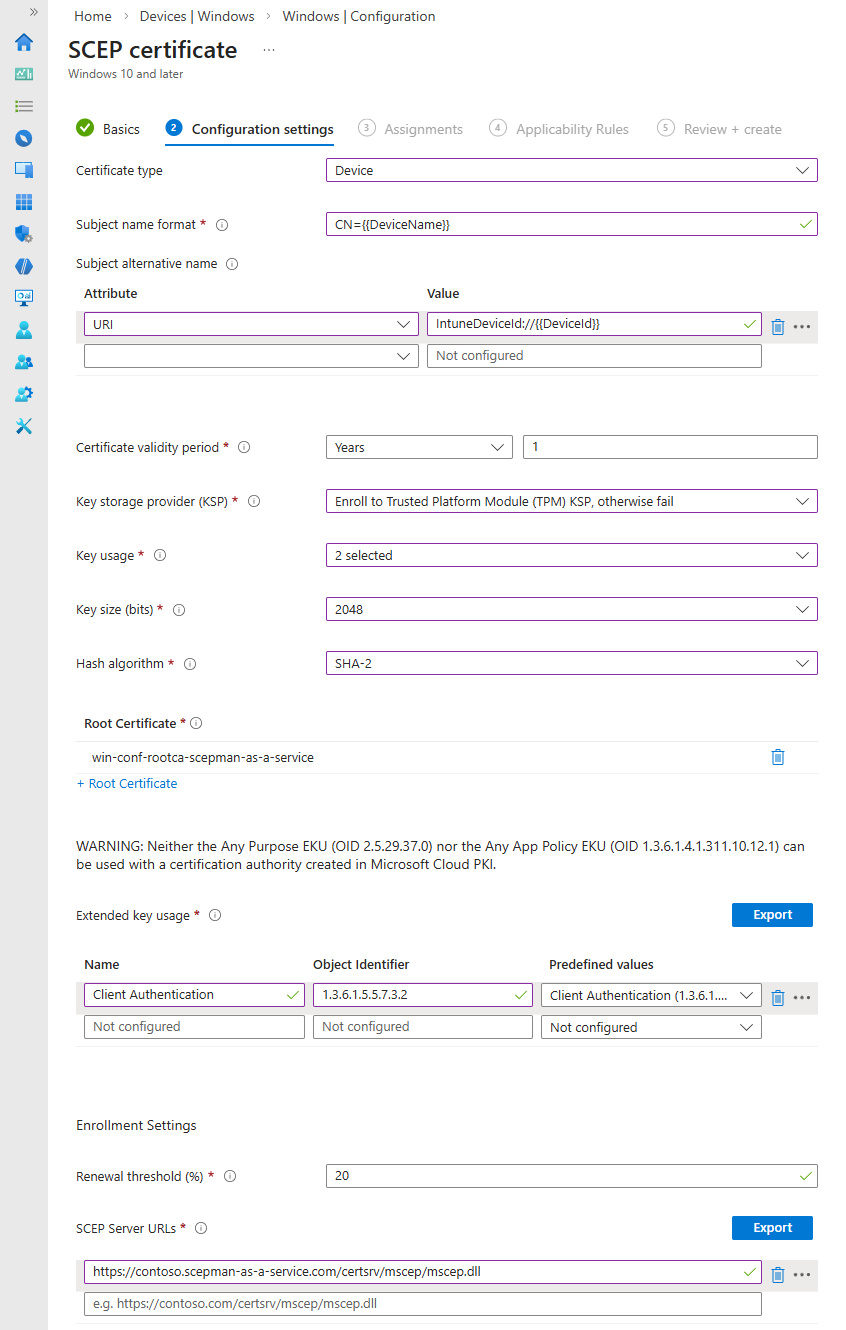
Next, configure the template according to the screenshot below making sure you attached the **Contoso Root Certificate** created earlier in step 1 and the **SCEP URI** you took a copy of above.

<figure><img src="https://1222554226-files.gitbook.io/~/files/v0/b/gitbook-x-prod.appspot.com/o/spaces%2FSWU1DQ4UGkqER7uGNUOm%2Fuploads%2Fm6EwP7bLWT2zBuKGd8lo%2Fimage.png?alt=media&amp;token=e7372449-57cd-4e09-9689-271dff73cc75" alt=""><figcaption><p>SCEP Device Certificate Configuration</p></figcaption></figure>

This must be repeated for every device platform that shall be using the service (e.g. Windows, macOS, ...)

#### Wi-Fi profile <a href="#step-1-create-root-ca-in-admin-center" id="step-1-create-root-ca-in-admin-center"></a>

Deploy the WiFi adapter settings to your devices by following this article:

{% content-ref url="/pages/-MYxiZmAIpyMYZXLfOdl" %}
[WiFi Profile](/profile-deployment/microsoft-intune/wifi-profile)
{% endcontent-ref %}
{% endstep %}

{% step %}

### Permissions and Technical Contacts

{% hint style="warning" %}
This is a **mandatory** step.
{% endhint %}

First, review your [Permissions](/admin-portal/access-and-rules/permissions) to ensure the right persons in your organization have the right level of administrative access to your RADIUSaaS instance.

{% hint style="success" %}
To **prevent yourself from being locked** out of your RADIUSaaS instance, always ensure that either

* at least two user identities or
* one service account

are configured as [Administrators](/admin-portal/access-and-rules/permissions#administrators).
{% endhint %}

Next, ensure that we are able to contact you in case we have important technical information to share by reviewing the [Technical Contacts](/admin-portal/access-and-rules/permissions#technical-contacts) section.

{% hint style="success" %}
For us to **reliably deliver important information** to you via email, always ensure that either

* at least two email addresses of individuals or
* one shared mailbox / distribution list

are configured.
{% endhint %}
{% endstep %}

{% step %}

### Rules

{% hint style="info" %}
This is an **optional** step.
{% endhint %}

If you would like to configure additional rules, for example to assign VLAN IDs or limit authentication requests to certain trusted CAs or WiFi access points, please check out the RADIUSaaS Rule Engine.

{% content-ref url="/pages/Np05pVHXbtrMwBdTDctJ" %}
[Rules](/admin-portal/access-and-rules/rules)
{% endcontent-ref %}
{% endstep %}
{% endstepper %}


# SCEPman Enterprise

This article describes the configuration steps necessary to implement certificate-based WiFi authentication using SCEPman with Intune. For this demonstration, we will use a MikroTik access point.

{% stepper %}
{% step %}

### Deploy SCEPman Enterprise

{% hint style="warning" %}
Please note that this scenario requires [SCEPman Enterprise Edition.](https://docs.scepman.com/editions#edition-comparison)
{% endhint %}

First and foremost, you will need to set up and configure your SCEPman. Please use [documentation](https://docs.scepman.com/scepman-deployment/deployment-guides) relevant to your environment to perform the installation and configuration of SCEPman. Once completed, return to this article.
{% endstep %}

{% step %}

### Establish trust between RADIUSaaS and SCEPman

For RADIUSaaS to trust client authentication certificates issued by SCEPman PKI, you must add SCEPman's root CA certificate to the RADIUSaaS trust store following [these steps](/admin-portal/settings/trusted-roots#add).
{% endstep %}

{% step %}

### Configure the RADIUS Server Certificate

{% embed url="<https://docs.radiusaas.com/admin-portal/settings/settings-server#scepman-connection>" %}
{% endstep %}

{% step %}

### Configure your Networking Equipment

To configure your networking equipment (WiFi access points, switches, or VPN gateways), follow [these steps](/configuration/get-started/generic-guide#step-4-network-equipment-configuration).

After successful completion of Steps 2 - 4, the **Trusted Certificates** page of your RADIUSaaS instance will look similar to the one below. Please note that in our example we have used a RadSec-enabled [MikroTik](/configuration/access-point-setup/radsec-available/mikrotik) access point that leverages a SCEPman-issued RadSec **Client Certificate**.

<figure><img src="https://1222554226-files.gitbook.io/~/files/v0/b/gitbook-x-prod.appspot.com/o/spaces%2FSWU1DQ4UGkqER7uGNUOm%2Fuploads%2F3SzVBPrnIcvtY9ppojCH%2Fimage.png?alt=media&amp;token=83ee3553-ac4f-49aa-8e45-2b159246bfad" alt=""><figcaption></figcaption></figure>
{% endstep %}

{% step %}

### Configure Intune Profiles

To set up certificate-based WiFi authentication, you will need to create and deploy a number of policies via Intune. These policies are as follow:

<table><thead><tr><th width="371">Profile Type</th><th>Purpose</th></tr></thead><tbody><tr><td>Trusted certificate</td><td>Deploy the Root CA certificate that has issued the RADIUS Server Certificate. <br><br>In this scenario, the relevant CA corresponds to the SCEPman Root CA. </td></tr><tr><td>SCEP certificate</td><td>Deploy the client authentication certificate.</td></tr><tr><td>Wi-Fi</td><td>Deploy the wireless network adapter settings.</td></tr></tbody></table>

<figure><img src="https://1222554226-files.gitbook.io/~/files/v0/b/gitbook-x-prod.appspot.com/o/spaces%2FSWU1DQ4UGkqER7uGNUOm%2Fuploads%2FnFBmwAxWn8oMM35Y5bFe%2Fimage.png?alt=media&amp;token=c1ad524f-476f-4ee3-afb8-9da3c58087b6" alt=""><figcaption><p>Relevant Intune Policies</p></figcaption></figure>

### Trusted Certificate Profiles

This profile was configured as part of the [SCEPman setup](https://docs.scepman.com/certificate-deployment/microsoft-intune).&#x20;

### SCEP Certificate Profile

This profile was configured as part of the [SCEPman setup](https://docs.scepman.com/certificate-deployment/microsoft-intune).

### WiFi Profile <a href="#step-1-create-root-ca-in-admin-center" id="step-1-create-root-ca-in-admin-center"></a>

Deploy the Wi-Fi adapter settings to your devices by following this article:&#x20;

{% content-ref url="/pages/-MYxiZmAIpyMYZXLfOdl" %}
[WiFi Profile](/profile-deployment/microsoft-intune/wifi-profile)
{% endcontent-ref %}
{% endstep %}

{% step %}

### Permissions and Technical Contacts

{% hint style="warning" %}
This is a **mandatory** step.
{% endhint %}

First, review your [Permissions](/admin-portal/access-and-rules/permissions) to ensure the right persons in your organization have the right level of administrative access to your RADIUSaaS instance.

{% hint style="success" %}
To **prevent yourself from being locked** out of your RADIUSaaS instance, always ensure that either

* at least two user identities or
* one service account

are configured as [Administrators](/admin-portal/access-and-rules/permissions#administrators).
{% endhint %}

Next, ensure that we are able to contact you in case we have important technical information to share by reviewing the [Technical Contacts](/admin-portal/access-and-rules/permissions#technical-contacts) section.

{% hint style="success" %}
For us to **reliably deliver important information** to you via email, always ensure that either

* at least two email addresses of individuals or
* one shared mailbox / distribution list

are configured.
{% endhint %}
{% endstep %}

{% step %}

### Rules

This is an **optional** step.

If you would like to configure additional rules, for example to assign VLAN IDs or limit authentication requests to certain trusted CAs or WiFi access points, please check out the RADIUSaaS Rule Engine.

{% content-ref url="/pages/Np05pVHXbtrMwBdTDctJ" %}
[Rules](/admin-portal/access-and-rules/rules)
{% endcontent-ref %}
{% endstep %}
{% endstepper %}


# SCEPman SaaS

This article describes the configuration steps necessary to implement certificate-based WiFi authentication using SCEPman SaaS with Intune.

{% stepper %}
{% step %}

### Configure SCEPman SaaS

First and foremost, you will need to set up and configure your SCEPman PKI. Please refer to this guide to complete this step. Once completed, return to this article.

{% content-ref url="/pages/tywmYoXQzMpzctQVCWnb" %}
[🆕 SCEPman SaaS](/configuration/scepman-saas)
{% endcontent-ref %}
{% endstep %}

{% step %}

### Establish Trust between RADIUSaaS and SCEPman

For RADIUSaaS to trust client authentication certificates issued by SCEPman PKI, you must add SCEPman's root CA certificate to the RADIUSaaS trust store following these steps:

{% embed url="<https://docs.radiusaas.com/admin-portal/settings/trusted-roots#add>" %}
{% endstep %}

{% step %}

### Configure the RADIUS Server Certificate

Leverage SCEPman to fully automate the lifecycle of your RADIUSaaS Server Certificate by setting up **SCEPman Connection** as belo&#x77;**:**

Navigate to **SCEPman Connection** section under **Settings** > **Server Settings** and click on **Setup Connection**.

<figure><img src="https://1222554226-files.gitbook.io/~/files/v0/b/gitbook-x-prod.appspot.com/o/spaces%2FSWU1DQ4UGkqER7uGNUOm%2Fuploads%2FjpZkL8Ty8X1UWnr3rzbA%2Fimage.png?alt=media&amp;token=97358c19-aff4-42b2-be22-b10dba5fb077" alt=""><figcaption></figcaption></figure>

Then you will get

<figure><img src="https://1222554226-files.gitbook.io/~/files/v0/b/gitbook-x-prod.appspot.com/o/spaces%2FSWU1DQ4UGkqER7uGNUOm%2Fuploads%2FNjDJYQ0ApGfcJkWw6bEJ%2Fimage.png?alt=media&amp;token=82cfd418-1b75-4c88-a1ed-0c88d61f0752" alt=""><figcaption></figcaption></figure>

Once you click Yes, RADIUSaaS will request a server certificate from SCEPman, activate it, and renew it in time before it expires. Everything happens automatically, without any interaction required from your side.
{% endstep %}

{% step %}

### Configure your Networking Equipment

To configure your networking equipment (WiFi access points, switches, or VPN gateways), follow these steps:

{% embed url="<https://docs.radiusaas.com/configuration/get-started/generic-guide#network-equipment-configuration>" %}

After completing the previous steps, the **Trusted Certificates** page of your RADIUSaaS instance will look similar to the one shown below. Please note that in our example we have used a RadSec-enabled [MikroTik](/configuration/access-point-setup/radsec-available/mikrotik) access point that leverages a SCEPman-issued RadSec **Client Certificate**.

<figure><img src="https://1222554226-files.gitbook.io/~/files/v0/b/gitbook-x-prod.appspot.com/o/spaces%2FSWU1DQ4UGkqER7uGNUOm%2Fuploads%2F3SzVBPrnIcvtY9ppojCH%2Fimage.png?alt=media&amp;token=83ee3553-ac4f-49aa-8e45-2b159246bfad" alt=""><figcaption></figcaption></figure>
{% endstep %}

{% step %}

### Configure Intune Profiles

To set up certificate-based Wi-Fi authentication, you will need to create and deploy several policies in Intune. These policies are as follows:

<table><thead><tr><th width="371">Profile Type</th><th>Purpose</th></tr></thead><tbody><tr><td>Trusted certificate</td><td>Deploy the Root CA certificate that has issued the RADIUS Server Certificate. <br><br>In this scenario, the relevant CA corresponds to the SCEPman Root CA. </td></tr><tr><td>SCEP certificate</td><td>Deploy the client authentication certificate.</td></tr><tr><td>Wi-Fi</td><td>Deploy the wireless network adapter settings.</td></tr></tbody></table>

<figure><img src="https://1222554226-files.gitbook.io/~/files/v0/b/gitbook-x-prod.appspot.com/o/spaces%2FSWU1DQ4UGkqER7uGNUOm%2Fuploads%2FnFBmwAxWn8oMM35Y5bFe%2Fimage.png?alt=media&amp;token=c1ad524f-476f-4ee3-afb8-9da3c58087b6" alt=""><figcaption><p>Relevant Intune Policies</p></figcaption></figure>

### Trusted Certificate Profiles

This profile was configured as part of the [SCEPman setup](https://docs.scepman.com/certificate-deployment/microsoft-intune).&#x20;

### SCEP Certificate Profile

This profile was configured as part of the [SCEPman setup](https://docs.scepman.com/certificate-deployment/microsoft-intune).

### WiFi Profile <a href="#step-1-create-root-ca-in-admin-center" id="step-1-create-root-ca-in-admin-center"></a>

Deploy the Wi-Fi adapter settings to your devices by following this article:&#x20;

{% content-ref url="/pages/-MYxiZmAIpyMYZXLfOdl" %}
[WiFi Profile](/profile-deployment/microsoft-intune/wifi-profile)
{% endcontent-ref %}
{% endstep %}

{% step %}

### Permissions and Technical Contacts

{% hint style="warning" %}
This is a **mandatory** step.
{% endhint %}

First, review your [Permissions](/admin-portal/access-and-rules/permissions) to ensure the right persons in your organization have the right level of administrative access to your RADIUSaaS instance.

{% hint style="success" %}
To **prevent yourself from being locked** out of your RADIUSaaS instance, always ensure that either

* at least two user identities or
* one service account

are configured as [Administrators](/admin-portal/access-and-rules/permissions#administrators).
{% endhint %}

Next, ensure that we are able to contact you in case we have important technical information to share by reviewing the [Technical Contacts](/admin-portal/access-and-rules/permissions#technical-contacts) section.

{% hint style="success" %}
For us to **reliably deliver important information** to you via email, always ensure that either

* at least two email addresses of individuals or
* one shared mailbox / distribution list

are configured.
{% endhint %}
{% endstep %}

{% step %}

### Rules

This is an **optional** step.

If you would like to configure additional rules, for example to assign VLAN IDs or limit authentication requests to certain trusted CAs or WiFi access points, please check out the RADIUSaaS Rule Engine.

{% content-ref url="/pages/Np05pVHXbtrMwBdTDctJ" %}
[Rules](/admin-portal/access-and-rules/rules)
{% endcontent-ref %}
{% endstep %}
{% endstepper %}


# Access Point Setup

The pages in this section explain how to setup your network access gear to integrate with your RADIUSaaS instance.

We will add more vendors and systems in the future. However, we encourage you to go through the setup wizards of your network gear and try to match them to the manuals already provided here, as they typically work all in the same way.


# RadSec

<figure><img src="https://1222554226-files.gitbook.io/~/files/v0/b/gitbook-x-prod.appspot.com/o/spaces%2FSWU1DQ4UGkqER7uGNUOm%2Fuploads%2FSPYhaqJKWvpS6cxKGAbt%2Fimage.png?alt=media&amp;token=68f6fd36-1ac8-46d4-bb0a-afcdfdb87892" alt=""><figcaption><p>Showing TLS outer tunnel and required certificates</p></figcaption></figure>

Before your access points are able to establish a valid **RadSec connection** (which can be considered an mTLS connection), the following requirements must be met regardless of the manufacturer of the access point.

* Access Points require a valid **client certificate** (typically referred to as "RadSec Client Certificate" or "RadSec Certificate"). This client certificate must have the **EKU Client Authentication** (1.3.6.1.5.5.7.3.2) and **not Server Authentication**.
* Access Points must **trust the CA** that issued the **RADIUS Server Certificate**.
* RADIUSaaS must **trust the CA** that issued the **RadSec client certificate** on your access points.

{% hint style="info" %}
The RadSec protocol requires a shared secret to compute the MD5 integrity checks.\
The [RadSec RFC](https://datatracker.ietf.org/doc/html/rfc6614#:~:text=to%20implement\).%0A%0A%20%20%204.-,start,-exchanging%20RADIUS%20datagrams) defines this shared secret as the literal string "radsec".
{% endhint %}

{% content-ref url="/pages/866i8vaujnDotY5bMxLh" %}
[Aruba](/configuration/access-point-setup/radsec-available/aruba)
{% endcontent-ref %}

{% content-ref url="/pages/Ov1MkwKbWcsukXtSuDbh" %}
[FortiNet](/configuration/access-point-setup/radsec-available/fortinet)
{% endcontent-ref %}

{% content-ref url="/pages/9CuV5Soe0kztpSCpWVgM" %}
[Juniper Mist](/configuration/access-point-setup/radsec-available/juniper-mist)
{% endcontent-ref %}

{% content-ref url="/pages/TZNh0jkwXn3yAiGLvuSE" %}
[Meraki](/configuration/access-point-setup/radsec-available/meraki)
{% endcontent-ref %}

{% content-ref url="/pages/-MYxptKGaLHkV8klwKqu" %}
[MikroTik](/configuration/access-point-setup/radsec-available/mikrotik)
{% endcontent-ref %}

{% content-ref url="/pages/4JjevW3adMbCnd2bh8y9" %}
[Ruckus](/configuration/access-point-setup/radsec-available/ruckus)
{% endcontent-ref %}

{% content-ref url="/pages/a7o9Xin6spkxl0PrF6Ha" %}
[UniFi](/configuration/access-point-setup/radsec-available/unifi)
{% endcontent-ref %}


# Aruba

## Prepare certificates

To establish a valid RadSec connection, your Access Points must trust the **RADIUS Server Certificate** and your RADIUS server must trust your **RadSec Client Certificate**. To achieve this,

1. Download the root certificate of the CA that has issued your active **RADIUS Server Certificate** as described [here](/admin-portal/settings/settings-server#download).
2. Create a **RadSec Client Certificate** for your WAPs (centrally managed via Aruba Central). If you are using **SCEPman Certificate Master**, the process is described [here](https://docs.scepman.com/certificate-deployment/certificate-master/client-certificate-pkcs-12).&#x20;

{% hint style="warning" %}
Ensure to monitor the expiry of your **RadSec Client Certificate** and renew it in due time to prevent service interruptions.
{% endhint %}

3. Add the root certificate of the CA that has issued the **RadSec Client Certificate** to your RADIUS instance as described [here](/admin-portal/settings/trusted-roots#add) and select **RadSec** under **Use for**.\
   In case the **RadSec Client Certificate** has been issued by SCEPman and you already trust the SCEPman Root CA for client authentication, simply edit the trusted SCEPman Root CA certificate and select **Both** under **Use for**.&#x20;

## Aruba Central configuration

{% hint style="info" %}
Below settings are the necessary settings to establish a functional RadSec connection with our service. Configure any other settings at your discretion.
{% endhint %}

For general information on how to import certificates to your Aruba platform, please refer to their documentation:

{% embed url="<https://www.arubanetworks.com/techdocs/ArubaOS_85_Web_Help/Content/arubaos-solutions/manage-utilities/impo-cert.htm>" %}

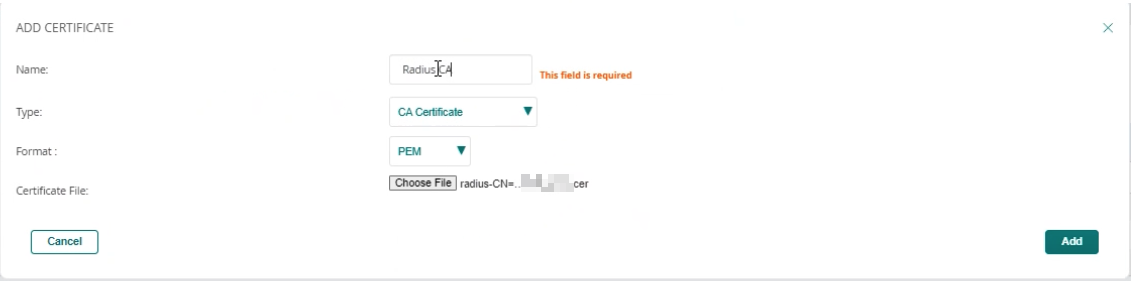
1. Import the root certificate of the CA that has issued your **RADIUS Server Certificate** with the type **CA certificate**.

   <figure><img src="https://content.gitbook.com/content/SWU1DQ4UGkqER7uGNUOm/blobs/7oZFIYHe5SPBELNr16Ai/image.png" alt=""><figcaption></figcaption></figure>
2. Import the **RadSec Client Certificate** (created in step 2 under [Prepare Certificates](#prepare-certificates)) with the type **Server certificate**.

   <figure><img src="https://content.gitbook.com/content/SWU1DQ4UGkqER7uGNUOm/blobs/l56DkhLOdLZNmaArbvoZ/image.png" alt=""><figcaption></figcaption></figure>
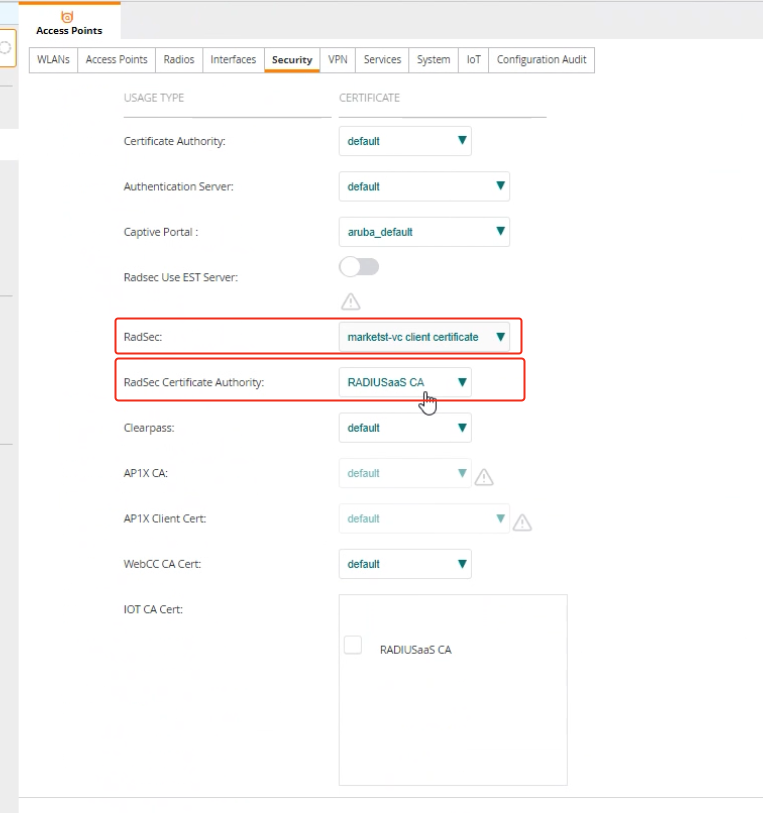
3. Under **Access Points >** **Security** select the imported **RadSec Client Certificate** for **RadSec** and the RADIUS root CA certificate for **RadSec Certificate Authority**.

   <figure><img src="https://content.gitbook.com/content/SWU1DQ4UGkqER7uGNUOm/blobs/pusmqfe8cbf9K5VIUGXL/image.png" alt=""><figcaption></figcaption></figure>
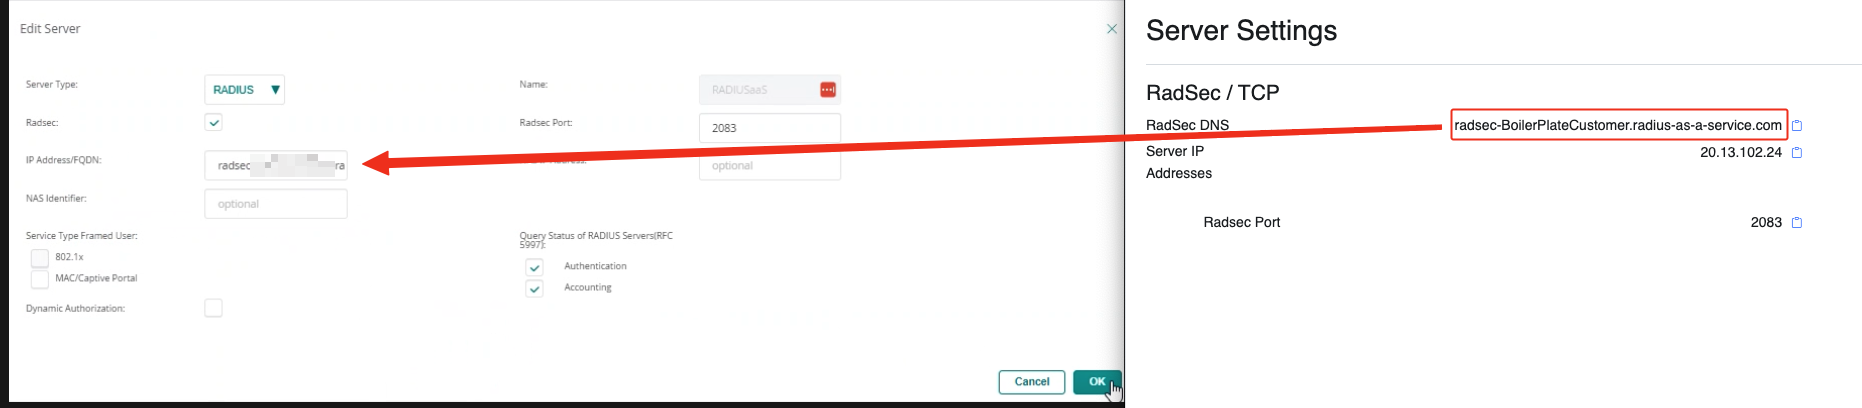
4. For the RADIUS server configuration, enable **RadSec** and choose either the IP address or the DNS name of your [RadSec service endpoint](/admin-portal/settings/settings-server#properties).

   <figure><img src="https://content.gitbook.com/content/SWU1DQ4UGkqER7uGNUOm/blobs/W246ZOMEYDAIP4sIVQkw/image.png" alt=""><figcaption></figcaption></figure>


# FortiNet

{% hint style="info" %}
To use the RadSec feature on your FortiGate for WiFi (with FortiAPs), firmware FortiOS **7.6.0** or later is required on the FortiGate.
{% endhint %}

## Prepare certificates

To establish a valid RadSec connection, your Access Points must trust the **RADIUS Server Certificate** and your RADIUS server must trust your **RadSec Client Certificate**. To achieve this,

1. Download the root certificate of the CA that has issued your active **RADIUS Server Certificate** as described [here](/admin-portal/settings/settings-server#download).
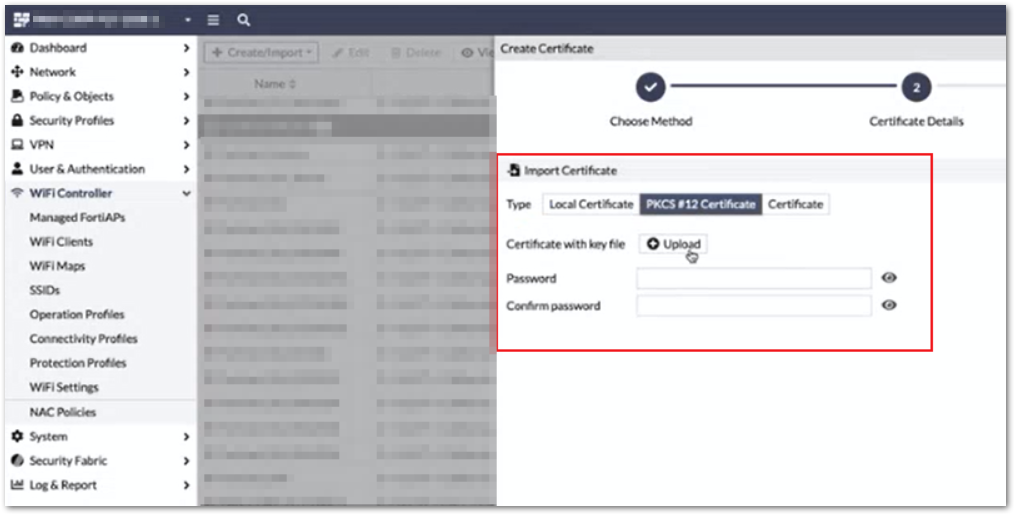
2. Create a **RadSec Client Certificate** for your WAPs (centrally managed via FortiGate). If you are using **SCEPman Certificate Master**, the process is described [here](https://docs.scepman.com/certificate-deployment/certificate-master/client-certificate-pkcs-12). FortiGate accepts the **PKCS#12** format for RadSec client certificates.

{% hint style="warning" %}
Ensure to monitor the expiry of your **RadSec Client Certificate** and renew it in due time to prevent service interruptions.
{% endhint %}

3. Add the root certificate of the CA that has issued the **RadSec Client Certificate** to your RADIUS instance as described [here](/admin-portal/settings/trusted-roots#add) and select **RadSec** under **Use for**.\
   In case the **RadSec Client Certificate** has been issued by SCEPman and you already trust the SCEPman Root CA for client authentication, simply edit the trusted SCEPman Root CA certificate and select **Both** under **Use for**.&#x20;

## FortiGate configuration

{% hint style="info" %}
Below settings are the necessary settings to establish a functional RadSec connection with our service. Configure any other settings at your discretion.
{% endhint %}

### Via UI

To configure RadSec on your FortiGate UI please follow the steps:

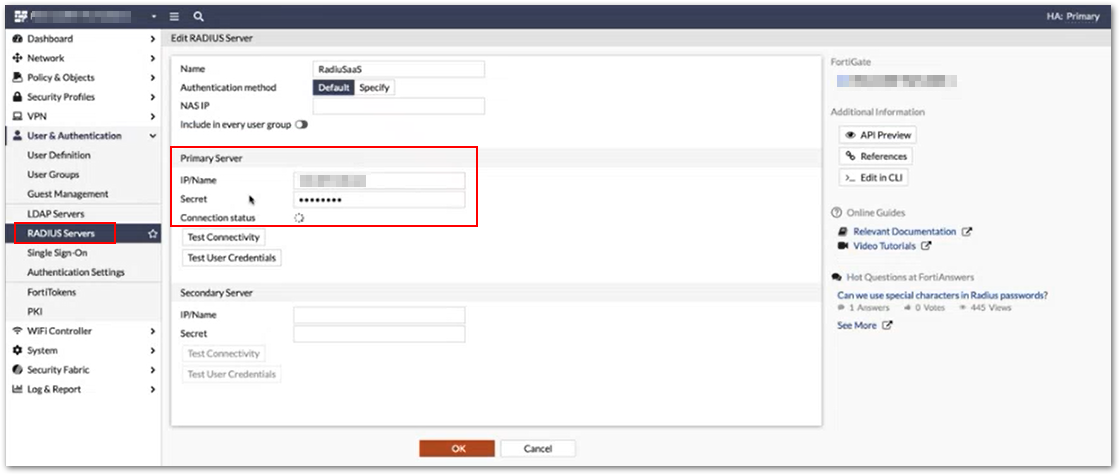
* Create a new **RADIUS Server** and add your [RadSec server IP address](/admin-portal/settings/settings-server#radsec-tcp) under **IP/Name**. For the **Secret**, use "radsec".

<figure><img src="https://content.gitbook.com/content/SWU1DQ4UGkqER7uGNUOm/blobs/0Aq2mpufCt5CMz5QZr5K/2023-08-28%2010_56_04-Medienwiedergabe.png" alt=""><figcaption></figcaption></figure>

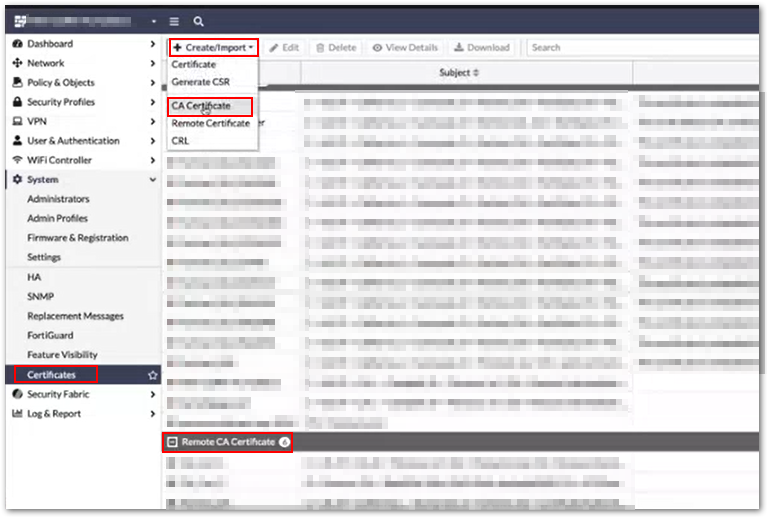
* Import the [root CA of your RADIUS Server Certificate](/admin-portal/settings/settings-server#download) to the FortiGate **Certificates** under **System > Certificates > Import > CA Certificate**. The imported root CA will be listed under **Remote CA Certificate**.

<figure><img src="https://content.gitbook.com/content/SWU1DQ4UGkqER7uGNUOm/blobs/VnLTR6XLeYAOTtSby2E8/2023-08-28%2010_57_07-Medienwiedergabe.png" alt=""><figcaption></figcaption></figure>

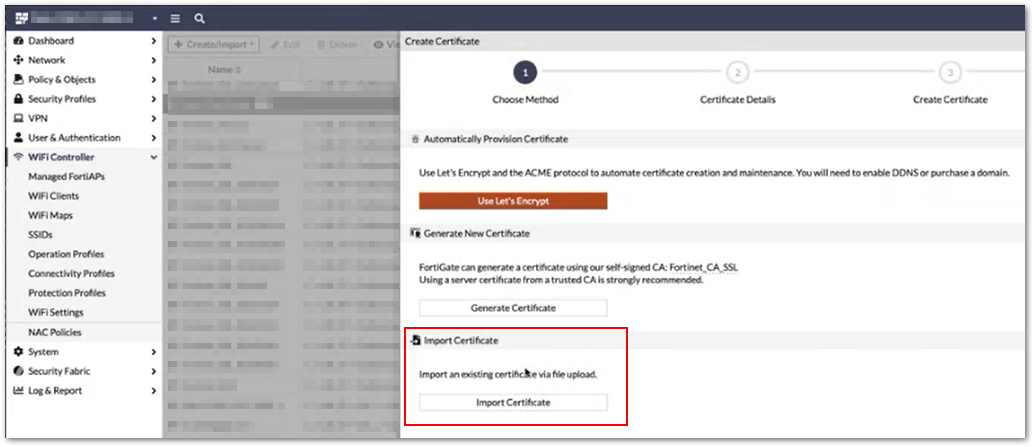
* Import the **RadSec Client Certificate** to your FortiGate under\
  **System > Certificates > Import > Certificate**.

<figure><img src="https://content.gitbook.com/content/SWU1DQ4UGkqER7uGNUOm/blobs/bekG8GtK4PpFihiSJCYQ/2023-08-28%2010_58_54-Medienwiedergabe.png" alt=""><figcaption></figcaption></figure>

<figure><img src="https://content.gitbook.com/content/SWU1DQ4UGkqER7uGNUOm/blobs/HzhDdnDjaSYaI14MiQhx/2023-08-29%2009_36_11-FortiGate.png" alt=""><figcaption></figcaption></figure>

* Modify the RADIUS server configuration in your FortiGate to use it as RadSec client certificate.
* If enabled, please disable the **server-identity-check** in your FortiGate RADIUS server configuration.

### Via command line

To configure RadSec on your FortiGate using the command line, please use these below sets of instructions:

#### RADIUS server configuration

```python
config user radius

    edit "radiusaas"

        set server "radsec-CLIENTNAME.radius-as-a-service.com"

        set secret radsec

        set acct-interim-interval 600

        set radius-port 2083

        set transport-protocol tls

        set ca-cert "CA_Cert"

        set client-cert "certificate-fortigate"

        set server-identity-check disable

    next

end

# Name the root CA of your RADIUS Server Certificate
set ca-cert "CA_Cert"

# Name the RadSec client certificate
set client-cert "certificate-fortigate"
```

#### WiFi SSID configuration

```python
config wireless-controller vap

    edit "client-wireless"

        set ssid "client-wireless"

        set security wpa2-only-enterprise

        set pmf enable

        set 80211k disable

        set 80211v disable

        set auth radius

        set radius-server "radiusaas"

        set local-bridging enable

        set schedule "always"

    next

end
```

### References

Link to FortiGate's documentation for the RadSec configuration:\
<https://docs.fortinet.com/document/fortigate/7.6.0/administration-guide/729374/configuring-a-radsec-client>


# Juniper Mist

## Prepare certificates

To establish a valid RadSec connection, your Access Points must trust the **RADIUS Server Certificate** and your RADIUS server must trust your **RadSec Client Certificate**. To achieve this,

1. Download the root certificate of the CA that has issued your active **RADIUS Server Certificate** as described [here](/admin-portal/settings/settings-server#download).
2. Create a **RadSec Client Certificate** for your Access Points. If you are using **SCEPman Certificate Master**, the process is described [here](https://docs.scepman.com/certificate-deployment/certificate-master/client-certificate-pkcs-12).&#x20;

{% hint style="warning" %}
Ensure to monitor the expiry of your **RadSec Client Certificate** and renew it in due time to prevent service interruptions.
{% endhint %}

3. Add the root certificate of the CA that has issued the **RadSec Client Certificate** to your RADIUS instance as described [here](/admin-portal/settings/trusted-roots#add) and select **RadSec** under **Use for**.\
   In case the **RadSec Client Certificate** has been issued by SCEPman and you already trust the SCEPman Root CA for client authentication, simply edit the trusted SCEPman Root CA certificate and select **Both** under **Use for**.&#x20;

## Mist configuration

{% hint style="info" %}
Below settings are the necessary settings to establish a functional RadSec connection with our service. Configure any other settings at your discretion.
{% endhint %}

1. Navigate to your Mist configuration plane.

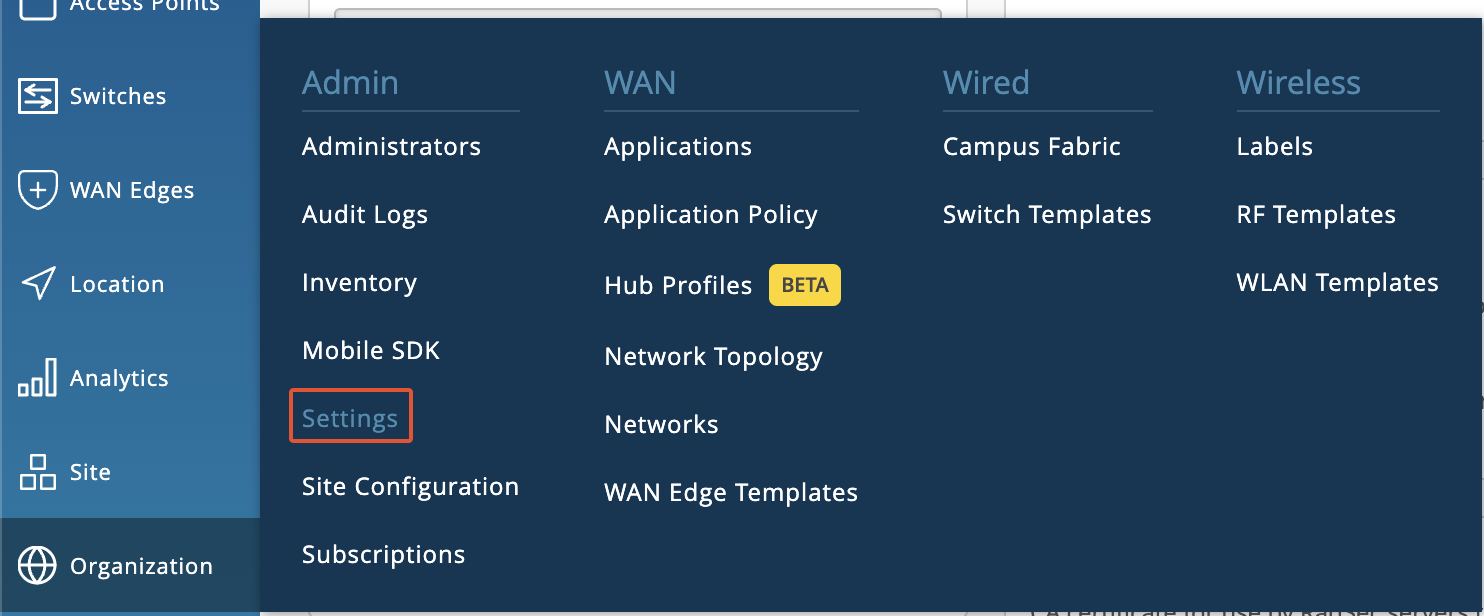
2. To configure the relevant certificates, navigate to **Organization** **>** **Settings**.

   <figure><img src="https://content.gitbook.com/content/SWU1DQ4UGkqER7uGNUOm/blobs/wBOxKsiVe4TpyMjUSAmP/image.png" alt=""><figcaption></figcaption></figure>

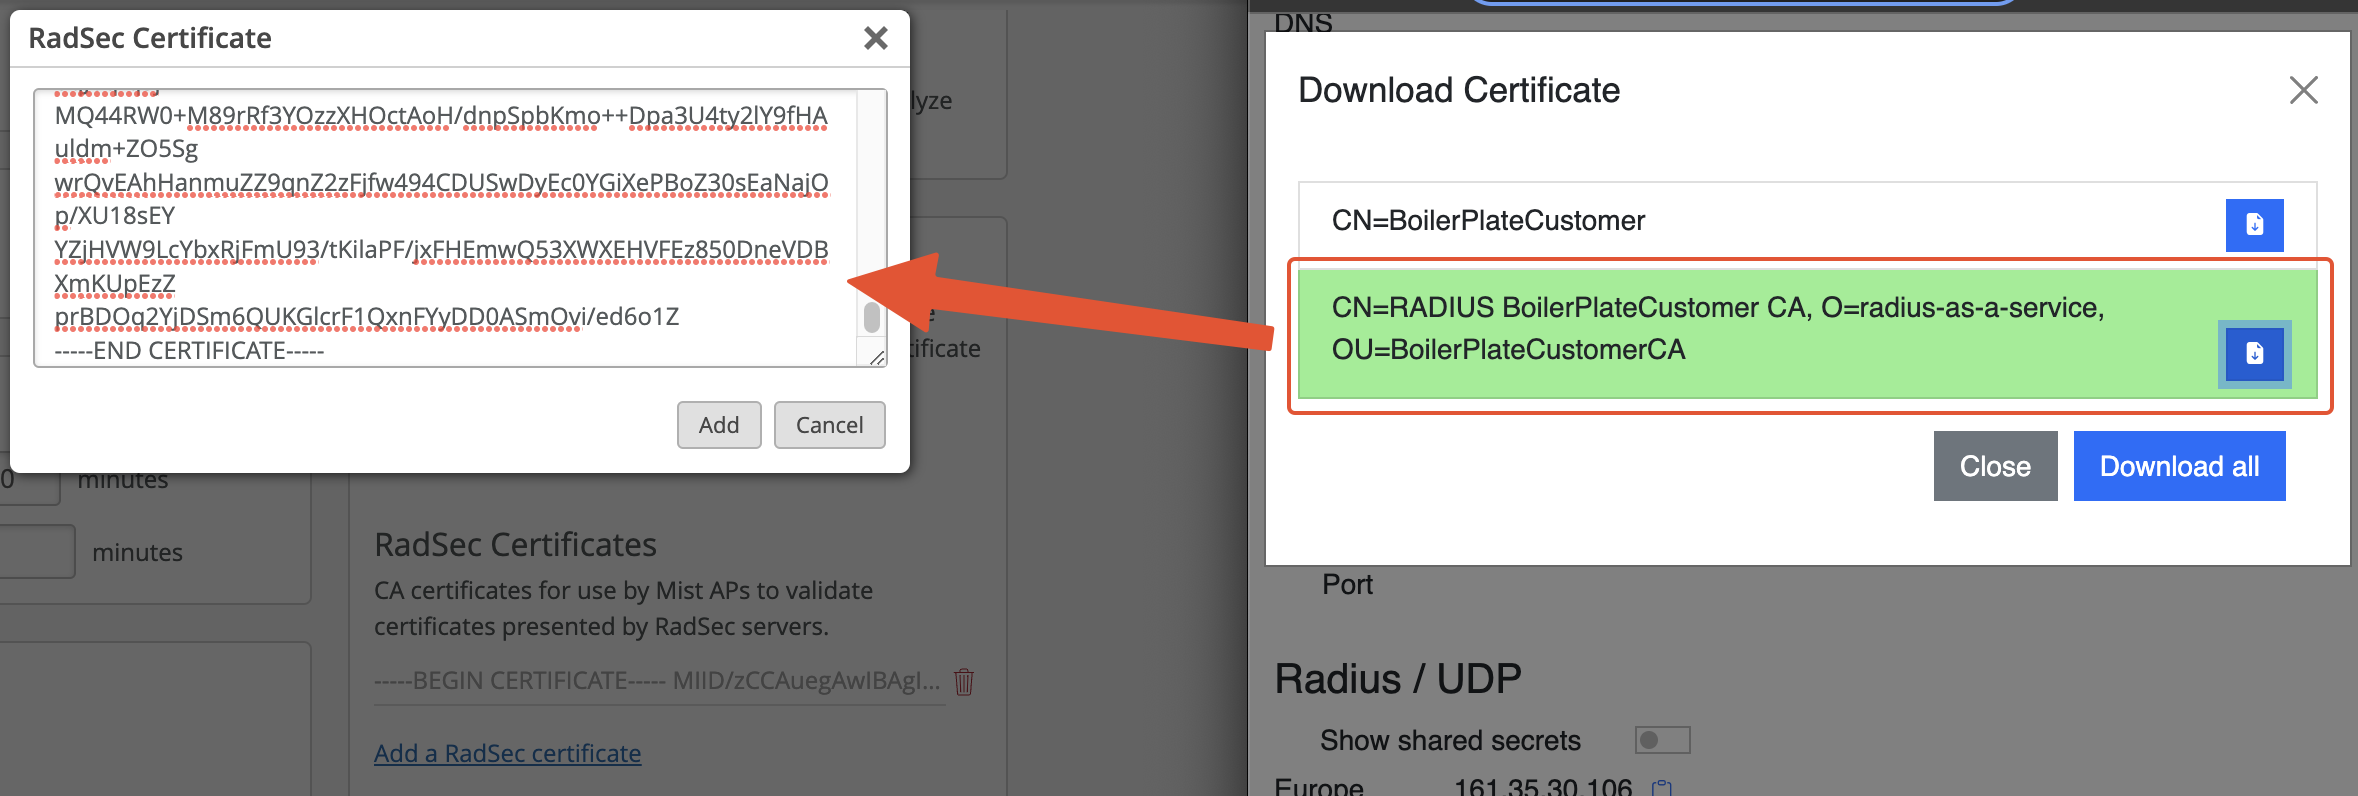
3. Add the root certificate of the CA that has issued your **RADIUS Server Certificate** under **RadSec Certificate**.

   <figure><img src="https://content.gitbook.com/content/SWU1DQ4UGkqER7uGNUOm/blobs/rtEnTwy87cwq4rOHKREE/image.png" alt=""><figcaption></figcaption></figure>

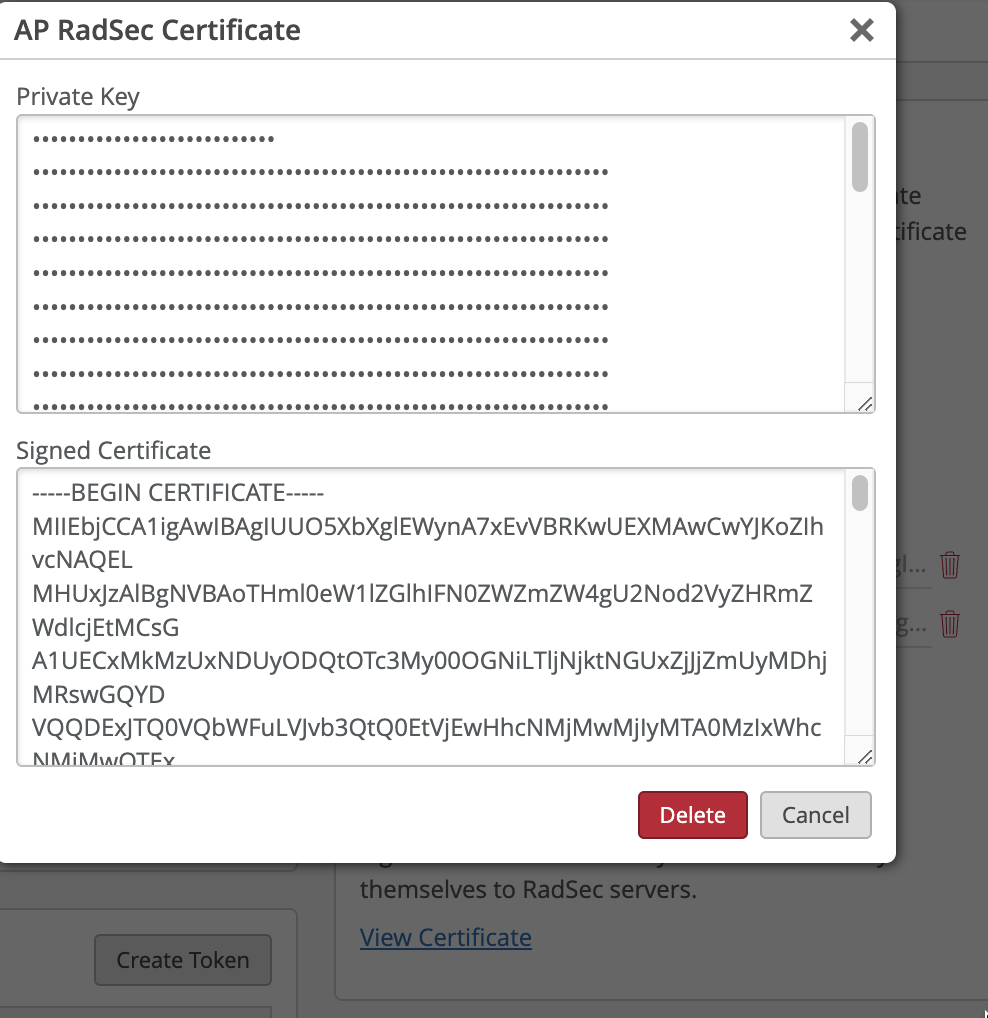
4. Add your **RadSec Client Certificate** (created in step 2 under [Prepare Certificates](#prepare-certificates)) to **AP RadSec Certificate**.

   <figure><img src="https://content.gitbook.com/content/SWU1DQ4UGkqER7uGNUOm/blobs/r8FmXbpm3SoZtsO68tNV/image.png" alt=""><figcaption></figcaption></figure>

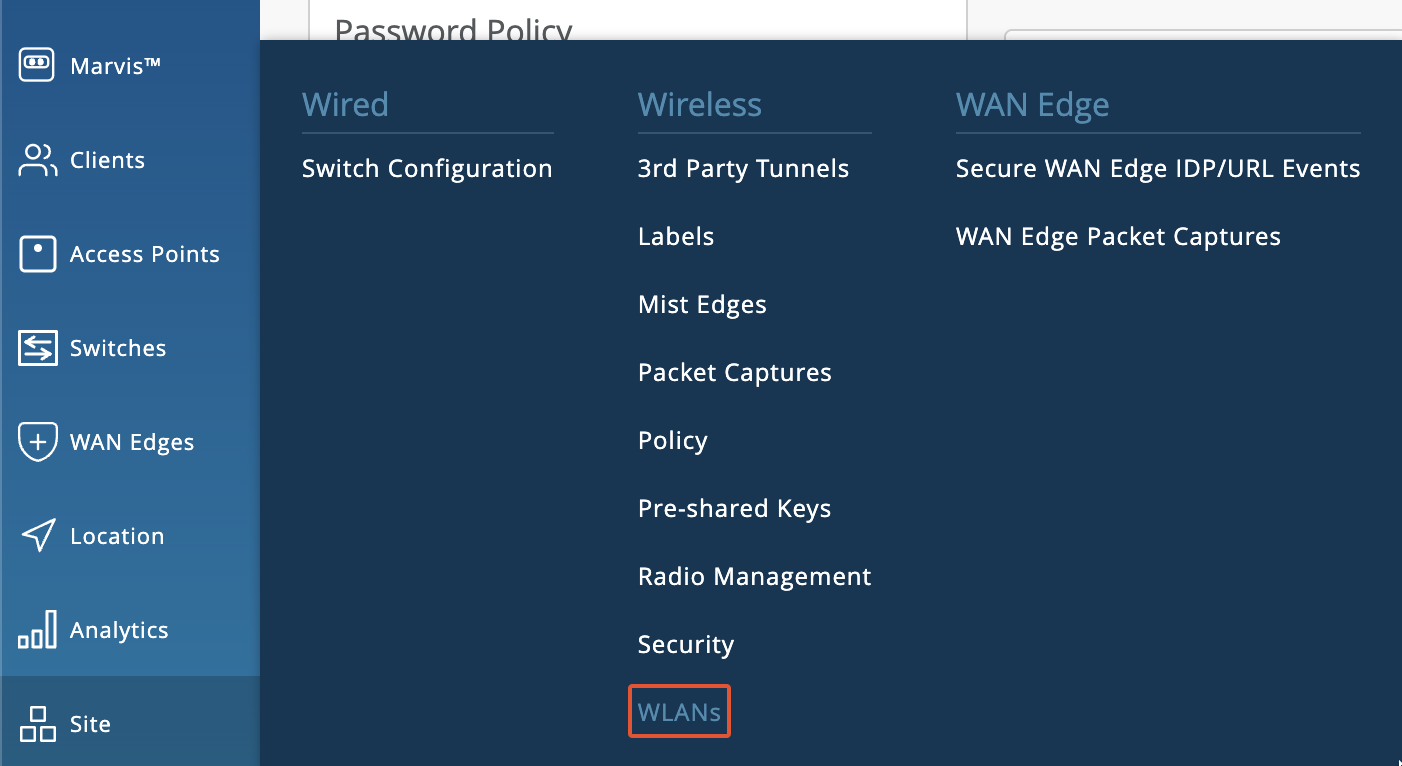
5. Go to **Site >** **WLANs**.

   <figure><img src="https://content.gitbook.com/content/SWU1DQ4UGkqER7uGNUOm/blobs/jub5W0VSNgszN2JPzqTj/image.png" alt=""><figcaption></figcaption></figure>

6. Create a new WLAN if you have not already created one for which you want to leverage RADIUS authentication against our service.

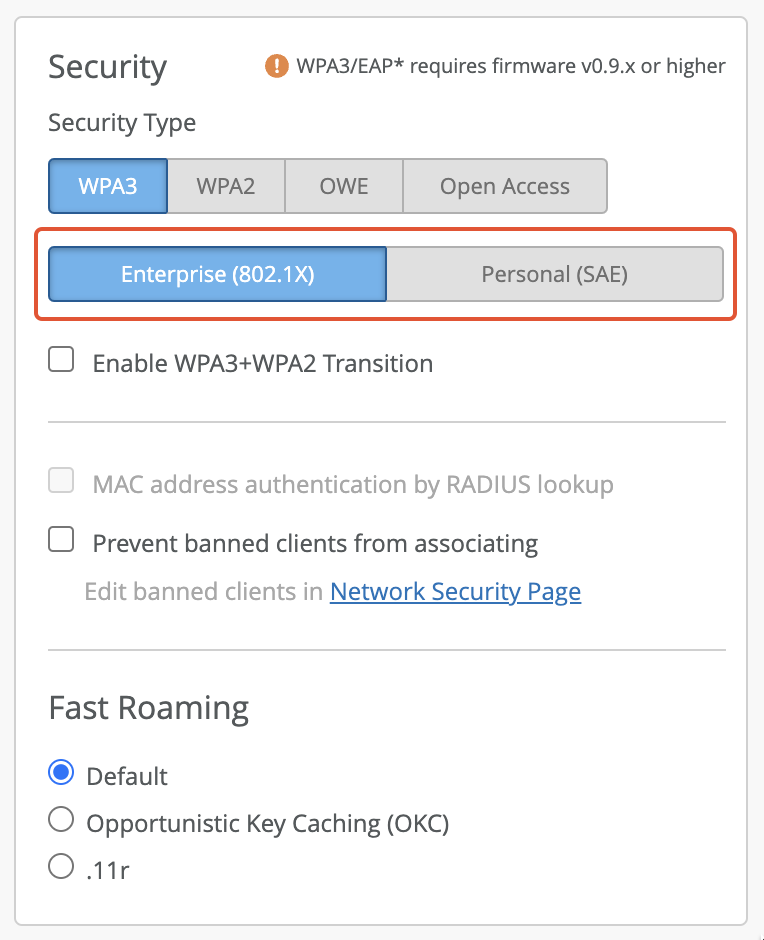
7. Select **Enterprise (802.1X)** as **Security Type**.

   <figure><img src="https://content.gitbook.com/content/SWU1DQ4UGkqER7uGNUOm/blobs/iHVm5F0LMJO0e4c8mDy1/image.png" alt=""><figcaption></figcaption></figure>

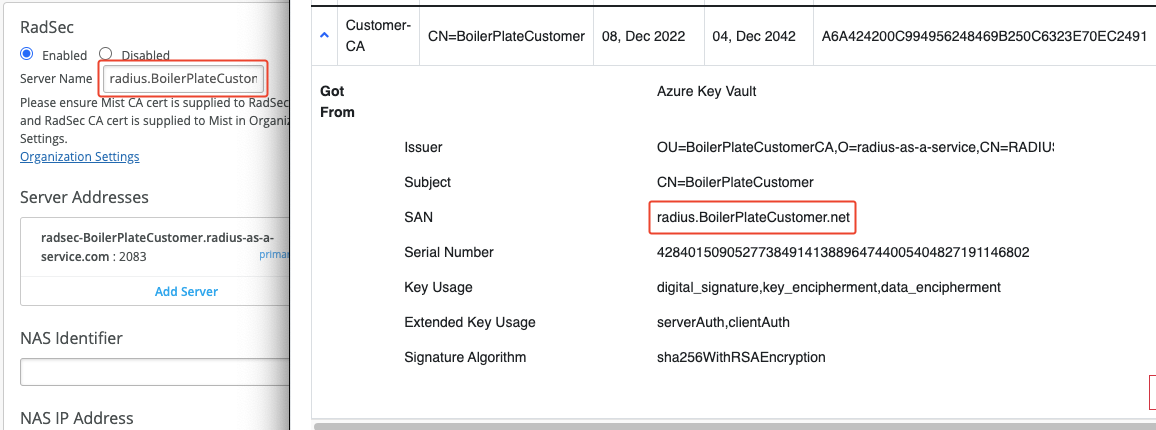
8. Under **RadSec**, select **Enabled** and set the **Server Name** to the **SAN** attribute of your **RADIUS Server Certificate**.

   <figure><img src="https://content.gitbook.com/content/SWU1DQ4UGkqER7uGNUOm/blobs/JvO1JCaAezEVFTMzT73z/image.png" alt=""><figcaption></figcaption></figure>

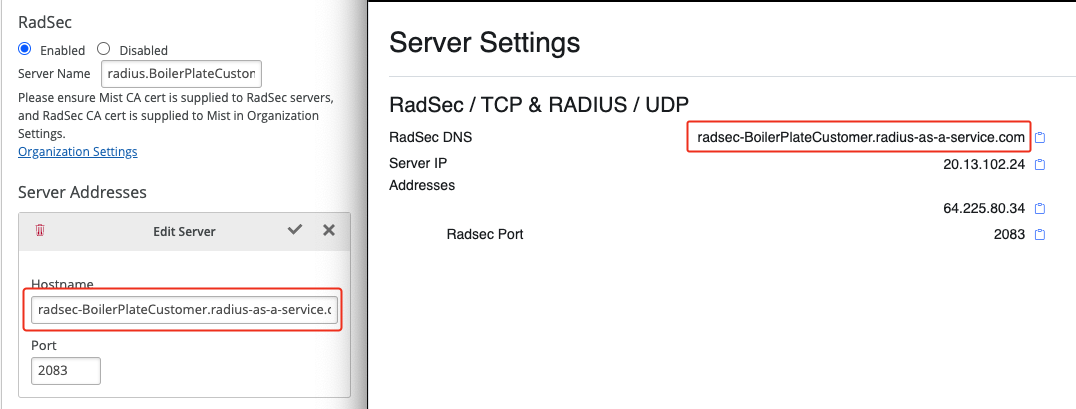
9. For **Server Addresses** use either the IP address or the DNS name of your [RadSec service endpoint](/admin-portal/settings/settings-server#properties).

   <figure><img src="https://content.gitbook.com/content/SWU1DQ4UGkqER7uGNUOm/blobs/Z5E3U27QXmd2iywAcL28/image.png" alt=""><figcaption></figcaption></figure>

### A complete walk-through

<figure><img src="https://content.gitbook.com/content/SWU1DQ4UGkqER7uGNUOm/blobs/NFa4Ojhq3NRMvyvmaqgU/Kapture%202023-02-23%20at%2016.01.24.gif" alt=""><figcaption></figcaption></figure>


# Meraki

{% hint style="info" %}
To use the RadSec feature on your Meraki APs, firmware version **MR 30.X** or later is required.
{% endhint %}

{% hint style="warning" %}
Retain the existing Certificate Authority (Cisco Meraki Keeper PKI) for RadSec deployments, rather than migrating to Meraki's newly introduced [PureCA](https://documentation.meraki.com/Wireless/Design_and_Configure/Architecture_and_Best_Practices/Cisco_Keeper_to_PureCA_Migration_Strategy) service.\
\
**Rationale**: Certificates generated by PureCA can only be used by networks running on MR 33.1.2 firmware version or higher. MR 33.1.2 firmware is currently classified as beta. - 08/09/2026.
{% endhint %}

## Prepare certificates

{% hint style="warning" %}
The Meraki platform does not allow you to generate RadSec client certificates from a CA of your choice. Instead, you must use Meraki's built-in **Organization CA** that is unique to your Meraki Organization.
{% endhint %}

Download the root certificate of the CA that has issued your active **RADIUS Server Certificate** as described [here](/admin-portal/settings/settings-server#download). You will need to upload it to your Meraki console later on.

## Meraki configuration

{% hint style="info" %}
Below settings are the necessary settings to establish a functional RadSec connection with our service. Configure any other settings at your discretion.
{% endhint %}

{% hint style="danger" %}
Ensure to **disable the OCSP revocation check of the RadSec client certificate** as described in step 7 of this guide.
{% endhint %}

{% stepper %}
{% step %}

### Navigate to your Meraki Dashboard

In your Dashboard, select **Wireless > Access Control** and ensure that you have switched to the **new UI version** of the Access control site:

<figure><img src="https://1222554226-files.gitbook.io/~/files/v0/b/gitbook-x-prod.appspot.com/o/spaces%2FSWU1DQ4UGkqER7uGNUOm%2Fuploads%2FRLtKMdY5l834M4uMHJVj%2Fimage.png?alt=media&amp;token=87edbda0-9b7b-4c58-a01e-bd453d64508a" alt=""><figcaption></figcaption></figure>
{% endstep %}

{% step %}

### Configure the RADIUS server in your SSID

Select the **SSID** you wish to configure RADIUS authentication for (or navigate to **Wireless > Configure > SSIDs** to create a new SSID first).

In the **Security** section of your SSID, select **Enterprise with** and in the dropdown **my RADIUS server:**

<figure><img src="https://1222554226-files.gitbook.io/~/files/v0/b/gitbook-x-prod.appspot.com/o/spaces%2FSWU1DQ4UGkqER7uGNUOm%2Fuploads%2FjopG00mWY56nwsR319b1%2Fimage.png?alt=media&amp;token=53c6664b-117d-409f-85f1-8cc6c5dbadd4" alt=""><figcaption></figcaption></figure>

Under **RADIUS**, click **Add server**. Configure the **Host IP or FQDN** to match the IP address or the DNS name of your [RadSec service endpoint](/admin-portal/settings/settings-server#properties), set the **Port** to 2083 and  set the **Secret** value to "radsec" and activate the **RadSec** checkbox.

<figure><img src="https://1222554226-files.gitbook.io/~/files/v0/b/gitbook-x-prod.appspot.com/o/spaces%2FSWU1DQ4UGkqER7uGNUOm%2Fuploads%2FSCtO35XEIsqFt93Le0QU%2Fimage.png?alt=media&amp;token=1e1b880a-0864-4334-8fa1-b2a6396cabd3" alt=""><figcaption></figcaption></figure>
{% endstep %}

{% step %}

### Configure EAP Timeouts

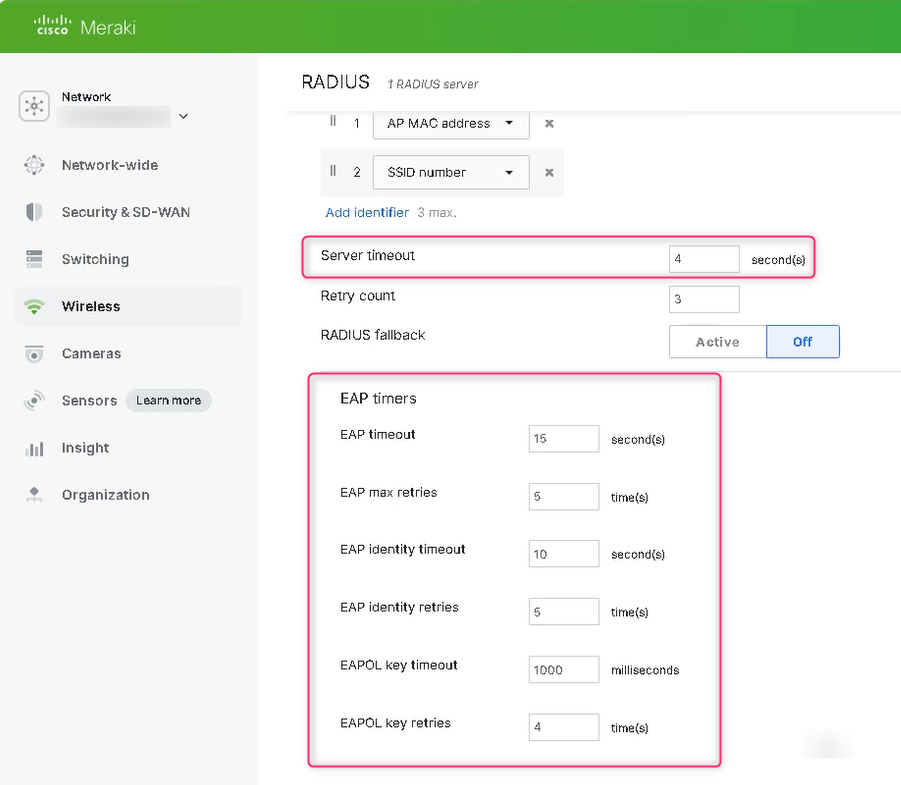
Configure **EAP parameters and timeouts** according to [this](/other/faqs/general#timers-and-timeouts) reference guide by going to **Wireless** > **Radius** > **Advanced RADIUS settings.** Once configured, it should look similar to the screenshot below. Click **Save** to apply the settings.

<figure><img src="https://1222554226-files.gitbook.io/~/files/v0/b/gitbook-x-prod.appspot.com/o/spaces%2FSWU1DQ4UGkqER7uGNUOm%2Fuploads%2FwYlgfLexYcWm400DulBZ%2Fimage.png?alt=media&amp;token=48c307ca-89f2-4933-a47a-b164da332685" alt=""><figcaption></figcaption></figure>
{% endstep %}

{% step %}

### Add RadSec Server Certificate

To upload and generate the required certificates that make the RadSec connection functional, navigate to **Organization > Certificates > RADSEC**.

<figure><img src="https://1222554226-files.gitbook.io/~/files/v0/b/gitbook-x-prod.appspot.com/o/spaces%2FSWU1DQ4UGkqER7uGNUOm%2Fuploads%2FEnApli3g02jjWf3A0Lvj%2Fimage.png?alt=media&amp;token=dd4a25d2-624a-40ad-9fc5-2f41100f5048" alt=""><figcaption></figcaption></figure>

In the top table, click **Upload certificate** and provide the root certificate of the CA that has signed your [**RADIUS Server Certificate**](/admin-portal/settings/settings-server#server-certificates), which you should have already downloaded in this [step](#prepare-certificates). Your Meraki APs now trust your RADIUS server.

{% tabs %}
{% tab title="Using RADIUSaaS Customer CA" %}

<figure><img src="https://1222554226-files.gitbook.io/~/files/v0/b/gitbook-x-prod.appspot.com/o/spaces%2FSWU1DQ4UGkqER7uGNUOm%2Fuploads%2FobW4brUKwgCGyPwW9vAd%2Fimage.png?alt=media&amp;token=1d21a6e0-7f30-4cbd-9baa-4ed9cd391c9a" alt=""><figcaption></figcaption></figure>
{% endtab %}

{% tab title="Using SCEPman or other CA" %}

<figure><img src="https://1222554226-files.gitbook.io/~/files/v0/b/gitbook-x-prod.appspot.com/o/spaces%2FSWU1DQ4UGkqER7uGNUOm%2Fuploads%2F4t5xf690TwRZxshp9uAk%2Fimage.png?alt=media&amp;token=f53eff64-da51-4d20-a28a-b87ee9e9e9f3" alt=""><figcaption></figcaption></figure>
{% endtab %}
{% endtabs %}
{% endstep %}

{% step %}

### Create RadSec Client Certificate

{% tabs %}
{% tab title="Keeper" %}
Under **RadSec device certificates**, first create an **Organization CA** by clicking **Generate CA**. This CA is unique to your Meraki Organization.\
The Meraki platform will now automatically generate RadSec client certificates for all your APs signed by this CA. The lifetime of the certificate is very long (> 50 years), i.e. you do not have to worry about renewing them.

Download the root CA certificate of your **Organization CA** of your Meraki system by clicking **Download CA**.

<figure><img src="https://1222554226-files.gitbook.io/~/files/v0/b/gitbook-x-prod.appspot.com/o/spaces%2FSWU1DQ4UGkqER7uGNUOm%2Fuploads%2FwsgYUzgZJWgyW59b5T6P%2Fimage.png?alt=media&amp;token=74c5490c-036a-4254-b344-2c9b6e6e59c1" alt=""><figcaption></figcaption></figure>
{% endtab %}

{% tab title="RadSec PureCA certificates" %}
{% hint style="info" %}
PureCA is currently in beta.
{% endhint %}

<figure><img src="https://1222554226-files.gitbook.io/~/files/v0/b/gitbook-x-prod.appspot.com/o/spaces%2FSWU1DQ4UGkqER7uGNUOm%2Fuploads%2FWANixFM5av2ynRFGJ0X1%2Fimage.png?alt=media&amp;token=3e32330b-6b87-4770-86d2-c1db0ac03526" alt=""><figcaption></figcaption></figure>

After downlading the certificate chain, you will have to split it up and upload it separately to RADIUSaaS > Trusted Certificates, starting with the root.&#x20;

You can use PowerShell to split the chain into 5 certificates. For example, the following script will split the downloaded chain and saves each file separately using the certificate's commonName as the file name.&#x20;

{% code overflow="wrap" %}

```powershell
$c=[regex]::Matches((Get-Content .\chain.pem -Raw),'(?s)-----BEGIN CERTIFICATE-----.*?-----END CERTIFICATE-----').Value | % { [Security.Cryptography.X509Certificates.X509Certificate2]::new([Text.Encoding]::ASCII.GetBytes($_)) }; $ord=[Collections.ArrayList]@(); $seen=@{}; $cur=$c | ? { $_.Subject -eq $_.Issuer } | Select -First 1; while($cur){ [void]$ord.Add($cur); $seen[$cur.Thumbprint]=1; $cur=$c | ? { $_.Issuer -eq $ord[-1].Subject -and -not $seen[$_.Thumbprint] } | Select -First 1 }; $c | ? { -not $seen[$_.Thumbprint] } | % { [void]$ord.Add($_) }; $i=0; $ord | % { $cn=($_.GetNameInfo('SimpleName',$false) -replace '[\\/:*?"<>|]','_'); $f=".\{0:d2}-{1}.pem" -f $i++,$cn; Set-Content $f ("-----BEGIN CERTIFICATE-----`n"+[Convert]::ToBase64String($_.RawData,'InsertLineBreaks')+"`n-----END CERTIFICATE-----") -Encoding ascii; "$f   subject=$($_.Subject)   issuer=$($_.Issuer)" }

```

{% endcode %}

The above script will produce the following certificate structure.&#x20;

```
00-Cisco Meraki Dashboard Root CA.pem
  └─ 01-Cisco Meraki Dashboard Cluster SubCA.pem
    └─ 02-Meraki.com Cluster CA.pem
      └─ 03-1608009.pem                   (your org CA)
        └─ 04-radsec-1608009.pem          (issues the RadSec client certs)
```

{% endtab %}
{% endtabs %}

{% hint style="warning" %}
You will not be able to upload RadSec client certificates of another CA with Meraki. Instead the Organization CA, which is unique to your organization, will provide all your access points with suitable certificates.
{% endhint %}
{% endstep %}

{% step %}

### Trust Organization CA in RADIUSaaS

Now, upload the downloaded CA certificate to your [Trusted Certificates in your RADIUSaaS web console](/admin-portal/settings/trusted-roots#add) and select **RadSec** under **Use for**.

<figure><img src="https://1222554226-files.gitbook.io/~/files/v0/b/gitbook-x-prod.appspot.com/o/spaces%2FSWU1DQ4UGkqER7uGNUOm%2Fuploads%2F7nWmyyegri5KupEslWdo%2Fimage.png?alt=media&amp;token=3f36a44b-6e97-406d-b5fe-e05886377392" alt=""><figcaption></figcaption></figure>

{% hint style="info" %}
In case your PKI has a multi-tier hierarchy (Root CA, Intermediate CA, Issuing CA), make sure to upload all of them to the RADIUSaaS Trusted Certificates store.
{% endhint %}
{% endstep %}

{% step %}

### Disable Revocation Check for RadSec Certificates

Finally, disable the [revocation check for the RadSec client certificates](/admin-portal/settings/settings-server#verification-check-for-radsec-certificates) on your RADIUSaaS instance (this does not adversely affect security as the Meraki Organization CA does not allow to revoke RadSec client certificates). Therefore, navigating to your RADIUSaaS instance and then **Settings > Server Settings** and disable the checkbox **Verification check for RadSec certificates**.

<figure><img src="https://1222554226-files.gitbook.io/~/files/v0/b/gitbook-x-prod.appspot.com/o/spaces%2FSWU1DQ4UGkqER7uGNUOm%2Fuploads%2Fx2AwP1KBglH14xdrsSe5%2Fimage.png?alt=media&amp;token=4b8b0f19-14f1-4f92-8a13-224669559ace" alt=""><figcaption></figcaption></figure>
{% endstep %}

{% step %}

### Test Configuration

To test that the configuration works, you can add a user in your [Portal](/admin-portal/users/users#add-a-new-user) and use the Meraki test function.

<figure><img src="https://1222554226-files.gitbook.io/~/files/v0/b/gitbook-x-prod.appspot.com/o/spaces%2FSWU1DQ4UGkqER7uGNUOm%2Fuploads%2FmMlZKcqr82x0TpYbZ9j0%2Fimage.png?alt=media&amp;token=468075bf-21b9-4e37-9da2-9972739f4917" alt=""><figcaption></figcaption></figure>
{% endstep %}
{% endstepper %}

### References

Link to Meraki's documentation for the RadSec configuration: <https://documentation.meraki.com/MR/Encryption_and_Authentication/MR_RADSec>


# MikroTik

## Prepare certificates

To establish a valid RadSec connection, the MikroTik Access Points must trust the **RADIUS Server Certificate** and your RADIUS server must trust the **RadSec Client Certificate**.  To achieve this, follow below steps:

### Option 1: Using the SCEPman PKI

1. Download the root certificate of the CA that has issued your active **RADIUS Server Certificate** as described [here](/admin-portal/settings/settings-server#download). Since you are using SCEPman, that might be your SCEPman Root CA certfiicate.
2. Log on to your MikroTik device, then upload the certificate from step 1 above to the MikroTik device using the **Files** menu on the left.
3. Once uploaded, switch to your **Terminal** tab on the top right and execute the following command to import this certificate to MikroTik's certificate store:

```
/certificate import file-name="scepman-root.cer"
```

4. Generate a **RadSec Client Certificate** using **SCEPman Certificate Master** by navigating to the [**Client Certificate**](https://docs.scepman.com/certificate-deployment/certificate-master/client-certificate-pkcs-12) menu:<br>

   <figure><img src="https://1222554226-files.gitbook.io/~/files/v0/b/gitbook-x-prod.appspot.com/o/spaces%2FSWU1DQ4UGkqER7uGNUOm%2Fuploads%2FF2MVB2Jktg7BswcMp1O3%2Fimage.png?alt=media&amp;token=21d77481-62f8-472a-92cf-03056e8bdec3" alt=""><figcaption></figcaption></figure>

{% hint style="warning" %}
Ensure to monitor the expiry of your **RadSec Client Certificate** and renew it in due time to prevent service interruptions.
{% endhint %}

5. Once the **RadSec Client Certificate** is downloaded, extract the private key, e.g. using OpenSSL, as this will have to be imported to the access point separately:&#x20;

```
openssl pkey -in yourfile.pem -out private.key
```

6. Upload both files, the certificate and the private key via the **Files** menu. Then import the certificate first and then the private key. During the import process the **private key** will merge with the certificate indicated by a letter '**K**' as shown below.&#x20;

<figure><img src="https://1222554226-files.gitbook.io/~/files/v0/b/gitbook-x-prod.appspot.com/o/spaces%2FSWU1DQ4UGkqER7uGNUOm%2Fuploads%2FcdN1L6tWzQ2Qf4Sw4XJT%2Fimage.png?alt=media&amp;token=e2bf84bf-eb9d-4366-84d4-2b088fa381b7" alt=""><figcaption></figcaption></figure>

### Option 2: Using other PKIs

{% hint style="info" %}
Use this section if you want to create a root CA on your Mikrotik AP and generate a **RadSec Client Certificate** from this root. Please note that all of these steps can be completed either in GUI or terminal.
{% endhint %}

1. Download the root certificate of the CA that has issued your active **RADIUS Server Certificate** as described [here](/admin-portal/settings/settings-server#download).
2. Log on to your MikroTik device, then upload the certificate from step 1 above to the MikroTik device using the **Files** menu on the left.
3. Once uploaded, switch to your **Terminal** tab on the top right and execute the following command to import this certificate to MikroTik's certificate store:

```
/certificate import file-name="RADIUS Customer CA - Contoso.cer"
```

4. If you have not already generated **RadSec Client Certificate** for MikroTik AP, generate one as per the below example. For more information about creating certificates, click [here](https://wiki.mikrotik.com/wiki/Manual:Create_Certificates).&#x20;

{% hint style="warning" %}
Ensure to monitor the expiry of your **RadSec Client Certificate** and renew it in due time to prevent service interruptions.
{% endhint %}

Example:&#x20;

```
/certificate add name=myCa common-name=myCa key-usage=key-cert-sign,crl-sign
/certificate add name=mikrotik-client common-name=mikrotik-client
/certificate sign mikrotik-client ca=myCa name=mikrotik-client
```

In the above example, the first line creates a root CA called **myCa**. The second line generates a client certificate for the MikroTik device, and the third line uses **myCa** (CA) to sign the **mikrotik-client** certificate generated in step 2. If all went well, you would end up with three certificates as shown below. Please ensure your MikroTik device trusts the relevant certificates (**T** flag in the green section). If that is not the case yet, set the flag using below command:

```
/certificate
set myCa trusted=yes
set "RADIUS Customer CA - Contoso.cer" trusted=yes
```

<figure><img src="https://content.gitbook.com/content/SWU1DQ4UGkqER7uGNUOm/blobs/yIhn9109WeJVm5tKDrkS/image.png" alt=""><figcaption></figcaption></figure>

5. Export the root CA certificate (`myCa`) that has issued your **RadSec Client Certificate** above:

```
/certificate export-certificate myCa
```

6. Download it from the **Files** menu and then upload the file to your RADIUSaaS instance as described [here](/admin-portal/settings/trusted-roots#add) and select **RadSec** under **Use for.** Once completed, continue configuring your MikroTik AP as per [below ](#mikrotik-configuration)and use **Option 1** for certificates.

## MikroTik Configuration

{% hint style="info" %}
Please note that the below configuration was tested with RouterOS 6.47.4 and 6.49.11
{% endhint %}

1. Switch back to your WebFig, add a new RADIUS profile and enter the following information:

<table><thead><tr><th width="198">Parameter</th><th>Value</th></tr></thead><tbody><tr><td>Address</td><td>Use the IP address from your <a href="/admin-portal/settings/settings-server">Server Settings </a>page.</td></tr><tr><td>Protocol</td><td>radsec</td></tr><tr><td>Secret</td><td>"radsec"</td></tr><tr><td>Authentication Port</td><td>2083</td></tr><tr><td>Accounting Port</td><td>2083</td></tr><tr><td>Timeout</td><td>4000 ms</td></tr><tr><td>Certificate</td><td><a href="#option-1-using-the-scepman-pki"><strong>Option 1</strong></a>: SCEPman Issued (RadSec) Client Certificate (generated in step 4).<br><a href="#option-2-using-other-cas"><strong>Option 2</strong></a>: <strong>RadSec Client Certificate</strong> issued by MikroTik's built-in CA (generated in step 4).</td></tr></tbody></table>

![Configuring RADIUS / RadSec profile](https://1222554226-files.gitbook.io/~/files/v0/b/gitbook-x-prod.appspot.com/o/spaces%2FSWU1DQ4UGkqER7uGNUOm%2Fuploads%2FfM6mmWqYWYDXC4rxDrBM%2F2024-09-03_14h43_36.png?alt=media\&token=c1ab1a19-5e32-42d2-9f57-394ffe51ae41)

2. Go to **Wireless,** add a new **Security Profile** and enter the following information:&#x20;

<table><thead><tr><th width="227">Parameter</th><th>Value</th></tr></thead><tbody><tr><td>Name</td><td>Name of the RADIUS security profile</td></tr><tr><td>Mode</td><td>dynamic keys</td></tr><tr><td>EAP Methods</td><td>passthrough</td></tr><tr><td>TLS Mode</td><td>verify certificate</td></tr><tr><td>TLS Certificate</td><td><a href="#option-1-using-the-scepman-pki"><strong>Option 1</strong></a>: SCEPman Root CA certificate.<br><a href="#option-2-using-other-cas"><strong>Option 2</strong></a>: RADIUSaaS Customer-CA certificate.</td></tr></tbody></table>

![](https://1222554226-files.gitbook.io/~/files/v0/b/gitbook-x-prod.appspot.com/o/spaces%2FSWU1DQ4UGkqER7uGNUOm%2Fuploads%2F8HFMIdX7JdMxugs31tgO%2F2025-08-28_12h39_32.png?alt=media\&token=acde26c0-eea6-43d7-be3b-725e966f3049)

3. Switch to your **Wi-Fi Interfaces** and assign your **Security Profile** to the interface.

![](https://content.gitbook.com/content/SWU1DQ4UGkqER7uGNUOm/blobs/0TAA2KG9NUR5tWOtjzdU/image.png)


# Ruckus

{% hint style="info" %}
The following guide was created using Ruckus **Virtual SmartZone Essentials** version **6.1.2.0.441**.
{% endhint %}

## Prepare certificates

To establish a valid RadSec connection, your Access Points must trust the **RADIUS Server Certificate** and your RADIUS server must trust your **RadSec Client Certificate**. To achieve this,

1. Download the root certificate of the CA that has issued your active **RADIUS Server Certificate** as described [here](/admin-portal/settings/settings-server#download).
2. Create a **RadSec Client Certificate** for your Ruckus SmartZone. If you are using **SCEPman Certificate Master**, the process is described [here](https://docs.scepman.com/certificate-deployment/certificate-master/client-certificate-pkcs-12).&#x20;
3. **Split the generated certificate** into the private key (named "priv.key" in this example) and the certificate (named "clientcert.cer"). In case the **RadSec Client Certificate** was downloaded in the **PKCS#12/.pfx** format, this can be easily done, e.g. using OpenSSL:\
   \
   Private Key:\
   `openssl pkcs12 -in <your-radsec-client-cert>.pfx -nocerts -nodes -out priv.key`\
   \
   Certificate without Private Key:\
   `openssl pkcs12 -in <your-radsec-client-cert>.pfx -clcerts -nokeys -out clientcert.cer`&#x20;

Depending on your Ruckus firmware version, it might be necessary to remove the bag attributes section from your certificate and private key files. This section looks like the following example:

```
Attributes
    localKeyID: 52 70 EB 96 89 23 90 F9 D5 0E 06 82 5C EC F7 63 30 44 F1 A9 
    friendlyName: Certificate from SCEPman
Key Attributes: <No Attributes>
```

{% hint style="warning" %}
Ensure to monitor the expiry of your **RadSec Client Certificate** and renew it in due time to prevent service interruptions.
{% endhint %}

3. Add the root certificate of the CA that has issued the **RadSec Client Certificate** to your RADIUS instance as described [here](/admin-portal/settings/trusted-roots#add) and select **RadSec** under **Use for**. \
   In case the **RadSec Client Certificate** has been issued by SCEPman and you already trust the SCEPman Root CA for client authentication, simply edit the trusted SCEPman Root CA certificate and select **Both** under **Use for**.&#x20;

## Ruckus SmartZone (SZ) configuration

{% hint style="info" %}
In the following, Ruckus SZ is configured as an **authentication proxy**, i.e. RADIUS authentication requests are routed from the WAPs to the Ruckus SZ and centrally forwarded to RADIUSaaS.
{% endhint %}

For general information on how to import certificates to the Ruckus SmartZone, please refer to their documentation:

{% embed url="<https://docs.commscope.com/bundle/sz-700-controlleradminguide-sz300sz144vsz/page/GUID-5EA43C47-3B01-4908-B5B6-0961CF283504.html>" %}

1. Import the root certificate of the CA that has issued your **RADIUS Server Certificate** (downloaded during step 1 [here](#prepare-certificates)) by navigating to **Administration >** **System > Certificates > SZ Trusted CA Certificates/Chain (external)**.
2. Click **Import**, provide a **Name** and optional **Description** for your RADIUS CA certificate and upload the certificate file by clicking **Browse** next to **Root CA Certificate**. In case you are bringing your own **RADIUS Server Certificate** and in case it has been issued by an intermediate CA, please also upload all intermediate certificates under **Intermediate CA Certificates**.<br>

   <figure><img src="https://1222554226-files.gitbook.io/~/files/v0/b/gitbook-x-prod.appspot.com/o/spaces%2FSWU1DQ4UGkqER7uGNUOm%2Fuploads%2FAZCF72Q5flkuuziNfqO1%2FScreenshot_2024-08-21_at_12_54_18.jpg?alt=media&amp;token=8b235815-5598-4aa0-92d3-1aac31b68810" alt="" width="375"><figcaption></figcaption></figure>
3. Next, click **Validate** and **OK**.
4. Import your **RadSec Client Certificate** (obtained from step 3 [here](#prepare-certificates)) by navigating to **Administration >** **System > Certificates > SZ as Client Certificate**.
5. Click **Import** and provide a **Name** and optional **Description** for your **RadSec Client Certificate**. Then upload the public portion of your **RadSec Client Certificate** by clicking **Browse** next to **Client Certificate**. Finally, upload the private key by clicking **Browse** next to **Private Key**.<br>

   <figure><img src="https://1222554226-files.gitbook.io/~/files/v0/b/gitbook-x-prod.appspot.com/o/spaces%2FSWU1DQ4UGkqER7uGNUOm%2Fuploads%2FUpPaaObb5SSDUhQnqoQM%2FScreenshot_2024-08-21_at_13_10_30.jpg?alt=media&amp;token=6c1869ef-6304-4f2d-9d17-e15d7a7e068b" alt=""><figcaption></figcaption></figure>
6. For the RADIUS server configuration, navigate to **Security > Authentication > Proxy (SZ Authenticator)**.
7. Click **Create** and provide a **Name**, optional **Friendly Name** and **Description** for the RADIUS profile.
8. Select **RADIUS** as **Service Protocol**.
9. Under **RADIUS Service Options**, configure the following settings:

| **Encryption**                            | Enable                                                                                                                                                                                                                                                                                                                                                                                                    |
| ----------------------------------------- | --------------------------------------------------------------------------------------------------------------------------------------------------------------------------------------------------------------------------------------------------------------------------------------------------------------------------------------------------------------------------------------------------------- |
| **CN/SAN Idenity**                        | <p>Provide the CN/SAN attribute of your <strong>RADIUS Server Certificate</strong>. </p><p><img src="https://1222554226-files.gitbook.io/~/files/v0/b/gitbook-x-prod.appspot.com/o/spaces%2FSWU1DQ4UGkqER7uGNUOm%2Fuploads%2FdCLBHFKCJZj1uZdxaCgS%2Fimage.png?alt=media&amp;token=be2354b0-4b68-47f5-8820-37d84231a9ee" alt="Showing SAN to be used as Certificate server name" data-size="original"></p> |
| **OCSP Validation**                       | <p>Default: Disabled<br>In case you are bringing your own <strong>RADIUS Server Certificate</strong> and the CA that has issued it allows for its revocation, provide the OCSP Responder URL of your CA here.</p>                                                                                                                                                                                         |
| **Client Certificate**                    | Select the **RadSec Client Certificate** uploaded to Ruckus SZ previously.                                                                                                                                                                                                                                                                                                                                |
| **Server Certificate**                    | Disable                                                                                                                                                                                                                                                                                                                                                                                                   |
| **RFC5580 Out of Band Location Delivery** | Disable                                                                                                                                                                                                                                                                                                                                                                                                   |

10. Next, under **Primary Server**, for the **IP Address/FQDN** choose either the IP address or the DNS name of your [RadSec service endpoint](/admin-portal/settings/settings-server#properties). For the **Port** select **2083**. <br>

    <figure><img src="https://1222554226-files.gitbook.io/~/files/v0/b/gitbook-x-prod.appspot.com/o/spaces%2FSWU1DQ4UGkqER7uGNUOm%2Fuploads%2F2Sy3yfp75uRGxmdtUD6n%2FScreenshot_2024-08-21_at_13_29_21.jpg?alt=media&amp;token=352eba23-1727-48bf-8917-86af18318c99" alt=""><figcaption></figcaption></figure>
11. Click **OK**.


# UniFi

{% hint style="info" %}
RADIUS over TLS (RADSEC) has been added to **UniFi Network 8.4** and newer versions. Please have your controller and network devices **up-to-date** before following this guide.
{% endhint %}

{% hint style="warning" %}
Customers have reported **delays** between activating the RadSec feature on the Unify Dashboard and becoming functional.
{% endhint %}

## Prepare certificates

To establish a valid RadSec connection, your Access Points must trust the **RADIUS Server Certificate** and your RADIUS server must trust your **RadSec Client Certificate**. To achieve this,

1. Download the root certificate of the CA that has issued your active **RADIUS Server Certificate** as described [here](/admin-portal/settings/settings-server#download).\
   In this example SCEPman is used as Root CA and has issued the RADIUS server certificate. So, we download the root CA certificate from SCEPman portal:\
   \
   ![](https://1222554226-files.gitbook.io/~/files/v0/b/gitbook-x-prod.appspot.com/o/spaces%2FSWU1DQ4UGkqER7uGNUOm%2Fuploads%2Fqcje6zykfUaJtZ2Mpn2J%2Fimage.png?alt=media\&token=2d4e54d1-79fa-40ff-8886-a3f23fa93eec)\
   Afterwards, please convert your certificate to Base-64. This can be easily done via Windows Certificate Export Wizard, OpenSSL or other tools:<br>

   <figure><img src="https://1222554226-files.gitbook.io/~/files/v0/b/gitbook-x-prod.appspot.com/o/spaces%2FSWU1DQ4UGkqER7uGNUOm%2Fuploads%2FPsfLYTHWwhFMHRC5e9v0%2Fimage.png?alt=media&amp;token=9699aa03-c995-4dd6-9023-83ea4bcedc62" alt=""><figcaption></figcaption></figure>
2. Create a **RadSec Client Certificate** for your access points. If you are using **SCEPman Certificate Master**, the process is described [here](https://docs.scepman.com/certificate-deployment/certificate-master/client-certificate-pkcs-12).\
   In this example we generate a certificate in the format "PEM". Please note down the password, as we need this later.<br>

   <figure><img src="https://1222554226-files.gitbook.io/~/files/v0/b/gitbook-x-prod.appspot.com/o/spaces%2FSWU1DQ4UGkqER7uGNUOm%2Fuploads%2FiiknhsyBtg1OMx5zokB4%2Fimage.png?alt=media&amp;token=008eea9c-a5a8-4ad6-9b0c-d43eda7501f6" alt=""><figcaption></figcaption></figure>
3. Split the generated certificate into the private key (named "priv.key" in this example) and the certificate (named "clientcert.cer"). This can be easily done via a text editor:<br>

   <figure><img src="https://1222554226-files.gitbook.io/~/files/v0/b/gitbook-x-prod.appspot.com/o/spaces%2FSWU1DQ4UGkqER7uGNUOm%2Fuploads%2Fy4RgXqj46pwMDFObuQT0%2FScreenshot%202024-09-24%20101150.png?alt=media&amp;token=e40c8932-f818-481e-af8c-ff8980dffea0" alt=""><figcaption></figcaption></figure>
4. Add the root certificate of the CA that has issued the **RadSec Client Certificate** to your RADIUS instance as described [here](/admin-portal/settings/trusted-roots#add) and select **RadSec** under **Use for**.\
   In case the **RadSec Client Certificate** has been issued by SCEPman (this example) and you already trust the SCEPman Root CA for client authentication, simply edit the trusted SCEPman Root CA certificate and select **Both** under **Use for**:\ <br>

   <figure><img src="https://1222554226-files.gitbook.io/~/files/v0/b/gitbook-x-prod.appspot.com/o/spaces%2FSWU1DQ4UGkqER7uGNUOm%2Fuploads%2FRC0VFYe5IAzWPOK6ZWrg%2Fimage.png?alt=media&amp;token=7ea810cd-aa2e-49a0-a5c2-0508bc1f818f" alt=""><figcaption></figcaption></figure>

## UniFi configuration

{% hint style="info" %}
Below settings are the necessary settings to establish a functional RadSec connection with our service. Configure any other settings at your discretion.
{% endhint %}

1. Navigate to your Unifi Network controller and open **Settings** **> Profiles > RADIUS**.
2. Create a new profile or update an existing one:<br>

   <figure><img src="https://1222554226-files.gitbook.io/~/files/v0/b/gitbook-x-prod.appspot.com/o/spaces%2FSWU1DQ4UGkqER7uGNUOm%2Fuploads%2F3ZiX4U8lG2ODqepWi9TR%2Fimage.png?alt=media&amp;token=3f8e33a3-87a1-4628-9051-8f5c9f79f5c3" alt=""><figcaption></figcaption></figure>
3. Fill in the required information:
   1. **RADIUS Assigned VLAN Support**: optional / if needed
   2. **RADIUS Settings**:
      1. **TLS**: Enable the checkbox.
      2. **Authentication Servers**:\
         \- **Server IP Address/es**: Provide the IP address of your [RadSec service endpoint](/admin-portal/settings/settings-server#properties).\
         \- **Port**: 2083.\
         \- **Shared Secret**: `radsec`.
      3. **Client Certificate**: Upload the **RadSec Client Certificate** (obtained from step 3 [here](#prepare-certificates)).
      4. **Private Key**: Upload the private key of your **RadSec Client Certificate** (obtained from step 3 [here](#prepare-certificates)).
      5. **Private Key Password**: as noted down.
      6. **CA Certificate**: Upload the Root certificate of the CA that has issued your **RADIUS Server Certificate** (obtained from step 1 [here](#prepare-certificates)).
      7. **Accounting**: Enable the checkbox.
      8. **RADIUS Accounting Server**:\
         \- **Server IP Address/es**: Provide the IP address of your [RadSec service endpoint](/admin-portal/settings/settings-server#properties).\
         \- **Port**: 2083\
         \- **Shared Secret**: `radsec`
      9. **Interim Update Interval**: optional / if needed<br>

         <figure><img src="https://1222554226-files.gitbook.io/~/files/v0/b/gitbook-x-prod.appspot.com/o/spaces%2FSWU1DQ4UGkqER7uGNUOm%2Fuploads%2F7bVZwLVu65fJAw2ip9yW%2Fimage.png?alt=media&amp;token=f4f95e73-62aa-493d-ad3a-b2aae7e7282d" alt=""><figcaption></figcaption></figure>
4. Assign this profile to the desired WiFi profile:<br>

   <figure><img src="https://1222554226-files.gitbook.io/~/files/v0/b/gitbook-x-prod.appspot.com/o/spaces%2FSWU1DQ4UGkqER7uGNUOm%2Fuploads%2FIYtSOpXKancg5DOguLnp%2Fimage.png?alt=media&amp;token=9d545eb1-1f53-483d-b0bb-b96dce504ec3" alt=""><figcaption></figcaption></figure>
5. Give your Access Points some time to apply the new configuration:\
   \
   ![](https://1222554226-files.gitbook.io/~/files/v0/b/gitbook-x-prod.appspot.com/o/spaces%2FSWU1DQ4UGkqER7uGNUOm%2Fuploads%2FgLOTqgYBnWr21PwSxqwx%2Fimage.png?alt=media\&token=6db006ec-38eb-4b04-be4e-cabe263426ea)

### Reference: UniFi Help Center

[UniFi Gateway - Configuring a RADIUS Server](https://help.ui.com/hc/en-us/articles/360015268353-UniFi-Gateway-Configuring-a-RADIUS-Server)


# RADIUS

{% hint style="warning" %}
Remember to configure a secondary RADIUS server whenever possible.
{% endhint %}

{% content-ref url="/pages/dCtvSPjFIKWEaLMZs1zb" %}
[ExtremeCloud IQ CoPilot](/configuration/access-point-setup/proxy-needed/extremecloud-iq-copilot)
{% endcontent-ref %}

{% content-ref url="/pages/XGBwMT56M67sQqWvoBft" %}
[Meraki](/configuration/access-point-setup/proxy-needed/meraki)
{% endcontent-ref %}

{% content-ref url="/pages/-Mkeas9F6QI4QE6FXxZx" %}
[Sophos UTM](/configuration/access-point-setup/proxy-needed/sophos-utm)
{% endcontent-ref %}

{% content-ref url="/pages/-MYxqL8KnpnbFeCQ9VUI" %}
[UniFi](/configuration/access-point-setup/proxy-needed/unifi)
{% endcontent-ref %}


# ExtremeCloud IQ CoPilot

Unfortunately only \`ExtremeCloud IQ SiteManager\` is able to speak RadSec(as far we know). This site handles CoPilot

## ExtremeCloud IQ CoPilot configuration

1. Go to **Configure > Common Objects > Authentication > External Radius Servers** and click **Add**&#x20;

   <figure><img src="https://content.gitbook.com/content/SWU1DQ4UGkqER7uGNUOm/blobs/HtTdshao7u9htRyy6yW3/image.png" alt=""><figcaption></figcaption></figure>
2. &#x20;Enter the IP Object and give everything a descriptive name

   <figure><img src="https://content.gitbook.com/content/SWU1DQ4UGkqER7uGNUOm/blobs/xxBTN7yRSYDw79UzPb3L/image.png" alt=""><figcaption></figcaption></figure>

   <figure><img src="https://content.gitbook.com/content/SWU1DQ4UGkqER7uGNUOm/blobs/acX63iweDWBB6CjrcUnU/image.png" alt=""><figcaption></figcaption></figure>
3. Set the **Shared secret** which is displayed on your RaaS website and save the changes

<figure><img src="https://content.gitbook.com/content/SWU1DQ4UGkqER7uGNUOm/blobs/7VVuJdlR276YZWUj5XMO/image.png" alt=""><figcaption></figcaption></figure>

4. Go to **Configure > Network Policies > Add Network Policy**<br>

   <figure><img src="https://content.gitbook.com/content/SWU1DQ4UGkqER7uGNUOm/blobs/M9dOt5UhQHhYLz3hsBjs/image.png" alt=""><figcaption></figcaption></figure>
5. After the policy has been created, you're able to create a **SSID.** Click **Add** on **Wireless Networks**
6. Choose your preferred **SSID** Name and select **Enterprise** for **SSID Authentication** <br>

   <figure><img src="https://content.gitbook.com/content/SWU1DQ4UGkqER7uGNUOm/blobs/dDXKiTleYGcPnGGbRkHF/image.png" alt=""><figcaption></figcaption></figure>
7. Under **Authentication Settings** add the radius server which we've added in step 3 and save everything<br>

   <figure><img src="https://content.gitbook.com/content/SWU1DQ4UGkqER7uGNUOm/blobs/8JFZFk9Os38259JXMDUk/image.png" alt=""><figcaption></figcaption></figure>
8. Deploy the **Network Policy** to the Access Points<br>

   <figure><img src="https://content.gitbook.com/content/SWU1DQ4UGkqER7uGNUOm/blobs/RJyMQk3JrEY9LtYQzaun/image.png" alt=""><figcaption></figcaption></figure>


# Meraki

{% hint style="warning" %}
Starting with firmware version **MR 30.X**, Meraki APs support RadSec. Hence, we recommend to update your firmware version and follow the [RadSec guide for Meraki](/configuration/access-point-setup/radsec-available/meraki) instead.
{% endhint %}

## Meraki configuration&#x20;

1. In your Meraki **Dashboard** go to **Wireless > SSIDs**
2. Enable a new SSID and give it the name you want
   1. Save your changes

      ![](https://content.gitbook.com/content/SWU1DQ4UGkqER7uGNUOm/blobs/HHH0BV5GfPQKlckfIOUN/image.png)
3. Edit the Settings of your SSID
   1. Under **Network access** select **Enterprise with my RADIUS server**![](https://content.gitbook.com/content/SWU1DQ4UGkqER7uGNUOm/blobs/7jgPgS9AnRFXvx9OKIMU/image.png)
4. After that, go to **RADIUS servers** and add your RADIUS servers. Use the **IP Address** of your [**Proxy**](/admin-portal/settings/settings-server#properties-1), the **Port** 1812 and the **Shared Secret** from your [**Server Settings**](/admin-portal/settings/settings-server) page![](https://content.gitbook.com/content/SWU1DQ4UGkqER7uGNUOm/blobs/FUN8zTvBZAiRhNL4j4uh/image.png)
5. Configure **EAP parameters and timeouts** according to [this ](https://docs.radiusaas.com/other/faqs/general)reference guide by going to **Wireless** > **Radius** > **Advanced RADIUS settings.** Once configured, it should look similar to the screenshot below.&#x20;

   <figure><img src="https://1222554226-files.gitbook.io/~/files/v0/b/gitbook-x-prod.appspot.com/o/spaces%2FSWU1DQ4UGkqER7uGNUOm%2Fuploads%2FaQH5hQujnvBcG5H96zWi%2F2024-05-17_11h10_26.png?alt=media&amp;token=834dd96d-dfb3-42b9-baca-58dd8873aad5" alt=""><figcaption><p>Showing <strong>EAP parameters and timeouts</strong></p></figcaption></figure>
6. To **test** that the configuration works, you can add a user in your [Portal](/admin-portal/users/users#add-a-new-user) and use the Meraki test function

   ![](https://content.gitbook.com/content/SWU1DQ4UGkqER7uGNUOm/blobs/vS67zRsPtNO9uDYp8bw2/image.png)
7. **Save** your changes.


# Sophos UTM

{% hint style="info" %}
The Sophos appliance does not allow to assign different RADIUS servers to different SSIDs. So be aware of that if you are migrating from a onPremises RADIUS server to RADIUS-as-a-Service. May talk with our support team to plan your migration.&#x20;
{% endhint %}

## Sophos configuration

### RADIUS profile

Please go through the following steps and configurations to create a RADIUS profile:

1. In Sophos navigate to **Definitions & Users** and select **Authentication Services** and select the tab **Servers**
2. Click **New Authentication Server**
3. Fill the forms with all your information

![](https://content.gitbook.com/content/SWU1DQ4UGkqER7uGNUOm/blobs/nFnzWHsDyhX4NnVh1hUI/sophos_1.png)

![](https://content.gitbook.com/content/SWU1DQ4UGkqER7uGNUOm/blobs/5VFqrzF1JvHv7lkNntKn/sophos_2.png)

### SSID configuration&#x20;

Perform the following steps and configurations for SSID:

1. Navigate to **Wireless Protection**, select **Global Settings** and go to the tab **Advanced**
2. Select the created RADIUS profile
3. Then navigate to your **SSID** settings which can be found under **Wireless Protection > Wireless Networks**
4. Create a SSID with the **Encryption Mode, WPA2/WPA-Enterprise**

![](https://content.gitbook.com/content/SWU1DQ4UGkqER7uGNUOm/blobs/oA1rRkoGB33F5dgqBumz/sophos_3.png)

![](https://content.gitbook.com/content/SWU1DQ4UGkqER7uGNUOm/blobs/aQB3byQRCbYjTSiZG0sB/sophos_4.png)


# UniFi

{% hint style="warning" %}
Starting with **UniFi Network 8.4** RadSec is supported. We recommend to follow the [RadSec guide for UniFi](/configuration/access-point-setup/radsec-available/unifi) instead.
{% endhint %}

## UniFi configuration

### RADIUS profile

Please go through the following steps and configurations to create a RADIUS profile:

1. In UniFi navigate to **Settings** and select **Profiles**
2. Click **Create a new RADIUS Profile**
3. Fill the forms with all your information

![](https://content.gitbook.com/content/SWU1DQ4UGkqER7uGNUOm/blobs/qxcXSsUpRMQnNCmjFYA5/image.png)

### SSID <a href="#ssid" id="ssid"></a>

Do the following steps and configurations for SSID:

1. In UniFi navigate to **Settings** and select **Wireless Networks**
2. Click **Create new Wireless Network**
3. Enter a name for **Name/SSID**
4. For **Security** choose **WPA Enterprise**
5. Finally as **RADIUS Profile** select the created profile

![](https://gblobscdn.gitbook.com/assets%2F-Lzl3JXanfpvdg6pLlGg%2F-M03hV6tYhKuZqKfxnpF%2F-M03l0lPBQzneR9sw0mC%2Fimage.png?alt=media\&token=162f4892-09ba-448a-8cf7-4e12d6bb614c)


# Server Certificate Renewal

This page describes the renewal process of the RADIUSaaS server certificate.

A server certificate is essential for securing both the EAP-TLS inner tunnel and the RadSec TLS outer tunnel on RADIUSaaS. To prevent authentication failures, ensure to renew your certificate before it expires.

### **Your server certificate can be one of the following two types:**

1. [Customer-CA](https://docs.radiusaas.com/admin-portal/settings/settings-server#customer-ca). This comes with your RADIUSaaS and offers long expiry of 20 years. Currently there is no way to create a new Customer-CA alongside the existing one. This means that the existing expiring Customer-CA will need to be deleted before a new one can be created. Creating a new Customer-CA will also generate a new root certificate that will need to be re-deployed to your clients. Please follow [this ](#deploying-the-new-server-certificate)article to deploy your new Customer-CA and reference it via your MDM's WiFi policy.&#x20;
2. Bring Your Own (BYO) certificate using your own PKI, e.g. [SCEPman-issued Server Certificate](https://docs.radiusaas.com/admin-portal/settings/settings-server#scepman-issued-server-certificate). SCEPman server certificates expire every two years, so be sure to set a reminder to prevent downtime. When using a BYO certificate, it's assumed that the **CA's root certificate** and the **FQDN (Subject and SAN)** will remain unchanged from the expiring certificate. Therefore, redeployment of the certificate is unnecessary.

## Creating a new certificate

### Built-in Customer-CA

This type of certificate is valid for 20 years and cannot be renewed before its expiry. It can, however, be deleted and a new one created by following [this ](https://docs.radiusaas.com/admin-portal/settings/settings-server#customer-ca)guide.

### BYO certificate

If you want to use your own certificate e.g.: a SCEPman-issued server certificate, then follow [this ](https://docs.radiusaas.com/admin-portal/settings/settings-server#bring-your-own-certificate)link to create a server certificate before the expiry in SCEPman or your preferred PKI. &#x20;

## Deploying the new server certificate

#### Intune profiles <a href="#intune-profiles" id="intune-profiles"></a>

If you are renewing the Customer-CA or a BYO CA with a different root and FQDN from the previous one then please follow the bellow steps to re-deploy this certificate to your clients, otherwise if you are using a BYO certificate with no change to the CA's root certificate and the FQDN (Subject and SAN), you can skip this step!

1. Deploy the new **server certificate/trusted root** to your clients as described [here](https://docs.radiusaas.com/profile-deployment/jamf-pro/server-trust) by creating a **new** profile.
2. Update your **existing** WiFi or wired profile(s)
   * If you have used the Intune wizard for the creation of your network profiles, edit all relevant profiles by **adding a second trusted server certificate**. Do not forget to add a second server name under **Certificate server names** in case the new certificate has a different domain.
   * If you have used a custom profile for the creation of your network profiles, re-download the XML generated by RADIUSaaS from [here](https://docs.radiusaas.com/admin-portal/settings/trusted-roots#xml), and replace it in your existing profile. Both server certificate thumbprints are automatically included in the XML.
3. Wait **until all your clients** have received the updated profile(s).

<figure><img src="https://1222554226-files.gitbook.io/~/files/v0/b/gitbook-x-prod.appspot.com/o/spaces%2FSWU1DQ4UGkqER7uGNUOm%2Fuploads%2FECU6EjwxgkZzSfGxcw1I%2Fimage.png?alt=media&amp;token=ee6d6189-ad58-4eb5-9729-ed2dbd005afb" alt=""><figcaption><p>Example: Updated Windows 10 WiFi profile with two trusted RADIUS server certificates and different domains.</p></figcaption></figure>

## WiFi & LAN infrastructure <a href="#wifi-and-lan-infrastructure" id="wifi-and-lan-infrastructure"></a>

If you're using [RadSec](https://docs.radiusaas.com/details#what-is-radsec), upload the new **server certificate** to your access points or network switch device.

## Activating the new server certificate

Finally, when you are ready to switch over to the new certificate, active it as described [here](/admin-portal/settings/settings-server#certificate-activation).


# 🆕 SCEPman SaaS

<code class="expression">space.vars.SCEPmanSAAS\_ProductName</code> is a fully managed, hosted and maintained SCEPman deployment. It is included with the RADIUSaaS & <code class="expression">space.vars.SCEPmanSAAS\_ProductName</code> Bundle, which provides both services under one subscription. Use it to issue certificates for certificate-based authentication with RADIUSaaS, without managing a SCEPman instance. This guide covers the initial configuration for an **Intune** deployment.

## Setup <code class="expression">space.vars.SCEPmanSAAS\_ProductName</code>

{% hint style="info" %}
If you are already using an existing SCEPman Enterprise deployment in your tenant with RADIUSaaS, make sure to have a look at our migration guide: [Migrate from SCEPman Enterprise](/configuration/scepman-saas/migrate-from-scepman-enterprise)
{% endhint %}

{% stepper %}
{% step %}

### Enroll the <code class="expression">space.vars.SCEPmanSAAS\_ProductName</code> CA

With an enabled <code class="expression">space.vars.SCEPmanSAAS\_ProductName</code> license, you will see that the menu section in **SCEPman** > **Settings** contains options to enroll and configure your SCEPman CA.

At the top you have the ability to choose the **Common Name** as well as the **Organization** name for your CA.

<figure><img src="https://1222554226-files.gitbook.io/~/files/v0/b/gitbook-x-prod.appspot.com/o/spaces%2FSWU1DQ4UGkqER7uGNUOm%2Fuploads%2FwLtBNxXY0TTNcjVHDs9E%2Fimage.png?alt=media&amp;token=ed4dc966-f7cd-493f-8bbb-5b6fc65ec76a" alt=""><figcaption></figcaption></figure>

{% hint style="info" %}
The Common Name and Organization will form the subject of the CA certificate during the enrollment.
{% endhint %}

By clicking **Enroll root CA**, the setup will start and the status is shown above. Once finished, the SCEPman section will contain additional pages.

{% tabs %}
{% tab title="Status" %}
The **Status** page shows the current state of the CA and its integrations as well as the endpoint URLs you need to request certificates.

<figure><img src="https://1222554226-files.gitbook.io/~/files/v0/b/gitbook-x-prod.appspot.com/o/spaces%2FSWU1DQ4UGkqER7uGNUOm%2Fuploads%2Fz7zU4TYIrpBAeXALIIXA%2Fimage.png?alt=media&amp;token=63df39b2-c37b-40bc-aa20-f5e620a9c4e2" alt=""><figcaption></figcaption></figure>
{% endtab %}

{% tab title="Manage Certificates" %}
Under **Manage Certificates** you can browse through issued certificates, check their validity, and also have the option to revoke them.

<figure><img src="https://1222554226-files.gitbook.io/~/files/v0/b/gitbook-x-prod.appspot.com/o/spaces%2FSWU1DQ4UGkqER7uGNUOm%2Fuploads%2FBkk06QcyZEXchYkkQLSF%2Fimage.png?alt=media&amp;token=34804be3-e355-4aff-93a1-a4ff1fdc4922" alt=""><figcaption></figcaption></figure>
{% endtab %}

{% tab title="Request Certificates" %}
Under **Request Certificates**, you can request different types of certificates for manual enrollment and installation or sign CSRs.

{% hint style="info" %}
Have a look at the dedicated [Certificate Master](https://docs.scepman.com/certificate-management/certificate-master) documentation for more information on the different types of certificates you can request here.
{% endhint %}

<figure><img src="https://1222554226-files.gitbook.io/~/files/v0/b/gitbook-x-prod.appspot.com/o/spaces%2FSWU1DQ4UGkqER7uGNUOm%2Fuploads%2FSOIKPnEVZ1znYQVuUU10%2Fimage.png?alt=media&amp;token=a7991a1c-6bcc-41bc-bfb8-f6616d14eccf" alt=""><figcaption></figcaption></figure>
{% endtab %}

{% tab title="Tasks" %}
The **Tasks** section shows the current status of the Certificate Master and links to sections permitted by your role.

<figure><img src="https://1222554226-files.gitbook.io/~/files/v0/b/gitbook-x-prod.appspot.com/o/spaces%2FSWU1DQ4UGkqER7uGNUOm%2Fuploads%2FWHcBCwuNy8waC7JqZSg5%2Fimage.png?alt=media&amp;token=e7ec2e18-f8f0-4a99-a0a7-a807e81f34c6" alt=""><figcaption></figcaption></figure>
{% endtab %}
{% endtabs %}

{% hint style="success" %}
SCEPman is now deployed and ready to issue certificates!
{% endhint %}
{% endstep %}

{% step %}

### Configure the default Certificate Profile

The default settings applied to certificates issued through all certificate endpoints. Each source under Certificate endpoints can override these two values with its own profile.

Revocation for every certificate this CA issues is configured here as well.

<details>

<summary>Default Certificate Profile Settings</summary>

**Default Extended Key Usage**

What the certificate may be used for. Server certificates need `ServerAuthentication`; device certificates for 802.1X need `ClientAuthentication`. This is only the fallback in case the request does not contain an EKU.

**Validity Period**

The maximum number of days that an issued certificate is valid. [Learn more](https://docs.scepman.com/scepman-configuration/application-settings/certificates#appconfig-validityperioddays).

**Certificate Revocation List (CRL)**

Publishes a signed list of revoked certificates for clients that don't support OCSP. The distribution point is embedded in every certificate issued from the moment you enable it. [Learn more](https://docs.scepman.com/certificate-management/manage-certificates/enabling-crl).

**OCSP Authorised Responder**

Answers revocation live over OCSP, signed by a dedicated responder certificate. Always enabled for SCEPman SaaS. [Learn more](https://docs.scepman.com/certificate-management/manage-certificates).

</details>

<figure><img src="https://1222554226-files.gitbook.io/~/files/v0/b/gitbook-x-prod.appspot.com/o/spaces%2FSWU1DQ4UGkqER7uGNUOm%2Fuploads%2FVGwADJNXvooW5zSU79LT%2Fimage.png?alt=media&amp;token=d8a39914-13ce-4fac-8d39-7ff00980a774" alt=""><figcaption></figcaption></figure>
{% endstep %}

{% step %}

### Enable Certificate Endpoints

Enable the certificate endpoints relevant to your tenant. Switching the endpoints on will reveal additional settings to configure. For more information on each endpoint, see [here](/admin-portal/scepman-saas/settings#certificate-endpoints).

{% hint style="warning" %}
Microsoft Intune and Static challenge + Entra device check endpoints require Step 4 to be done first.
{% endhint %}

<figure><img src="https://1222554226-files.gitbook.io/~/files/v0/b/gitbook-x-prod.appspot.com/o/spaces%2FSWU1DQ4UGkqER7uGNUOm%2Fuploads%2FACReWrV5aYvMycKbdqKC%2Fimage.png?alt=media&amp;token=0f07edb7-77a9-4513-ba96-2578cea8962a" alt=""><figcaption></figcaption></figure>
{% endstep %}

{% step %}

### Connect SCEPman to your Azure Tenant

{% hint style="info" %}
You will only need to connect SCEPman to your Azure tenant if you plan to deploy certificate through Intune or the Static-AAD endpoint.
{% endhint %}

In most scenarios you will want SCEPman to be able to issue certificates by using Intune SCEP profiles and also revoke certificates automatically if a device has been wiped for example.

For this to work as intended, SCEPman requires specific roles in your tenant. This can either happen by consenting to our multi-tenant enterprise application or by providing an app registration holding the required permissions yourself.

#### Confirm Tenant

{% hint style="info" %}
We recommend the Admin Consent / multi-tenant enterprise application approach to connect to your Azure tenant, since it does not require a client secret that must be monitored for expiration.
{% endhint %}

The first step of the **Admin Consent** flow is to enter your tenant ID and confirming it.

<figure><img src="https://1222554226-files.gitbook.io/~/files/v0/b/gitbook-x-prod.appspot.com/o/spaces%2FSWU1DQ4UGkqER7uGNUOm%2Fuploads%2FoCK6nCA5tiBakhiJhnTK%2Fimage.png?alt=media&amp;token=364a99a0-4b11-4eb2-ab72-7c8b3f096236" alt=""><figcaption></figcaption></figure>

Upon clicking **Confirm Tenant** you will be redirected to Microsoft's consent page for authentication and to approve this application initially:

<figure><img src="https://1222554226-files.gitbook.io/~/files/v0/b/gitbook-x-prod.appspot.com/o/spaces%2FSWU1DQ4UGkqER7uGNUOm%2Fuploads%2FXX2m3HlBt0xcU4HINfcp%2Fimage.png?alt=media&amp;token=47767ac7-4021-4747-b78b-580753709adb" alt=""><figcaption></figcaption></figure>

Accepting this consent will add the <code class="expression">space.vars.SCEPmanSAAS\_ProductName</code> enterprise application to your tenant but does not yet add the required permissions.

#### Consent Admin

<figure><img src="https://1222554226-files.gitbook.io/~/files/v0/b/gitbook-x-prod.appspot.com/o/spaces%2FSWU1DQ4UGkqER7uGNUOm%2Fuploads%2FIw0lq2QNJIPnrvXZkof0%2Fimage.png?alt=media&amp;token=a2a8c4f4-9ca5-4416-bae0-4523d1437f79" alt=""><figcaption></figcaption></figure>

After you confirm the tenant, select **Consent Admin**. Microsoft's consent page opens again. Confirm that the application can receive the listed permissions. Learn more in the Security & Privacy Q\&As.

<figure><img src="https://1222554226-files.gitbook.io/~/files/v0/b/gitbook-x-prod.appspot.com/o/spaces%2FSWU1DQ4UGkqER7uGNUOm%2Fuploads%2F6F2ZseSEQOU8YLvZYBuA%2Fimage.png?alt=media&amp;token=17e7374d-9607-4d2f-9c92-e6b14cbb3f39" alt=""><figcaption></figcaption></figure>

{% hint style="success" %}
SCEPman is now able to connect to your Azure tenant and retrieve information for certificate binding!
{% endhint %}
{% endstep %}

{% step %}

### Enable the Intune Endpoint

In most scenarios, certificates will be deployed by leveraging Intune SCEP certificate profiles to trigger devices to request certificates from SCEPman. To enable this endpoint, navigate to **SCEPman** > **Settings** and enable the **Intune Validation** setting and save the configuration:

<figure><img src="https://1222554226-files.gitbook.io/~/files/v0/b/gitbook-x-prod.appspot.com/o/spaces%2FSWU1DQ4UGkqER7uGNUOm%2Fuploads%2F2N4NTI27aAh6Y8cnVBU4%2Fimage.png?alt=media&amp;token=403f07af-3d0e-469c-8201-0d1114f6045f" alt=""><figcaption></figcaption></figure>

#### Compliance Check

As with SCEPman Enterprise, SCEPman can evaluate the validity of a certificate by checking the compliance state of a bound device. Please refer to the [SCEPman documentation](https://docs.scepman.com/scepman-configuration/application-settings/scep-endpoints/intune-validation#appconfig-intunevalidation-compliancecheck) for more information.

#### Device Directory

Selecting the device directory depends on the specific binding you choose in the SCEP profile:

* `{{DeviceId}}` will be looked up in **Intune**
* `{{AAD_DeviceID}}` will be looked up in **AAD** (Entra ID)
* `{{UserPrincipalName}}` (UPN) will be looked up in **AAD** (Entra ID)

Please refer to the [SCEPman documentation](https://docs.scepman.com/scepman-configuration/application-settings/scep-endpoints/intune-validation#appconfig-intunevalidation-devicedirectory) for more details on the device directories.

{% hint style="success" %}
The Intune validation is now enabled and its certificate endpoint is available!
{% endhint %}
{% endstep %}

{% step %}

### Deploy Certificates

With the Intune validation enabled, you will find that the SCEPman status page now shows an endpoint URL for the Intune MDM:

<figure><img src="https://1222554226-files.gitbook.io/~/files/v0/b/gitbook-x-prod.appspot.com/o/spaces%2FSWU1DQ4UGkqER7uGNUOm%2Fuploads%2Fx7awLC4VVaXsPPvx5zLb%2Fimage.png?alt=media&amp;token=88046637-d00e-4962-bb86-e4e79caa244d" alt=""><figcaption></figcaption></figure>

This URL will be used in the Intune SCEP certificate profile for the **SCEP Server URL**.

#### Root Certificate

Make sure to create a **Trusted Certificate** profile in Intune before continuing to the **SCEP certificate** profile and deploy the CA certificate of <code class="expression">space.vars.SCEPmanSAAS\_ProductName</code> to your clients.

[SCEPman documentation: Root Certificate](https://docs.scepman.com/certificate-management/microsoft-intune/windows-10#root-certificate)

<figure><img src="https://1222554226-files.gitbook.io/~/files/v0/b/gitbook-x-prod.appspot.com/o/spaces%2FSWU1DQ4UGkqER7uGNUOm%2Fuploads%2FAJGdaC7h6GTNWVhU1m3n%2Fimage.png?alt=media&amp;token=fc0c04a2-6c13-459f-8a0c-212889eb460b" alt=""><figcaption></figcaption></figure>

#### SCEP Certificate

The process of creating the SCEP certificate profile is identical to SCEPman Enterprise.

[SCEPman documentation: SCEP - Intune - Windows](https://docs.scepman.com/certificate-management/microsoft-intune/windows-10)

<figure><img src="https://1222554226-files.gitbook.io/~/files/v0/b/gitbook-x-prod.appspot.com/o/spaces%2FSWU1DQ4UGkqER7uGNUOm%2Fuploads%2FK0Mj6thqRO714qXEBZ1o%2Fimage.png?alt=media&amp;token=28eaf12d-7a0f-4f38-885c-09606b09563d" alt=""><figcaption></figcaption></figure>

{% hint style="success" %}
Your clients should now receive certificates issued by SCEPman!
{% endhint %}
{% endstep %}
{% endstepper %}

## Establish Trust

To allow devices to authenticate using certificates from your <code class="expression">space.vars.SCEPmanSAAS\_ProductName</code> CA and enabling your access points to establish RadSec connections to your RADIUSaaS instance, you will need to trust its CA certificate. To do this, first download your CA certificate from the **SCEPman** > **Status** page.

<figure><img src="https://1222554226-files.gitbook.io/~/files/v0/b/gitbook-x-prod.appspot.com/o/spaces%2FSWU1DQ4UGkqER7uGNUOm%2Fuploads%2FxlMuZhVhgRPluw3vecSM%2Fimage.png?alt=media&amp;token=6f0dfc1c-9d85-4384-8aeb-6e5feb9142e4" alt=""><figcaption></figcaption></figure>

Having the CA certificate in place, navigate to **Settings** > **Trusted Certificates** and add a new certificate.

<figure><img src="https://1222554226-files.gitbook.io/~/files/v0/b/gitbook-x-prod.appspot.com/o/spaces%2FSWU1DQ4UGkqER7uGNUOm%2Fuploads%2F2ElSWHAYkImEEVqEvErJ%2Fimage.png?alt=media&amp;token=55d0627d-8286-4bbe-8a66-918539317414" alt=""><figcaption></figcaption></figure>

Upload your downloaded certificate file and save:

<figure><img src="https://1222554226-files.gitbook.io/~/files/v0/b/gitbook-x-prod.appspot.com/o/spaces%2FSWU1DQ4UGkqER7uGNUOm%2Fuploads%2FsKd9KvH9AFQAtipsDJFI%2Fimage.png?alt=media&amp;token=a1ffb361-7645-498d-96a3-003131acc2fe" alt=""><figcaption></figcaption></figure>

{% hint style="success" %}
RADIUSaaS will now accept accept incoming connections that use certificates issued by SCEPman!
{% endhint %}

## Enable Management of the RADIUSaaS Server Certificate

After you have enrolled <code class="expression">space.vars.SCEPmanSAAS\_ProductName</code>, you will notice that the SCEPman Connection section under **Connectivity** > **SCEPman** allows you to pregenerate a certificate and setup a connection.

<figure><img src="https://1222554226-files.gitbook.io/~/files/v0/b/gitbook-x-prod.appspot.com/o/spaces%2FSWU1DQ4UGkqER7uGNUOm%2Fuploads%2FKeox1Rj9S8E15av4dcVU%2Fimage.png?alt=media&amp;token=01ad0871-6e97-4a50-ae70-75ebeb548204" alt=""><figcaption></figcaption></figure>

A connection to your SCEPman instance has already been established at this point and RADIUSaaS can request server certificates. The correct way of going further now depends on if you already use RADIUSaaS to authenticate clients at this point or if this is a fresh setup.

#### Pregenerate Certificate

RADIUSaaS will request a server certificate and add it to the list of certificates but **will not activate it or enable the automatic management.**

In case you currently have clients authenticating to RADIUSaaS, this allows you to verify that your Wifi profile has the correct names for server validation as well as the correct root certificate for server validation.

<figure><img src="https://1222554226-files.gitbook.io/~/files/v0/b/gitbook-x-prod.appspot.com/o/spaces%2FSWU1DQ4UGkqER7uGNUOm%2Fuploads%2Fjp9KpyVKoacpGi9IKgCS%2Fimage.png?alt=media&amp;token=e1f3ae26-89fd-4677-b268-1fd9bc4beea7" alt=""><figcaption></figcaption></figure>

#### Setup Connection

If this is a fresh setup or after you have verified that your clients use the correct information for validating the server certificate, you can enable the automatic management of the server certificate by clicking **Setup Connection**.

<figure><img src="https://1222554226-files.gitbook.io/~/files/v0/b/gitbook-x-prod.appspot.com/o/spaces%2FSWU1DQ4UGkqER7uGNUOm%2Fuploads%2FVaIvrtFWIqBOL71JyMiX%2Fimage.png?alt=media&amp;token=7be60572-74ef-45a0-a0c1-701d423910e3" alt=""><figcaption></figcaption></figure>

{% hint style="success" %}
RADIUSaaS will now request a server certificate from SCEPman, activate it, and renew it in time before it expires!
{% endhint %}

## Other Certificate Endpoints

Setting up other certificate endpoints is similar to the way they are set up with SCEPman Enterprise. Make sure to take a look at the relevant documentation:

#### Jamf

{% embed url="<https://docs.scepman.com/certificate-management/jamf/general>" %}

#### REST Enrollment API

{% hint style="info" %}
The SCEPman SaaS variant of the REST Enrollment API uses RADIUSaaS access tokens instead of Entra access tokens.
{% endhint %}

{% embed url="<https://docs.scepman.com/certificate-management/api-certificates>" %}

#### Active Directory Validation

{% embed url="<https://docs.scepman.com/certificate-management/active-directory>" %}

#### Static Validation

{% embed url="<https://docs.scepman.com/scepman-configuration/application-settings/scep-endpoints/static-validation>" %}

#### Static-AAD Validation

{% embed url="<https://docs.scepman.com/scepman-configuration/application-settings/scep-endpoints/staticaad-validation>" %}

#### DC

{% embed url="<https://docs.scepman.com/scepman-configuration/application-settings/scep-endpoints/dc-validation>" %}

## Logs

You can find all application logs that you would expect in SCEPman Enterprise in the **Logs** section. These include:

* Service Health Messages
* Issued Certificates
* OCSP Responses
* Warnings and Errors during Validation and Issuance

<figure><img src="https://1222554226-files.gitbook.io/~/files/v0/b/gitbook-x-prod.appspot.com/o/spaces%2FSWU1DQ4UGkqER7uGNUOm%2Fuploads%2FUHIrulw7a8cNMoWAx43i%2Fimage.png?alt=media&amp;token=85d53b3b-f3be-4442-9c2c-9d1b42783410" alt=""><figcaption></figcaption></figure>


# Migrate from SCEPman Enterprise

If you are currently using SCEPman Enterprise in your own tenant and want to further reduce your infrastructure footprint you might want to consider moving to <code class="expression">space.vars.SCEPmanSAAS\_ProductName</code>, a fully integrated CA solution built into RADIUSaaS.

### What will change?

<table data-full-width="false"><thead><tr><th>What</th><th>Changes</th><th>Stays the same</th></tr></thead><tbody><tr><td><strong>SCEPman hosting</strong></td><td>Managed by us, no longer in your Azure tenant.</td><td></td></tr><tr><td><strong>SCEPman URL</strong></td><td>New endpoint URLs.</td><td></td></tr><tr><td><strong>RADIUS server certificate</strong></td><td>If you currently use the <a href="/admin-portal/settings/settings-server#scepman-issued-server-certificate">SCEPman connection</a> or a <a href="/admin-portal/settings/settings-server#scepman-issued-server-certificate">SCEPman-issued server certificate</a> a new server certificate will be created.</td><td>No changes if you use the <a href="/admin-portal/settings/settings-server#customer-ca">Customer CA</a>.</td></tr><tr><td><strong>Certificate functionality</strong></td><td></td><td>Certificates work the same way as before.</td></tr><tr><td><strong>MDM integration</strong></td><td>SCEP certificate profile(s) need to point to new URL and reference a new Root CA certificate.</td><td>Overall integration approach remains the same.</td></tr><tr><td><strong>End-user experience</strong></td><td></td><td>No impact, transparent to end-users.</td></tr><tr><td><strong>Existing certificates</strong></td><td>See migration impact section below.</td><td>Valid certificates continue to work.</td></tr></tbody></table>

### Pre-Migration Considerations

* **Features**: Some features of SCEPman Enterprise are not available in <code class="expression">space.vars.SCEPmanSAAS\_ProductName</code>. Please have a look in our [SCEPman Edition Comparison](/overview#scepman-edition-comparison) to ensure, that you have all your use-cases covered, before you start the migration.&#x20;
* **MDM SCEP profiles**: You'll need to update your SCEP profiles to point to the new <code class="expression">space.vars.SCEPmanSAAS\_ProductName</code> URL and reference the new Root CA. Plan for how you want to roll this out (all at once vs. phased).
* **Network Environment**: If you are using RadSec, migrating to <code class="expression">space.vars.SCEPmanSAAS\_ProductName</code> can mean that the server certificate used for the connection might change.
* **DNS or firewall rules**: If you have any network rules tied to your current SCEPman endpoint, these will need to be updated.

## Migration Path

{% stepper %}
{% step %}

### Setup <code class="expression">space.vars.SCEPmanSAAS\_ProductName</code>

Follow our dedicated guide on how to enroll:

{% content-ref url="/pages/tywmYoXQzMpzctQVCWnb" %}
[🆕 SCEPman SaaS](/configuration/scepman-saas)
{% endcontent-ref %}

You should be in the following situation after this step:

* <code class="expression">space.vars.SCEPmanSAAS\_ProductName</code> is enrolled and your devices have received suitable certificates for client authentication to be used with RADIUSaaS (besides the ones issued by your current SCEPman Enterprise deployment).
* <code class="expression">space.vars.SCEPmanSAAS\_ProductName</code>' CA certificate is trusted by your devices and added to the RADIUSaaS trust store.
  {% endstep %}

{% step %}

### Verify Client Configuration

Clients already using RADIUSaaS will require the following adjustments if you want to migrate to <code class="expression">space.vars.SCEPmanSAAS\_ProductName</code> :

* Ensure they are trusting the <code class="expression">space.vars.SCEPmanSAAS\_ProductName</code> Root CA certificate
* Adjust the WiFi profile to include (additive to the current SCEPman Enterprise root) the <code class="expression">space.vars.SCEPmanSAAS\_ProductName</code> CA certificate for server validation

{% hint style="danger" %}
**Caution if you have an existing** [**SCEPman Connection**](https://docs.radiusaas.com/admin-portal/settings/settings-server#scepman-connection)

If you have already setup the SCEPman connection for automatic server certificate management, <code class="expression">space.vars.SCEPmanSAAS\_ProductName</code> will take over the connection after the enrollment. This means the server certificate will be from a different issuer **after the next certificate rotation**.

Ensure that your clients have the <code class="expression">space.vars.SCEPmanSAAS\_ProductName</code> CA certificate installed and trust the new CA for server validation in the WiFi profile.
{% endhint %}
{% endstep %}

{% step %}

### Verify Authenticator Configuration

If you are using RadSec, your RADIUS authenticators (access points, switches, and VPN gateways) will also have to trust the new Root CA certificate to establish a connection to RADIUSaaS.

Ensure that the <code class="expression">space.vars.SCEPmanSAAS\_ProductName</code> Root CA has been added here to prevent impact during the cutover of the server certificate.

{% hint style="danger" %}
**Please check if your network equipment handles multiple CAs**

If your authenticators are not able to trust multiple CAs for the RadSec server validation, changing the server certificate to one issued by <code class="expression">space.vars.SCEPmanSAAS\_ProductName</code> will need to happen at the same time as changing the CA trusted for the RadSec authentication as connections will be failing otherwise.
{% endhint %}
{% endstep %}

{% step %}

### Check for Rules matching Issuer(s)

If you are using rules to filter for specific certificate authorities, client authentications might be rejected when using certificates from <code class="expression">space.vars.SCEPmanSAAS\_ProductName</code> if the **Any authentication allowed** rule is disabled.

Add new rules for the added CA certificate or make sure to modify existing rules to include it:

<figure><img src="https://1222554226-files.gitbook.io/~/files/v0/b/gitbook-x-prod.appspot.com/o/spaces%2FSWU1DQ4UGkqER7uGNUOm%2Fuploads%2FwYmNxxwMXs6pxEh656NZ%2Fimage.png?alt=media&amp;token=dbff993d-c6e9-48fd-a8d5-8d42db2f3afa" alt=""><figcaption></figcaption></figure>
{% endstep %}
{% endstepper %}

## Frequently Asked Questions

### Can I run SCEPman Enterprise and <code class="expression">space.vars.SCEPmanSAAS\_ProductName</code> in parallel during the migration phase?

Yes. As long as you have trusted both Root CA certificates for client connection in RADIUSaaS, client certificates from both certification authorities can be used for authentication.

### Can I use my existing SCEPman Enterprise Root Certificate for <code class="expression">space.vars.SCEPmanSAAS\_ProductName</code>?

While technically possible through [Bring your own Key Vault](broken://pages/7X1Zb4WB9Xmw7gDVwJNo#scepman-identity-and-keys), reusing your existing Root CA certificate is not recommended for the following reasons:

* Already issued certificates are only stored in the tenant of the existing SCEPman Enterprise deployment while newly created certificates will be stored within <code class="expression">space.vars.SCEPmanSAAS\_ProductName</code>. This can lead to failing validations if components are not able to figure out which CA should be considered for validation

* Depending on the deployment location of your Key Vault and your RADIUSaaS instance, added latency is expected during cryptographic operations that require the Root CA certificate

### When can I decommission my old SCEPman instance?

Once all certificate use cases of the SCEPman Enterprise instance have been migrated to <code class="expression">space.vars.SCEPmanSAAS\_ProductName</code>, you can safely stop the app service. These use cases include but are not limited to:

* Client Certificates
* Server Certificates
* DC Certificates
* Certificates for TLS inspection
* Code Signing Certificates
* S/MIME Certificates

Make sure to monitor the Log Analytics Workspace long enough to verify that no certificate validation or issuance is happening anymore.

{% embed url="<https://docs.scepman.com/azure-configuration/log-configuration>" %}


# Dashboard

## Login Screen

You are presented with the login screen when you open your RADIUSaaS Admin Portal for the first time or when your access token has expired. The login screen provides an easily accessible option to download the CA certificate that has signed your [RADIUS Server Certificate](/admin-portal/settings/settings-server#server-certificates). This feature is particularly useful for bring-your-own-device (BYOD) setups and administrators who need to create network profiles on their devices.

<figure><img src="https://1222554226-files.gitbook.io/~/files/v0/b/gitbook-x-prod.appspot.com/o/spaces%2FSWU1DQ4UGkqER7uGNUOm%2Fuploads%2FDspVnSiL7aDrDRnLgNtb%2Fimage.png?alt=media&amp;token=91c73d9b-1cf9-4945-ac46-3f8f7a0132b1" alt=""><figcaption></figcaption></figure>

## Service State

The RADIUSaaS homepage presents you with an interactive service state that is **updated in** **real-time**.

### Infrastructure

When you access the homepage of your RADIUSaaS instance, the Infrastructure tab displays the RADIUSaaS instance's key components, including the RadSec Server and RADIUS proxies. The availability of the individual components is monitored in **real-time** and realized through **actual authentications** (PAP-based) that are periodically performed.  By hovering over individual nodes, additional information such as the public IP address and the data center location is shown.

<figure><img src="https://1222554226-files.gitbook.io/~/files/v0/b/gitbook-x-prod.appspot.com/o/spaces%2FSWU1DQ4UGkqER7uGNUOm%2Fuploads%2FccrEpMedE2Yt6zNsAJcG%2Fimage.png?alt=media&amp;token=11a1b836-30b2-4fda-b01a-43a66dac8a75" alt=""><figcaption></figcaption></figure>

In case, a node is detected to be malfunctioning, the corresponding node along with the unavailable authentication and communication path is highlighted in red:

<figure><img src="https://1222554226-files.gitbook.io/~/files/v0/b/gitbook-x-prod.appspot.com/o/spaces%2FSWU1DQ4UGkqER7uGNUOm%2Fuploads%2FenpMRBW4Gb9BCkhKkDV5%2FProxyDown.gif?alt=media&amp;token=e437f898-3972-401f-a1f7-2498ac44cd8b" alt=""><figcaption></figcaption></figure>

**Important:** As long as there is at least one green path leading to **Authentications**, the service is generally available. In case you are using RADIUS proxies, ensure that you have followed our architectural [recommendations](/admin-portal/settings/settings-proxy) to decrease the likelihood that a proxy failure leads to an overall outage of the service.&#x20;

The **Service State** icon in addition to a healthy (green) state can indicate one of three error conditions.&#x20;

| Disabled                                                                                                                                                                                                                                                  | Removed                                                                                                                                                                                                                                                   | Expired / Not Yet Valid                                                                                                                                                                                                                                   |
| --------------------------------------------------------------------------------------------------------------------------------------------------------------------------------------------------------------------------------------------------------- | --------------------------------------------------------------------------------------------------------------------------------------------------------------------------------------------------------------------------------------------------------- | --------------------------------------------------------------------------------------------------------------------------------------------------------------------------------------------------------------------------------------------------------- |
| <img src="https://1222554226-files.gitbook.io/~/files/v0/b/gitbook-x-prod.appspot.com/o/spaces%2FSWU1DQ4UGkqER7uGNUOm%2Fuploads%2FdklyTUAdXDrSItCCtzd8%2Fimage.png?alt=media&amp;token=511cbc44-fc9d-4fc3-90b6-fea63aa76c62" alt="" data-size="original"> | <img src="https://1222554226-files.gitbook.io/~/files/v0/b/gitbook-x-prod.appspot.com/o/spaces%2FSWU1DQ4UGkqER7uGNUOm%2Fuploads%2FkMoLyv8qAu7yo9q1PQ81%2Fimage.png?alt=media&amp;token=b77bbe68-e104-4656-b305-412b392bf174" alt="" data-size="original"> | <img src="https://1222554226-files.gitbook.io/~/files/v0/b/gitbook-x-prod.appspot.com/o/spaces%2FSWU1DQ4UGkqER7uGNUOm%2Fuploads%2F6UOiQollMWFzMje17Tro%2Fimage.png?alt=media&amp;token=76388850-ef0e-4bec-b6e1-f55d9a71b4b9" alt="" data-size="original"> |

### Health

The Health tab displays the health status of all components relevant to your RADIUSaaS instance, including certificates and the optional SCEPman-aaS module.

<figure><img src="https://1222554226-files.gitbook.io/~/files/v0/b/gitbook-x-prod.appspot.com/o/spaces%2FSWU1DQ4UGkqER7uGNUOm%2Fuploads%2FW16ADiFDMuq3hTQLneJZ%2Fimage.png?alt=media&amp;token=31b9ff39-6913-42ad-9c3f-2b3210d21087" alt=""><figcaption></figcaption></figure>

## Other controls

The RADIUSaaS homepage gives you easy access to frequently used controls and information.

<figure><img src="https://1222554226-files.gitbook.io/~/files/v0/b/gitbook-x-prod.appspot.com/o/spaces%2FSWU1DQ4UGkqER7uGNUOm%2Fuploads%2FTU383Bd3zfpCXYefdqmK%2Fimage.png?alt=media&amp;token=1705f7bb-8ac2-49a6-8e29-092300f9abd7" alt=""><figcaption></figcaption></figure>

### Notifications

You can find notifications (alerts, configuration improvement notifications, important announcements) regarding your service in here.

<figure><img src="https://1222554226-files.gitbook.io/~/files/v0/b/gitbook-x-prod.appspot.com/o/spaces%2FSWU1DQ4UGkqER7uGNUOm%2Fuploads%2F43kRTTGLboCOkFGlRSWW%2Fimage.png?alt=media&amp;token=17c0d52c-2737-4474-8b44-0effeae8325a" alt=""><figcaption></figcaption></figure>

### Help

Click on the life saver button to lodge a support request.

<figure><img src="https://1222554226-files.gitbook.io/~/files/v0/b/gitbook-x-prod.appspot.com/o/spaces%2FSWU1DQ4UGkqER7uGNUOm%2Fuploads%2Fk2zXimD3chnJkLVWdpri%2Fimage.png?alt=media&amp;token=0db7f60d-7da2-4ec7-a1a2-34cf836a563d" alt=""><figcaption></figcaption></figure>

<figure><img src="https://1222554226-files.gitbook.io/~/files/v0/b/gitbook-x-prod.appspot.com/o/spaces%2FSWU1DQ4UGkqER7uGNUOm%2Fuploads%2FLAUpsW04MYnRayG2qHzI%2Fimage.png?alt=media&amp;token=3d5c25d5-9798-4545-b659-f54a21afa475" alt=""><figcaption></figcaption></figure>

### Dark Mode

Click on the User Account button, followed by "Switch to dark/light theme" to toggle between dark and light mode.

<figure><img src="https://1222554226-files.gitbook.io/~/files/v0/b/gitbook-x-prod.appspot.com/o/spaces%2FSWU1DQ4UGkqER7uGNUOm%2Fuploads%2FHs2uXdUZJIopcuDSU3c3%2FLightDark.gif?alt=media&amp;token=1a968a87-d8f4-4feb-9445-1318d74a1917" alt=""><figcaption></figcaption></figure>

### Language

The RADIUSaaS Portal is available in German, English, Spanish, French, Japanese and Portuguese.

<figure><img src="https://1222554226-files.gitbook.io/~/files/v0/b/gitbook-x-prod.appspot.com/o/spaces%2FSWU1DQ4UGkqER7uGNUOm%2Fuploads%2FnYTdH9xrWd0BhXAm90Ou%2FLanguage.gif?alt=media&amp;token=4d37753b-3f2a-47a9-a9e2-4b6b51519f30" alt=""><figcaption></figcaption></figure>

### Service Documentation

A direct link to the RADIUSaaS documentation.

<figure><img src="https://1222554226-files.gitbook.io/~/files/v0/b/gitbook-x-prod.appspot.com/o/spaces%2FSWU1DQ4UGkqER7uGNUOm%2Fuploads%2FGjLTQmpTLwqgUOQ3jAKr%2Fimage.png?alt=media&amp;token=3d31722b-3445-4ab0-9747-9256f3cc4b9f" alt=""><figcaption></figcaption></figure>

### API Documentation

A direct link the RADIUSaaS REST API Swagger documentation.

<figure><img src="https://1222554226-files.gitbook.io/~/files/v0/b/gitbook-x-prod.appspot.com/o/spaces%2FSWU1DQ4UGkqER7uGNUOm%2Fuploads%2FFb2LydMdop12z29jPFII%2Fimage.png?alt=media&amp;token=97c8ad75-ae01-4e05-b3a0-4be0ce294fd8" alt=""><figcaption></figcaption></figure>

{% content-ref url="/pages/mXZUFCBt7eW9P2U71bTS" %}
[REST API](/other/rest-api)
{% endcontent-ref %}


# Insights

Under the insights group Dashboards and Log views can be found

### Dashboards

In your Overview you have a short overview about the status for the logged in users over the day.&#x20;

![](https://content.gitbook.com/content/SWU1DQ4UGkqER7uGNUOm/blobs/eHfAMTO6MpuLz3x2SSFI/test.png)

### Authentications

Under Authentications you have tables to get an overview on how many times someone has been logged in and an overview about why authentications are failing.&#x20;

![](https://content.gitbook.com/content/SWU1DQ4UGkqER7uGNUOm/blobs/9XD2QHcQPs6yvnu0p9NF/image.png)

### Creating Custom Visualisation

The clip below shows how you can modify or replace a widget to better suit your needs. For example, the current IPs widget can only display 30 IPs, whereas your environment requires 100.

{% hint style="info" %}
Please note that the default dashboards (Overview, Authentications, Rule Engine, and Logs) will be reset due to instance maintenance. Therefore, we recommend creating an additional dashboard for your purposes.
{% endhint %}

<figure><img src="https://1222554226-files.gitbook.io/~/files/v0/b/gitbook-x-prod.appspot.com/o/spaces%2FSWU1DQ4UGkqER7uGNUOm%2Fuploads%2Fc7Q34CZiO2maO4qsd0DR%2F2025-10-30_12h13_18.gif?alt=media&amp;token=57cb7e2e-0473-4ccd-9d4c-7bd746df5515" alt=""><figcaption></figcaption></figure>


# Rule Engine

The rule engine log-interface was made to get easy access to what decisions were made by your Rule Engine with an interactive graph.&#x20;

## Filter the graph for a certain period

![](https://content.gitbook.com/content/SWU1DQ4UGkqER7uGNUOm/blobs/eZPY2DY1LBKklt5MAdSO/rule-engine-timeFilter.gif)

## Filter by Rules

![](https://content.gitbook.com/content/SWU1DQ4UGkqER7uGNUOm/blobs/ccqQMnJDB558VtezmcFG/rule-engine-ruleFilter.gif)

## Filter for everything you can see in the table

![](https://content.gitbook.com/content/SWU1DQ4UGkqER7uGNUOm/blobs/oRs878w0iplUOSUtcycL/rule-engine-anyFilter.gif)


# Logs

You can access basically every log that the platform generates. Naturally, this means that you may not be able to understand everything which you can read. You don't have to. If you have any questions, [drop a message](https://www.radius-as-a-service.com/drop-a-question) and we're happy to answer them.

<figure><img src="https://1222554226-files.gitbook.io/~/files/v0/b/gitbook-x-prod.appspot.com/o/spaces%2FSWU1DQ4UGkqER7uGNUOm%2Fuploads%2F8BlwjA6zWdQ6cnvQvZGP%2F2024-05-13_12h16_21.gif?alt=media&amp;token=c0280a28-f50b-44a1-accb-7ed5b930afea" alt=""><figcaption></figcaption></figure>

## Log types

Log types **not** mentioned in below table are less relevant for common trouble shooting scenarios.

| Log Type | Summary                                                                                                                                                                                                                                                                                                                                                                                                                                                                                                                                                                                                                                                                                                                                                                                                                 | Useful for ...                                                                                                                                                                                                                                                                                                                                                                                                                                                                                                                                              |
| -------- | ----------------------------------------------------------------------------------------------------------------------------------------------------------------------------------------------------------------------------------------------------------------------------------------------------------------------------------------------------------------------------------------------------------------------------------------------------------------------------------------------------------------------------------------------------------------------------------------------------------------------------------------------------------------------------------------------------------------------------------------------------------------------------------------------------------------------- | ----------------------------------------------------------------------------------------------------------------------------------------------------------------------------------------------------------------------------------------------------------------------------------------------------------------------------------------------------------------------------------------------------------------------------------------------------------------------------------------------------------------------------------------------------------- |
| `engine` | <p>Aggregated and correlated logs that provide key information on every authentication, e.g.</p><ul><li>Timestamp</li><li>Authentication duration</li><li>Identity of the supplicant</li><li>Credentials used (username/password, certificate)</li><li>Client authentication certificate used incl. verification type (<code>ocsp</code> or <code>crl</code>) and verification result (<code>valid</code> or <code>revoked</code>)</li><li>Authentication decision (<code>Accept</code> or <code>Reject</code>)</li><li>Error message (Rejects only)</li><li>Applied rule</li><li>MAC addresses (authenticator / supplicant)</li><li>Network type (<code>WiFi</code>, <code>LAN</code>, <code>VPN</code>)</li><li>SSID (for WiFi only)</li><li>AAA protocol used (<code>radius</code> or <code>radsec</code>)</li></ul> | <p>Most troubleshooting scenarios, e.g. debugging</p><ul><li><a href="/other/troubleshooting#unknown-ca">Trust issues</a></li><li><a href="/other/troubleshooting#fatal-decrypt-or-access-denied">Supplicant issues</a></li><li>Rule engine issues</li></ul>                                                                                                                                                                                                                                                                                                |
| `proxy`  | Generated by the [RADIUS Proxies](/admin-portal/settings/settings-proxy) (in case at least one is configured)                                                                                                                                                                                                                                                                                                                                                                                                                                                                                                                                                                                                                                                                                                           | <ul><li>Determination of the <a href="/other/faqs/general#how-can-i-identify-the-public-ip-address-pip-of-the-site-from-which-an-authentication-originates"><strong>public IP address of</strong> the authenticating <strong>sites</strong></a> (not applicable if RadSec is used)</li><li>Identifying <a href="/other/troubleshooting#wrong-shared-radius-secret"><strong>wrongly configured RADIUS shared secrets</strong></a></li></ul>                                                                                                                  |
| `detail` | Comprehensive (raw) logs generated by the RadSec server(s). They include most EAP messages exchanged between supplicant and RADIUSaaS during authentication ("inner tunnel" messages).                                                                                                                                                                                                                                                                                                                                                                                                                                                                                                                                                                                                                                  | <ul><li>Debugging of issues that go beyond what can be debugged with the engine logs, e.g. checking if <strong>authentications</strong> are <strong>incomplete</strong> (Acess-Reject or Access-Accept missing for a particular authentication)</li><li><p>Troubleshooting issues with the <strong>RadSec connection</strong> - if used by your infrastructure</p><ul><li>Accessing the <strong>entire error message stack</strong> (found in Access-Reject messages) in case the error message parsed in the engine logs is ambiguous.</li></ul></li></ul> |
| `radsec` | Comprehensive (raw) logs generated by the RadSec server(s) related to the RadSec connection.                                                                                                                                                                                                                                                                                                                                                                                                                                                                                                                                                                                                                                                                                                                            | <ul><li>Troubleshooting RadSec connections issues, e.g. trust issues.</li><li>Identifying certificates presented by the authenticators when establishing RadSec connections.</li></ul>                                                                                                                                                                                                                                                                                                                                                                      |


# SCEPman SaaS


# Status

{% hint style="info" %}
To use <code class="expression">space.vars.SCEPmanSAAS\_ProductName</code>, please ensure to configure it first under **Settings** > [**SCEPman**](broken://pages/7X1Zb4WB9Xmw7gDVwJNo).
{% endhint %}

The **SCEPman** menu hive gives you access to your SCEPman SaaS instance built right into RADIUSaaS (requires a separate license).

The submenus allow you to perform manual certificate tasks leveraging the Certificate Master component. More information on how to **Manage Certificates**, **Request Certificates**, and **Tasks**, can be found in the corresponding SCEPman documentation:

{% embed url="<https://docs.scepman.com/certificate-management/certificate-master>" %}

## Status

The status page of your <code class="expression">space.vars.SCEPmanSAAS\_ProductName</code> instance provides you with the most relevant information that you require when configuring the service for your environment. It allows you to

* review the connectivity status to dependencies, such as the Key Vault, Graph API (Intune), or Jamf Pro,
* download the public portion of the CA certificate, or
* access the SCEP enrolment endpoint(s) that are required for configuration in your MDM system(s).

<figure><img src="https://1222554226-files.gitbook.io/~/files/v0/b/gitbook-x-prod.appspot.com/o/spaces%2FSWU1DQ4UGkqER7uGNUOm%2Fuploads%2FGBIiXP3W44fbhTmrxL4K%2Fimage.png?alt=media&amp;token=4953f960-8539-4543-a10e-91d99c3a1a7c" alt=""><figcaption></figcaption></figure>


# Manage Certificates

For more information about certificate management in SCEPman Certificate Master, please refer to the SCEPman [Manage Certificates](https://docs.scepman.com/certificate-management/certificate-master/manage-certificates) documentation.

<figure><img src="https://1222554226-files.gitbook.io/~/files/v0/b/gitbook-x-prod.appspot.com/o/spaces%2FSWU1DQ4UGkqER7uGNUOm%2Fuploads%2FK8gJKIIPb8uNu4dlo3O9%2Fimage.png?alt=media&amp;token=9e48b786-50d1-4577-936d-9424193b78e7" alt=""><figcaption></figcaption></figure>


# Request Certificates

On this page, you can request and download certificates directly from SCEPman, either by submitting your own CSR or by using one of the predefined certificate types (server, TLS inspection, code signing, device, user). For more details, please refer to [Certificate Master](https://docs.scepman.com/certificate-management/certificate-master)

<figure><img src="https://1222554226-files.gitbook.io/~/files/v0/b/gitbook-x-prod.appspot.com/o/spaces%2FSWU1DQ4UGkqER7uGNUOm%2Fuploads%2Fa7cgkdvzezRaST9rZwur%2Fimage.png?alt=media&amp;token=4ef490aa-6b32-42de-a41f-02d49b71e1be" alt=""><figcaption></figcaption></figure>


# Tasks

This is a central starting point for manual certificate operations in SCEPman Certificate Master. From here, you can browse issued certificates via Jamf and Intune, as well as revoked certificates, and download or revoke individual ones. You can also jump directly to a certificate request type: Generic CSR, (Web) Server, TLS Inspection, Code Signing, Device, or User.

<figure><img src="https://1222554226-files.gitbook.io/~/files/v0/b/gitbook-x-prod.appspot.com/o/spaces%2FSWU1DQ4UGkqER7uGNUOm%2Fuploads%2FqfmogZOCxGNOI0gG0zX4%2Fimage.png?alt=media&amp;token=db2a4de5-1b30-4aaa-bec7-f2e80601a370" alt=""><figcaption></figcaption></figure>


# Settings

The entries below provide a brief overview of the settings available for SCEPman SaaS. They are intentionally kept concise. For full details, refer to the corresponding sections of the [SCEPman documentation](https://docs.scepman.com/)

<figure><img src="https://1222554226-files.gitbook.io/~/files/v0/b/gitbook-x-prod.appspot.com/o/spaces%2FSWU1DQ4UGkqER7uGNUOm%2Fuploads%2FUg2LmMPvJLOwEkp3TFKa%2Fimage.png?alt=media&amp;token=341c6aec-3d17-49cf-b6f5-0f89af9fae54" alt=""><figcaption></figcaption></figure>

### Certificate Authority

The root certificate for your tenant. Every certificate SCEPman issues chains up to it. It is created once and its subject name cannot be changed afterwards.

The root CA itself is valid for 7300 days (20 years).

<figure><img src="https://1222554226-files.gitbook.io/~/files/v0/b/gitbook-x-prod.appspot.com/o/spaces%2FSWU1DQ4UGkqER7uGNUOm%2Fuploads%2Fi7yCSCvVOoqRHLG1lLsZ%2Fimage.png?alt=media&amp;token=f3f26ee9-e293-48ba-b262-7c0fd303ca68" alt=""><figcaption></figcaption></figure>

### Default Certificate Profile

The default settings applied to certificates issued through all certificate endpoints. Each source under Certificate endpoints can override these two values with its own profile.

Revocation for every certificate this CA issues is configured here as well.

<details>

<summary>Default Certificate Profile Settings</summary>

**Default Extended Key Usage**

What the certificate may be used for. Server certificates need `ServerAuthentication`; device certificates for 802.1X need `ClientAuthentication`. This is only the fallback in case the request does not contain an EKU.

**Validity Period**

The maximum number of days that an issued certificate is valid. [Learn more](https://docs.scepman.com/scepman-configuration/application-settings/certificates#appconfig-validityperioddays).

**Certificate Revocation List (CRL)**

Publishes a signed list of revoked certificates for clients that don't support OCSP. The distribution point is embedded in every certificate issued from the moment you enable it. [Learn more](https://docs.scepman.com/certificate-management/manage-certificates/enabling-crl).

**OCSP Authorised Responder**

Answers revocation live over OCSP, signed by a dedicated responder certificate. Always enabled for SCEPman SaaS. [Learn more](https://docs.scepman.com/certificate-management/manage-certificates).

</details>

<figure><img src="https://1222554226-files.gitbook.io/~/files/v0/b/gitbook-x-prod.appspot.com/o/spaces%2FSWU1DQ4UGkqER7uGNUOm%2Fuploads%2FuBTHvhmdCQYQPe0FmC2L%2Fimage.png?alt=media&amp;token=6ade9391-731d-4a1c-8637-d50f3e2c586d" alt=""><figcaption></figcaption></figure>

### Certificate endpoints

Every endpoint is a route a device can request a certificate through. Each one brings its own certificate profile and its own credentials. Switch one on to configure it.

{% hint style="warning" %}
Enable only the endpoints you actually use. Each enabled endpoint is an additional way to obtain a certificate from your CA.
{% endhint %}

<figure><img src="https://1222554226-files.gitbook.io/~/files/v0/b/gitbook-x-prod.appspot.com/o/spaces%2FSWU1DQ4UGkqER7uGNUOm%2Fuploads%2FFi97SBr6o9EbOjayG8uq%2Fimage.png?alt=media&amp;token=c2679dcb-c376-4837-893e-5668a37e4098" alt=""><figcaption></figcaption></figure>

#### Microsoft Intune

{% hint style="info" %}
This endpoint requires the Entra tenant connection to be configured
{% endhint %}

Checks the device against Intune before issuing. Use this for Intune-managed Windows, iOS, Android and macOS devices. Requires the Entra tenant connection. [Learn more](https://docs.scepman.com/scepman-configuration/application-settings/scep-endpoints/intune-validation).

<details>

<summary>Microsoft Intune Settings</summary>

**Validity Period**

Overrides the default profile for every certificate issued to an Intune-managed device.

**Require the device to be compliant**

* Off: any enrolled device gets a certificate.
* On: the device must report as compliant in Intune.

[Learn more](https://docs.scepman.com/scepman-configuration/application-settings/scep-endpoints/intune-validation#appconfig-intunevalidation-compliancecheck).

**Compliance Grace Period**

Shown when the compliance check is on. A window in minutes during which a device counts as compliant even if it has not reported yet. [Learn more](https://docs.scepman.com/scepman-configuration/application-settings/scep-endpoints/intune-validation#appconfig-intunevalidation-compliancegraceperiodminutes).

**Where to look the device up**

Which directories SCEPman queries to validate the device. [Learn more](https://docs.scepman.com/scepman-configuration/device-directories).

Lookup sources, selectable in combination:

| Source                      | Behaviour                                                                                                                                                              |
| --------------------------- | ---------------------------------------------------------------------------------------------------------------------------------------------------------------------- |
| **Entra ID device objects** | Matches the request against the device object in Entra ID. Covers Entra-joined devices even when Intune hasn't checked in yet.                                         |
| **Intune managed devices**  | Matches against the Intune device record. The usual choice for MDM-enrolled devices.                                                                                   |
| **Endpoint list**           | Matches against Intune's list of issued certificates.                                                                                                                  |
| **Opportunistic match**     | Issues the certificate if none of the directories above can be reached or return a result. Keeps enrolment working during an outage — at the cost of the check itself. |

</details>

#### Jamf Pro

Checks Apple devices against your Jamf Pro inventory before issuing. Needs Jamf API credentials.

Make sure to check out the SCEPman Enterprise guide on how to setup SCEPman SaaS with Jamf Pro:

{% embed url="<https://docs.scepman.com/certificate-management/jamf/general>" %}

<details>

<summary>Jamf Pro Settings</summary>

**Default Extended Key Usage**

EKU fallback for certificates issued to Jamf devices.

**Validity period**

Overrides the default profile for this endpoint.

**Jamf API Credentials**

Client ID and secret of the Jamf Pro API role. [Learn more](https://docs.scepman.com/certificate-management/jamf/general).

</details>

#### Active Directory

Kerberos-authenticated enrolment for domain-joined Windows clients, driven entirely by Group Policy. Requires a service principal and keytab in your on-premises domain. [Learn more](https://docs.scepman.com/certificate-management/active-directory).

Four certificate templates can be enabled independently, each with its own tab:

| Template              | Purpose                                                                                                                                                                                |
| --------------------- | -------------------------------------------------------------------------------------------------------------------------------------------------------------------------------------- |
| **User**              | User certificates for domain users. [Learn more](https://docs.scepman.com/scepman-configuration/application-settings/active-directory/user-template).                                  |
| **Computer**          | Machine certificates for domain-joined devices, e.g. for 802.1X. [Learn more](https://docs.scepman.com/scepman-configuration/application-settings/active-directory/computer-template). |
| **Domain controller** | LDAPS and Kerberos PKINIT certificates for DCs. [Learn more](https://docs.scepman.com/scepman-configuration/application-settings/active-directory/dc-template).                        |
| **RDP**               | Certificates for RDP server authentication. [Learn more](https://docs.scepman.com/scepman-configuration/application-settings/active-directory/rdp-template).                           |

Per template:

<details>

<summary>Template Settings</summary>

**Default Extended Key Usage**

EKU fallback for this template.

**Validity Period**

Certificate lifetime for this template, in days.

**Group Filter (SIDs)**

Limits enrolment to members of the given Active Directory groups, specified by SID. Empty means every domain member may enrol.

**KSPs**

Key storage providers the private key may be created in, e.g. *Microsoft Platform Crypto Provider* (TPM) or *Microsoft Smart Card Key Storage Provider*. Empty means the client chooses.

</details>

{% hint style="info" %}
Deploying the matching group policy is described in [Group Policy](https://docs.scepman.com/certificate-management/active-directory/group-policy).
{% endhint %}

#### Domain controller certificates

Issues the certificates domain controllers need for LDAPS and Kerberos PKINIT, authenticated with a challenge password instead of Active Directory. Enable only if SCEPman serves your DCs. [Learn more](https://docs.scepman.com/certificate-management/domain-controller-certificates).

<details>

<summary>Domain Controller Settings</summary>

**Validity Period**

Certificate lifetime in days.

**Challenge Password**

Used on the domain controller when it requests its certificate.

</details>

#### Enrollment REST API

Lets your own tooling request certificates over HTTPS instead of SCEP, using Microsoft identities rather than a challenge password. Leave off unless a script or service of yours uses it. [Learn more](https://docs.scepman.com/certificate-management/api-certificates).

Requests authenticate with an API token. Manage tokens under **Access & rules → Permissions**.

Example:

{% code overflow="wrap" %}

```powershell
New-SCEPmanCertificate -Url 'contoso.scepman-as-a-service.com' -AccessToken 'IyBJJ2FtIGFuIGFjY2VzcyB0b2tlbi4gIw==' -Subject 'CN=Certificate'
```

{% endcode %}

<details>

<summary>Enrolment REST API Settings</summary>

**Default Extended Key Usage**

EKU fallback for API-issued certificates.

**Validity Period**

Certificate lifetime in days.

</details>

#### Static Challenge

Accepts any request presenting a shared challenge password. Convenient for appliances no MDM can enrol. [Learn more](https://docs.scepman.com/scepman-configuration/application-settings/scep-endpoints/static-validation).

<details>

<summary>Static Challenge Settings</summary>

**Default Extended Key Usage**

EKU fallback for this endpoint.

**Validity Period**

Certificate lifetime in days.

**Challenge Password**

Anyone holding this value can obtain a certificate. Rotate it when someone with access leaves.

**Renewals without Challenge**

* Off: every renewal must present the challenge password again.
* On: a client holding a valid certificate can renew without it.

</details>

#### Static challenge + Entra device check (Static-AAD)

{% hint style="info" %}
This endpoint requires the Entra tenant connection to be configured
{% endhint %}

As above, but the device must also exist in Entra ID. Prefer this over a plain static challenge whenever the device is Entra-joined. Requires the Entra tenant connection. [Learn more](https://docs.scepman.com/scepman-configuration/application-settings/scep-endpoints/staticaad-validation).

Same settings as **Static Challenge**.

### Entra tenant connection

{% hint style="info" %}
Optional but required for **Intune Validation** and **Static AAD Validation** endpoints.
{% endhint %}

Controls how SCEPman reads device and user objects from your Entra ID tenant. This is what makes the Intune and Entra validation sources available. While it is disabled, those sources cannot be switched on.

<figure><img src="https://1222554226-files.gitbook.io/~/files/v0/b/gitbook-x-prod.appspot.com/o/spaces%2FSWU1DQ4UGkqER7uGNUOm%2Fuploads%2FI2BJxqzYyaKFYsMgdPml%2Fimage.png?alt=media&amp;token=e7259508-947b-409f-8082-6a631da298c4" alt=""><figcaption></figcaption></figure>

{% tabs %}
{% tab title="Admin consent (recommended)" %}
Grants our multi-tenant app read access in one consent flow. Fastest path, and we keep the permission set current as SCEPman evolves.

Needs a Global Administrator to approve once.

Three steps complete the connection:

{% stepper %}
{% step %}

### **Confirm the tenant**

Sign in to Entra ID. We take the tenant from that sign-in and show you which directory it is, so you don't consent in the wrong one.

You do not need to consent on behalf of your organization.

This consent will add the **SCEPman as a Service (xxxxxxxx-xxxx-xxxx-xxxx-xxxxxxxxxxxx)** Enterprise Application to your Entra environment.
{% endstep %}

{% step %}

### **Grant admin consent**

Opens the Microsoft consent screen. A Global Administrator must approve; if that isn't you, send them the consent link from this page.

This will grant the **SCEPman as a Service** Enterprise Application the required permissions.
{% endstep %}

{% step %}

### **Test the connection**

Reads one device object to prove the permissions work before you rely on them.
{% endstep %}
{% endstepper %}
{% endtab %}

{% tab title="Your own app registration" %}
Use an app registration you create and control. Choose this when policy forbids third-party multi-tenant apps.

Needs tenant ID, client ID and a client secret.

Grant the following **application** permissions and admin-consent them:

| API                  | Permission                                | Purpose                          |
| -------------------- | ----------------------------------------- | -------------------------------- |
| Microsoft Graph      | `Directory.Read.All`                      | Read directory data              |
| Microsoft Graph      | `DeviceManagementManagedDevices.Read.All` | Read Intune devices              |
| Microsoft Graph      | `DeviceManagementConfiguration.Read.All`  | Read Intune device configuration |
| Microsoft Intune API | `scep_challenge_provider`                 | SCEP challenge validation        |
| {% endtab %}         |                                           |                                  |
| {% endtabs %}        |                                           |                                  |

### Remote debug

Enables detailed request tracing for our support team. It is disabled by default. Because traces may contain device identifiers, tracing automatically switches off on the specified date.

<figure><img src="https://1222554226-files.gitbook.io/~/files/v0/b/gitbook-x-prod.appspot.com/o/spaces%2FSWU1DQ4UGkqER7uGNUOm%2Fuploads%2F2xKvarOq5SRCzmV9c1dO%2Fimage.png?alt=media&amp;token=c971f150-623a-44ae-a3e8-3c1436d23211" alt=""><figcaption></figcaption></figure>


# Connectivity


# Server Settings

Server settings are available under https\://YOURNAME.radius-as-a-service.com/settings/server

## Ports & IP Addresses

### Overview

RADIUSaaS operates a RadSec service to provide secure cloud-based authentication for its users. In addition, for those customers who are unable to utilise RadSec in their network environment, e.g. due to hardware and software limitations, RADIUSaaS provides RADIUS Proxies, that handle the protocol conversion from RADIUS to RadSec.&#x20;

Both RadSec and RADIUS service offer public IP address that enable your network appliances and services to communicate with our service from anywhere via the internet. These services operate on their unique registered ports. &#x20;

## RadSec / TCP

<figure><img src="https://1222554226-files.gitbook.io/~/files/v0/b/gitbook-x-prod.appspot.com/o/spaces%2FSWU1DQ4UGkqER7uGNUOm%2Fuploads%2FcuFQfpH90N1Sv9KxxL2N%2FScreenshot%202026-08-12%20at%2009.25.56.png?alt=media&amp;token=6eda63a7-25dc-4b8e-b2ea-ece4ec61388d" alt=""><figcaption></figcaption></figure>

#### **RadSec DNS**

The DNS entry through which the RadSec service can be reached.&#x20;

#### **Server IP Addresses**

This is the public IP address of the RadSec service.

#### **RadSec Ports**

This is the registered port for RadSec: 2083

### Failover & Redundancy

In cases where customers require higher levels of redundancy, multiple RadSec endpoints can be configured for your instance providing an additional IP addresses. Please note that there is an additional cost for this service.

<figure><img src="https://1222554226-files.gitbook.io/~/files/v0/b/gitbook-x-prod.appspot.com/o/spaces%2FSWU1DQ4UGkqER7uGNUOm%2Fuploads%2F7gZK3Ko3YeBdKh8f1wob%2FScreenshot%202026-08-12%20at%2009.25.56%20copy.png?alt=media&amp;token=a12f35d9-5524-4d60-bf32-fe6ba069ea14" alt=""><figcaption></figcaption></figure>

{% hint style="info" %}
It is important to note that RADIUSaaS **does NOT provide failover** between RadSec endpoints. Instead, this failover is typically implemented on your network equipment as shown in below example using Meraki.&#x20;

It is recommended to configure your failover scenario using IP addresses rather than DNS for better visibility and less reliance on an additional service (DNS).&#x20;
{% endhint %}

In this configuration, the two RadSec IP addresses are listed in order of preference. When Meraki is unable to reach one of the IP addresses, it will typically try two more times and moves on to the next one. For more information regarding the failover capability of your Meraki (or other) system, please consult your own resources.

<figure><img src="https://1222554226-files.gitbook.io/~/files/v0/b/gitbook-x-prod.appspot.com/o/spaces%2FSWU1DQ4UGkqER7uGNUOm%2Fuploads%2FSFXfyQYG5IyUeYBrBtr4%2F2025-01-24_15h14_06.png?alt=media&amp;token=8d296cd1-f4db-49ed-8887-4a6ed8e9d7ef" alt=""><figcaption><p>Showing multiple RadSec servers in order of priority (Meraki).</p></figcaption></figure>

## RadSec Settings

### Maximum TLS Version

This setting controls the maximum TLS version for your **RadSec interface**. The minimum version is fixed at 1.2, the default maximum is set to 1.3.

TLS 1.3 offers several advantages over 1.2, including the post-handshake authentication mechanism, which allows requesting additional credentials before completing the handshake. This is important for the verification checks for RadSec certificates setting discussed next.

### Maximum EAP TLS Version

This setting controls the maximum TLS version used with EAP when your endpoints authenticate against your RADIUSaaS instance using a certificate (EAP-TLS) or [username/password credentials](/admin-portal/users/users#protocols).

For all modern operating systems, **TLS 1.3 is the recommended default**. However, certain (older) Windows 10/11 builds advertised TLS 1.3 support for EAP-TLS with a non-conformant implementation. If Windows clients on affected builds exhibit connectivity issues, cap the negotiated protocol version at TLS 1.2 for broader compatibility.

### Revocation Check for RadSec Certificates

{% hint style="info" %}
This setting determines whether a revocation check should be performed for all RadSec connections. The method for verifying the revocation check differs slightly from that used for client authentication certificates.
{% endhint %}

For proper RadSec operation, network devices such as Access Points, Switches, and VPN Servers establish a TLS-protected connection to the RadSec server. RadSec deployments typically use mutual TLS (mTLS), where both peers authenticate each other using X.509 certificates during the TLS handshake. RADIUSaaS implementation enforces mTLS.&#x20;

To determine the validity and revocation status of a RadSec client certificate, the certificate must be presented by the client as part of the TLS authentication process. Only after the certificate is received can revocation checks (for example, via CRL or OCSP) be performed.

#### **TLS 1.2**

TLS 1.2 supports mutual TLS authentication during the initial handshake using the `CertificateRequest`, `Certificate`, and `CertificateVerify` messages. When client authentication is required and correctly enforced, the RadSec client certificate is presented, validated, and checked for revocation before the TLS session is established and before any RADIUS traffic is exchanged.

\
However, TLS 1.2 also permits optional client authentication and supports renegotiation. As a result, some RadSec client implementations may complete the initial handshake without presenting a client certificate. This behavior is implementation-specific and not a limitation of the TLS 1.2 protocol.&#x20;

{% hint style="info" %}
To mitigate the above behaviour, the **Revocation Check for RadSec Certificates** setting is deactivated when the maximum TLS version is set to 1.2. Please note you can manually reactive it later.&#x20;
{% endhint %}

#### **TLS 1.3**

TLS 1.3 provides a more deterministic and streamlined model for mutual TLS authentication. When client authentication is requested, the RadSec client certificate is exchanged as part of the initial handshake and validated before the TLS connection is established.\
This allows the RadSec server to immediately verify the client certificate, including its revocation status, and to fail the handshake if the certificate is invalid or revoked. As a result, TLS 1.3 enables stricter and more predictable enforcement of mutual TLS authentication for RadSec connections.&#x20;

{% hint style="info" %}
The **Revocation Check for RadSec Certificates** setting is automatically enabled when the maximum TLS version is set to 1.3.
{% endhint %}

<figure><img src="https://1222554226-files.gitbook.io/~/files/v0/b/gitbook-x-prod.appspot.com/o/spaces%2FSWU1DQ4UGkqER7uGNUOm%2Fuploads%2FT3y6UdKzUj5YSZc94OzA%2Fimage.png?alt=media&amp;token=eb9ed11a-a8c4-40cb-a23b-beee84d9b1da" alt=""><figcaption></figcaption></figure>

## RADIUS / UDP

This section is available when you have configured at least on [RADIUS Proxy](/admin-portal/settings/settings-proxy). For each proxy, a separate public IP address is available. The public IP addresses in this section support the RADIUS protocol only and thus listen on ports 1812/1813.

<figure><img src="https://1222554226-files.gitbook.io/~/files/v0/b/gitbook-x-prod.appspot.com/o/spaces%2FSWU1DQ4UGkqER7uGNUOm%2Fuploads%2FkukB6fdyHT5KFUkUYWO8%2Fimage.png?alt=media&amp;token=79dd44b2-6c76-4a20-8485-0d582c2f561d" alt=""><figcaption></figcaption></figure>

### **Server IP Addresses and Location**

{% hint style="warning" %}
These IP addresses only listen on [RADIUS](/overview#what-is-radius) over UDP ports 1812/1813.
{% endhint %}

Geo-location of the RADIUS Proxy/Proxies as well as the respective public IP address(es).

### **Shared Secrets**

The shared secret for the respective RADIUS Proxy. By default, all RADIUS Proxies are initialized with the same shared secret.

<figure><img src="https://1222554226-files.gitbook.io/~/files/v0/b/gitbook-x-prod.appspot.com/o/spaces%2FSWU1DQ4UGkqER7uGNUOm%2Fuploads%2FqJcuyphmHKkFcMt027hW%2F2024-05-24_18h45_54.gif?alt=media&amp;token=b4f5cd4f-326f-4e41-b439-2e00fbbcef74" alt=""><figcaption><p>Showing changing of shared secrets per proxy</p></figcaption></figure>

### **Ports**

This section displays the standard ports for the RADIUS authentication (1812) and RADIUS accounting (1813) services.

### **Failover & Redundancy**

#### Proxy Redundancy

Note that a single RADIUSaaS Proxy does not provide redundancy. To ensure redundancy, set up multiple RADIUSaaS Proxies as described [here](/admin-portal/settings/settings-proxy#load-balancing).

#### RadSec Service Redundancy for Proxies

When using RADIUSaaS with multiple RadSec instances, Proxies are automatically configured to connect to all available RadSec instances. A RADIUSaaS Proxy will prioritize connecting to the nearest regional RadSec Service. If that service is unavailable, it will switch to another available RadSec Service.&#x20;

## Server Certificates

### Customer-CA

By default, RADIUSaaS generates a **RADIUS Server Certificate** signed by a Certificate Authority (CA) that is available on our service solely for this very purpose. We refer to it as the **Customer-CA**. The Customer-CA is unique for each customer.

To create your Customer-CA, follow these simple steps:&#x20;

1. Navigate to **Settings** > **Server Settings**
2. Click **Add**
3. Choose **Let RaaS create a CA for you**
4. Click on **Save**
5. After the creation, you will see a new certificate available under Server Certificates

<figure><img src="https://1222554226-files.gitbook.io/~/files/v0/b/gitbook-x-prod.appspot.com/o/spaces%2FSWU1DQ4UGkqER7uGNUOm%2Fuploads%2FFNdfZzA3kBs9w5QAzt1j%2Fimage.png?alt=media&amp;token=70d142b8-5c2b-42f4-83c6-d5ba3eacaee9" alt=""><figcaption></figcaption></figure>

### Bring your own certificate

In case you do not want to use the **Customer CA**, you can upload up to two of your own certificates.

#### SCEPman-issued server certificate

Please follow these steps to leverage SCEPman Certificate Master to generate a new server certificate:

1. Navigate to your SCEPman Certificate Master web portal.
2. Select Request Certificate on the left
3. Select **(Web) Server** at the top
4. Select **Form**
5. Enter all Subject Alternative Names (SANs) that the certificate shall be valid for, separated by commas, semicolons, or line breaks. Generate a server certificate as described [here](https://docs.scepman.com/certificate-deployment/certificate-master/tls-server-certificate-pkcs-12) and provide any FQDN you want. We recommend adapting the SAN of the default server certificate, e.g. `radsec-<your RADIUSaaS instance name>.radius-as-a-service.com`.
6. Set the **Download file format** to **PEM**&#x20;
7. Select **Include Certificate Chain** and download the certificate.&#x20;
8. Make sure to include **both Server and Client Authentication** for the EKU.
9. **Submit** the request to download the new server certificate.

{% hint style="warning" %}
**Important**: Take temporary note of the password since it cannot be recovered from Certificate Master.
{% endhint %}

<figure><img src="https://1222554226-files.gitbook.io/~/files/v0/b/gitbook-x-prod.appspot.com/o/spaces%2FSWU1DQ4UGkqER7uGNUOm%2Fuploads%2FqrJkLMR29lWvi0PDKzs5%2Fimage.png?alt=media&amp;token=1c0839a7-df64-4819-9953-8e1f82eef2c2" alt=""><figcaption></figcaption></figure>

### Upload the new server certificate to **RADIUSaaS**

To add your server certificate created in the above steps, navigate to **RADIUSaaS instance** > **Settings** > **Server Settings** > **Add,** then

1. Choose **PEM or PKCS#12 encoded Certificate** (If you selected PKCS#12 in step 5, this contains both public and private key)
2. Drag & drop your certificate file or click to browse for it
3. Enter the password of your **Private Key**&#x20;
4. Click **Save**

<figure><img src="https://1222554226-files.gitbook.io/~/files/v0/b/gitbook-x-prod.appspot.com/o/spaces%2FSWU1DQ4UGkqER7uGNUOm%2Fuploads%2Fcunb1xlB9AfxsJqJlepI%2Fimage.png?alt=media&amp;token=c5854bf3-45df-49d9-b562-8bceed0ac8e3" alt=""><figcaption></figcaption></figure>

{% hint style="info" %}
Please note: By default, SCEPman Certificate Master issues certificates that are valid for 730 days. If you'd like to change this, please refer to SCEPman's [documentation](https://docs.scepman.com/advanced-configuration/application-settings/certificates#appconfig-validityperioddays).
{% endhint %}

### Certificate activation

{% hint style="warning" %}
Ensure to monitor the expiry of your server certificate and renew it in due time to prevent service interruptions.
{% endhint %}

As certificates expire from time to time or your preference on which certificates you would like to use change, it is important that you can control the certificate that your server is using. The **Active** column shows you the certificate your server is currently using. To change the certificate your server is using, expand the row of the certificate you would like to choose and click **Activate**.&#x20;

### Download

To download your **Server Certificate,** you have two options:&#x20;

1. Click **Download CA Certificate** on the top. This will directly download the **trusted root CA** of the currently **active** server certificate. &#x20;
2. &#x20;Click the **download** icon in the corresponding row.

<figure><img src="https://1222554226-files.gitbook.io/~/files/v0/b/gitbook-x-prod.appspot.com/o/spaces%2FSWU1DQ4UGkqER7uGNUOm%2Fuploads%2FKEBf1beoXjQ0TL2969k3%2Fimage.png?alt=media&amp;token=dde859e8-981c-4cce-bc70-339b9c76c258" alt=""><figcaption></figcaption></figure>

**Option 2** will open a dialog showing the complete certificate path. The **root certificate** will always be marked in green.

<figure><img src="https://1222554226-files.gitbook.io/~/files/v0/b/gitbook-x-prod.appspot.com/o/spaces%2FSWU1DQ4UGkqER7uGNUOm%2Fuploads%2Fik7X4yvpLMOdhsUHyu8l%2Fimage.png?alt=media&amp;token=dda576ab-8cd2-45d7-b9ed-50521d92948b" alt=""><figcaption><p>Showing the root certificate in green</p></figcaption></figure>

For both options, the downloaded root certificate is encoded in base64 (PEM). In case your device (e.g. WiFi controller) needs a binary coding (DER), you can convert it using [OpenSSL](https://openssl.org/):

```sh
openssl x509 -inform pem -in <DOWNLOADED_FILE> -outform der -out <CONVERTED_FILE>
```

### Delete

To delete a certificate, expand the corresponding row, click **Delete** and confirm your choice.&#x20;

### Certificate Expiration

{% hint style="danger" %}
Do not let the RADIUS Server Certificate expire. It will break the authentication.
{% endhint %}

Certificates expire from time to time. Five months before your certificate is going to expire, your dashboard will give you a hint by displaying a warning sign next to it.

![Screenshot showing certificate expiration](https://content.gitbook.com/content/SWU1DQ4UGkqER7uGNUOm/blobs/vyZwJeKE1HD6XpnxGymy/image.png)

If the triangle is displayed next to the active RADIUS Server Certificate, follow this guide to update it:&#x20;

{% content-ref url="/pages/-Me\_4gkoPSj70sBbkQ0G" %}
[Server Certificate Renewal](/configuration/renew-certificate)
{% endcontent-ref %}


# Trusted Certificates

## Types of Trusted Certificates

### Trusted CAs for Client Authentication

Trusted CAs for client authentication establish the trust between the CAs that issue client authentication certificates to your endpoint devices and RADIUSaaS.

### Trusted RadSec Connection Certificates

RadSec itself works with mutual certificate authentication (mTLS). This means, on the one hand your authenticators must [trust RADIUSaaS](/admin-portal/settings/settings-server#server-certificates) and on the other hand RADIUSaaS must know which authenticators to trust so that a valid RadSec connection can be established. The trusted RadSec connection certificates ensure RADIUSaaS only trusts those authenticators that you specify.

## **Pre-installed trusted RadSec certificate**

Due to the [above](/admin-portal/settings/trusted-roots#trusted-radsec-connection-certificates), you will always see at least one RadSec trusted certificate that establishes the trust with your [RADIUS proxies](https://docs-preview.radiusaas.com/admin-portal/settings/settings-proxy) (effectively acting as RadSec clients). To ensure that your proxies are able to start up properly and are able to establish a connection to your instance, you cannot delete it.

## Add&#x20;

{% hint style="warning" %}
If you have a tiered PKI infrastructure (e.g. a **Microsoft legacy PKI**), please consider [this](#tiered-pki-hierarchy).
{% endhint %}

To add a new trusted certificate, follow these steps:

1. Click **Add**
2. Select if you want to import to trusted certificate&#x20;
   * from SCEPman (by providing the URL to your SCEPman instance), or
   * from any other CA (by uploading a PEM or DER-encoded certificate file)
3. Select the [type](#types-of-trusted-certificates) of trusted certificate under **Use for**:
   * [**Client authentication**](#trusted-cas-for-client-authentication)
   * [**RadSec**](#trusted-radsec-connection-certificates)
   * **Both** (helpful if the same CA is issuing your client authentication certificates as well as your RadSec client certificates)
4. Upload the certificate file by drag & drop (alternatively you can click in the blue area and select your file)
5. Select the certificate verification option:
   * **OCSP Autodetect**: RADIUSaaS will try to infer the OCSP responder URL from the client certificate's Authority Information Access (AIA) extension that is used for the network authentication. In case no OCSP responder URL is found or the OCSP responder is unavailable, RADIUSaaS will consider the [**Soft fail** ](#ocsp-soft-fail)configuration.
   * **OCSP**: Manually specify which OCSP responder URL will be used for any certificate that was issued by the trusted CA. If the OCSP responder is unavailable, RADIUSaaS will consider the [**Soft fail** ](#ocsp-soft-fail)configuration.
   * **CRL**: If selected, RADIUSaaS will use a CRL instead of OCSP to verify certificate issued by the CA. Specify the CRL encoding (**DER** or **PEM**) and the **CRL distribution points**.
   * **None:** If your CA supports neither OCSP nor CRL, select **None** to skip the verification.
6. Click **Save**

{% hint style="info" %}
In case your PKI has a multi-tier hierarchy (Root CA, Intermediate CA, Issuing CA), make sure to upload all of them to the RADIUSaaS Trusted Certificates store.
{% endhint %}

## Delete

To delete a certificate, expand the corresponding row, click **Delete** and confirm your choice.&#x20;

<figure><img src="https://1222554226-files.gitbook.io/~/files/v0/b/gitbook-x-prod.appspot.com/o/spaces%2FSWU1DQ4UGkqER7uGNUOm%2Fuploads%2F881Etn4X8SPLFDEUIEaz%2Fimage.png?alt=media&amp;token=1f14289f-0179-45e1-ab9f-72a39f4e2e37" alt=""><figcaption><p>Showing deletion of a trusted certificate</p></figcaption></figure>

## OCSP Soft-fail

This setting determines how RADIUSaaS behaves, when the OCSP responder of your trusted CA cannot be reached.&#x20;

{% hint style="danger" %}
If you **disable** this setting, authentication requests will be **rejected** when your CA's OCSP responder cannot be reached.

Please check [OCSP Soft-fail Consequences](/other/faqs/ocsp-soft-fail-consequences) to make sure you understand the implications of this setting.
{% endhint %}

{% hint style="info" %}
Note that this setting is only available when **OCSP Autodetect** or **OCSP** is selected for certificate verification.&#x20;
{% endhint %}

By default, we **recommend enabling OCSP Soft fail** to increase the availability of the service by allowing authentication requests to be accepted even if the OCSP responder cannot be reached. With this **soft fail** mechanism, and in case OCSP is not reachable, RADIUSaaS will only check if the incoming certificate was signed by one of the [trusted CAs](/admin-portal/settings/trusted-roots) and processes any optional [Rules](/admin-portal/access-and-rules/rules).

<figure><img src="https://1222554226-files.gitbook.io/~/files/v0/b/gitbook-x-prod.appspot.com/o/spaces%2FSWU1DQ4UGkqER7uGNUOm%2Fuploads%2FOZsiGA2Azh5szBKobNvd%2Fimage.png?alt=media&amp;token=c5f34e6d-2d2d-49b3-813d-ea8165f8ce52" alt=""><figcaption></figcaption></figure>

## Tiered PKI hierarchy

In a tiered CA environment with multiple issuing CAs configured, certificates issued from the root CA or any issuing CA will get access regardless of whether the certificate was issued from the root or issuing CA. This means that trusting the root will automatically trust certificates issued by any of the issuing CAs. \
\
If access needs to be controlled based on the issuing CAs, this can be achieved by configuring [respective rules](/admin-portal/access-and-rules/rules#certificate-based-authentication).

### Considerations

When uploading root and issuing CAs of a tiered PKI, please consider the following:

* The **root CA must be uploaded first**, before uploading any issuing CAs derived from this root CA.
* Root and issuing CAs must be uploaded in separate files. Uploading certificate chains from a single file may result in unexpected behaviour.

## Optional settings

### Intune ID

It is possible to use the certificate which every Windows 10 machine receives from Intune when joining Microsoft Entra ID (Azure AD).

{% hint style="danger" %}
This setting is optional. In case you are not familiar with Intune Certificates, please do not configure them!
{% endhint %}

#### Why are we not recommending using Intune certificates for authentication purposes?

* Intune certificates are not supported by Microsoft for other purposes than management with Intune.
* Validity time for the Intune certificates is 1 year.
* There is no mechanism to revoke certificates (like OCSP).

Instead of using Intune certificates, we recommend using certificates from a PKI like [SCEPman](https://scepman.com/).

#### Configure Intune IDs

{% hint style="danger" %}
Use this setting with care. One of the following IDs **must** exist in the certificate extension 1.2.840.113556.5.14. All other certificates will **be rejected**.
{% endhint %}

To get your Intune Tenant ID, follow these steps:&#x20;

* Press **Windows + R** and enter **certlm.msc**
* Go to your personal certificates. There will be a certificate from one of the following issuers
  * SC Online Issuing
  * MDM Device Authority&#x20;
* Open this certificate, go to **Details** and search for the extension&#x20;

  1.2.840.113556.5.14
* The printed HEX value is your Intune Tenant ID.&#x20;

**Example:**

The Tenant ID of the following certificate is: **bb4397cb6891c64db17f766487518a6a**

![Showing Certificate](https://content.gitbook.com/content/SWU1DQ4UGkqER7uGNUOm/blobs/idPvrWmWOtjQuz2my7Yj/image.png)

## XML

{% hint style="info" %}
The XML profile generated by RADIUSaaS will enable [PMK caching](/profile-deployment/microsoft-intune/wifi-profile/windows#fast-roaming).
{% endhint %}

Today, most MDM platforms provide a wizard-based method to deploy networking profiles (WiFi and LAN). If this is not possible, or if the wizard provides only limited configuration options, you may generate a raw-XML profile directly on the RADIUSaaS platform.

* To generate your **WiFi** XML profile:&#x20;
  1. Expand the **XML** menu,&#x20;
  2. select the desired security protocol (WPA2 or WPA3),&#x20;
  3. enter your **SSID,**
  4. and click **Download**.
* To generate your **Wired** XML profile, click **Download**.

<figure><img src="https://1222554226-files.gitbook.io/~/files/v0/b/gitbook-x-prod.appspot.com/o/spaces%2FSWU1DQ4UGkqER7uGNUOm%2Fuploads%2FjHbQ9ohBN5f6bMmug00h%2Fimage.png?alt=media&amp;token=ea446f76-6399-41fa-b81c-88414d863dcc" alt=""><figcaption></figcaption></figure>


# Proxy Settings

Proxy settings are available under https\://YOURNAME.radius-as-a-service.com/settings/proxy

Proxies are required when your authenticators (e.g., access points, switches) support only traditional RADIUS over UDP for AAA. The proxies handle protocol conversion from RADIUS to RadSec, enabling your equipment to communicate securely with the RADIUSaaS core servers, which support only RadSec (RADIUS over TCP) for AAA.

## Architecture

{% hint style="warning" %}
Your subscription includes at least two public IP addresses capable of communicating via RADIUS. We strongly recommend configuring these IP addresses as the primary and secondary RADIUS servers on your network devices and appliances. For optimal redundancy, the secondary IP should be located in a different geographic region from the primary.
{% endhint %}

### Performance

Each proxy can handle up to **1,500** **concurrent** connections flawlessly.&#x20;

This corresponds to a time-based performance of **10,000 authentications per minute per proxy**.

### Scaling&#x20;

To ensure smooth operation, consider the following number of proxies based on the number of users you have licensed (your needs may change if your offices are more globally distributed):

|       User       | Proxy Count |
| :--------------: | :---------: |
|    50 - 2,500    |      2      |
|  2,501 - 10,000  |      3      |
|  10,001 - 25,000 |      4      |
|  25,001 - 50,000 |      6      |
| 50,001 - 100,000 |      10     |

### Regions

You can deploy the proxy servers in the following regions:

| Continent     | Region                                                              |
| ------------- | ------------------------------------------------------------------- |
| Africa        | Johannesburg                                                        |
| Asia          | <p>Bangalore<br>Singapore<br>TelAviv<br>Tokio<br>Seoul<br>Osaka</p> |
| Australia     | <p>Sydney<br>Melbourne</p>                                          |
| Europe        | <p>Frankfurt<br>London<br>Madrid<br>Stockholm</p>                   |
| North America | <p>Dallas<br>New York<br>Seattle<br>Toronto</p>                     |
| South America | <p>Santiago<br>São Paulo</p>                                        |

### Load Balancing

If you have a setup with more than 1,000 users, we highly recommend ensuring, that your network equipment will send equal amounts of authentications to each proxy.

For network equipment, where you can define the priority of the RADIUS servers, you can ensure load-balancing by defining different priority orders for your different network equipment instances.

**Example:** You have 5 WiFi controllers and 3 RADIUS Proxies. You may then configure the following priority orders in your WiFi controllers:

<table><thead><tr><th width="196.5">WiFi Controller #</th><th>RADIUS Priority Order</th></tr></thead><tbody><tr><td>1 and 4</td><td>1, 2, 3</td></tr><tr><td>2 and 5</td><td>2, 3, 1</td></tr><tr><td>3</td><td>3, 1, 2</td></tr></tbody></table>

### Failover

When [multiple RadSec endpoints](/admin-portal/settings/settings-server#failover-and-redundancy) are configured, RADIUSaaS provides an automatic failover mechanism for your RADIUS proxies.&#x20;

In the unlikely event that one or more RadSec endpoints fail, the available proxies will detect the failed state and redirect requests to the (geographically) closest active RadSec endpoint.&#x20;

{% hint style="info" %}
Please note that this failover does not apply if the RadSec protocol is being used by the Authenticators rather than RADIUS. In that case, failover is provided by the Authenticator as described [here](https://docs.radiusaas.com/admin-portal/settings/settings-server#failover-and-redundancy). &#x20;
{% endhint %}

### Properties

The IP address, ports and shared secret of the RADIUS Proxies will be displayed under [**Server Settings**](/admin-portal/settings/settings-server) **>** [**Ports and IP Addresses**](/admin-portal/settings/settings-server#properties-1).

## Add&#x20;

To Add a new proxy, simply click **Add**, choose your **Region** and click **Create.**&#x20;

<figure><img src="https://1222554226-files.gitbook.io/~/files/v0/b/gitbook-x-prod.appspot.com/o/spaces%2FSWU1DQ4UGkqER7uGNUOm%2Fuploads%2FdYYSzIgvS3UWx49CaBac%2FAddingProxy.gif?alt=media&amp;token=882a1588-cef6-40e5-a4f1-acd3bfda1794" alt=""><figcaption><p>Showing how to create a proxy</p></figcaption></figure>

\
After the installation has finished, it can take up to 15 minutes until your proxy has established a connection to your RADIUS server.

<figure><img src="https://1222554226-files.gitbook.io/~/files/v0/b/gitbook-x-prod.appspot.com/o/spaces%2FSWU1DQ4UGkqER7uGNUOm%2Fuploads%2FYEt9K2psQhtWbTnmZglz%2Fimage.png?alt=media&amp;token=2718c72f-7dc9-4c47-93d7-0a4edf4c1f21" alt=""><figcaption><p>Showing proxy servers</p></figcaption></figure>

## Delete

To **Delete** a proxy, simply click **Delete** of corresponding table row and confirm your choice.&#x20;

<figure><img src="https://1222554226-files.gitbook.io/~/files/v0/b/gitbook-x-prod.appspot.com/o/spaces%2FSWU1DQ4UGkqER7uGNUOm%2Fuploads%2FdG9S6y1JYJULGymRizAk%2Fimage.png?alt=media&amp;token=a301871a-220a-4e75-8cfd-902880a9df75" alt="" width="417"><figcaption><p>Showing deletion of a proxy server</p></figcaption></figure>


# SCEPman Connection

### SCEPman Connection

{% hint style="warning" %}
SCEPman Enterprise Edition only

Applicable to version 3.0 and above
{% endhint %}

The **SCEPman Connection** setting connects your RADIUSaaS instance directly to your SCEPman instance so that the RADIUS Server Certificate is issued and renewed automatically. Once the connection is established, RADIUSaaS will:

1. Create and activate a new Server Certificate issued by SCEPman.
2. Manage the lifecycle of that certificate, including its renewal.

This setting is **optional**. If you do not connect a SCEPman instance, you can continue to use the Customer-CA or upload your own certificate as described [here](/admin-portal/settings/settings-server#server-certificates).

The status badge next to the section title shows the current state of the integration: **NOT CONNECTED** until the setup is completed, **CONNECTED** afterwards. If you do not have a SCEPman instance yet, use the **Set up SCEPman** link to open the SCEPman deployment documentation.

<figure><img src="https://1222554226-files.gitbook.io/~/files/v0/b/gitbook-x-prod.appspot.com/o/spaces%2FSWU1DQ4UGkqER7uGNUOm%2Fuploads%2FwaVFoGQBhakvYWnsPmyZ%2Fimage.png?alt=media&amp;token=5d4dfac9-eb52-4124-a39e-dc2424a712d2" alt=""><figcaption></figcaption></figure>

#### Overview of the setup

The setup consists of three steps, summarized at the top of the section:

| # | Step                             | Description                                                                     |
| - | -------------------------------- | ------------------------------------------------------------------------------- |
| 1 | **Copy this token into SCEPman** | Trust this token by adding it to SCEPman's environment variables.               |
| 2 | **Enter your SCEPman URL**       | The base URL of your SCEPman instance.                                          |
| 3 | **Pregenerate a certificate**    | Optional: verify that SCEPman issues a certificate before you finish the setup. |

#### 1. Token

The **Token** field contains the API token that RADIUSaaS uses to authenticate against your SCEPman instance. The token is generated by RADIUSaaS and shown masked by default.

* Click the **eye** icon to reveal the token.
* Click the **copy** icon to copy it to your clipboard.

{% hint style="info" %}
The token is read-only. It cannot be set or changed in the RADIUSaaS Admin Portal — you only enter it on the SCEPman side.
{% endhint %}

Transfer the token to SCEPman by creating the application setting [AppConfig:RADIUSaaSValidation:Token](https://docs.scepman.com/scepman-configuration/application-settings/scep-endpoints/radiusaas) in your SCEPman App Service, as described in [this guide](https://docs.scepman.com/scepman-configuration/application-settings#convenient-configuration-in-the-app-service-configuration). We recommend storing the value as a secret in Azure Key Vault using the name `AppConfig--RADIUSaaSValidation--Token`. Apply the settings and restart your App Service afterwards.

#### 2. SCEPman URL

Enter the base URL of your SCEPman instance, for example `https://<your-scepman-instance>.azurewebsites.net`. The **Connect** button stays disabled until a URL has been entered.

#### 3. Pregenerate a certificate (optional)

Before finishing the setup, you can let RADIUSaaS request a test certificate from SCEPman. This confirms that the token and the URL are correct and that SCEPman is able to issue a certificate. The pregenerated certificate is added to your Server Certificates but is **not activated**.

<figure><img src="https://1222554226-files.gitbook.io/~/files/v0/b/gitbook-x-prod.appspot.com/o/spaces%2FSWU1DQ4UGkqER7uGNUOm%2Fuploads%2FrENdIxa0V4IFGIDnYrP7%2Fimage.png?alt=media&amp;token=27f99997-22fa-4713-b76d-b911019c105e" alt=""><figcaption></figcaption></figure>

#### Connect

Click **Connect** to establish the connection.

{% hint style="warning" %}
This action deactivates the currently active server certificate so that the newly issued certificate can be managed by RADIUSaaS. Ensure that your clients and RadSec-enabled authenticators trust the SCEPman Root CA before you connect, otherwise authentication will fail.
{% endhint %}

After a successful setup, the status changes to **CONNECTED,** and two additional actions become available:

* **Rotate Certificate:** rotates and activates your server certificate.
* **Delete Connection:** removes the configured connection. This also deletes the token and cannot be undone. To set up the connection again later, you must repeat the steps above.

**Note:** A new token will be automatically created after deleting the connection.


# Log Exporter

The Log Exporter allows you to push RADIUSaaS Logs to an external Security information and event management (SIEM) system for monitoring and alerting.

## General

Logs will be **fetched every 60 seconds** and sent to your configured **Export Target(s)**. Currently, the Log Exporter can connect to the following target systems:

* [Microsoft Teams Channel](/admin-portal/settings/log-exporter/teams)
* [Azure Log Analytics Workspace](/admin-portal/settings/log-exporter/log-analytics)
* [Generic Webhook (JSON)](/admin-portal/settings/log-exporter/generic-webhook)

The Log Exporter allows you to configure a specific **Message Filter** for each target. For example:&#x20;

* Send every entry where a user was not able to login to a **Log Analytics Workspace**
* Send every failed TCP connection to a **Microsoft Teams Channel**

## Message Filter

The **Message Filter** that can be configured for each target helps you to only receive those logs, that are really relevant for your monitoring and alerting system.

<figure><img src="https://content.gitbook.com/content/SWU1DQ4UGkqER7uGNUOm/blobs/qxAEnSFIBAnURGYDwtbr/image.png" alt=""><figcaption></figcaption></figure>

The filter can be configured to only consider logs from certain sources/sub-system from the RADIUSaaS platform:

* Rule Engine
* Authorization System
* Proxy Authentication

Furthermore, the log level can be configured for each of those sub-systems.

If you are familiar with reading the RADIUSaaS' [raw log data](/admin-portal/insights/log) and have already identified a set of  messages that are of interest for you, you can very easily derive from those messages the suitable filter settings for export. Therefore, below table provides a mapping from the log message origin (sub-system) to the `tags` property as well as from the log level to the `level` property of each log message.

| Filter               | Tag      | Level                                                                                                                                 |
| -------------------- | -------- | ------------------------------------------------------------------------------------------------------------------------------------- |
| Rule Engine          | `engine` | <p>Success = <code>INFO</code><br>Failed = <code>WARNING</code><br>Error = <code>ERROR</code></p>                                     |
| Authorization System | `detail` | <p>Requests = <code>debug</code><br>Success = <code>info</code><br>Failed = <code>warning</code><br>Error = <code>error</code></p>    |
| Proxy Authentication | `proxy`  | <p>Connections = <code>debug</code><br>Success = <code>info</code><br>Failed = <code>warning</code><br>Error = <code>error</code></p> |

<figure><img src="https://content.gitbook.com/content/SWU1DQ4UGkqER7uGNUOm/blobs/7YajPWrLySDLlpLB3iG2/image.png" alt=""><figcaption></figcaption></figure>

<figure><img src="https://content.gitbook.com/content/SWU1DQ4UGkqER7uGNUOm/blobs/Q5336rb7YaELWkkVW2kp/image.png" alt=""><figcaption></figcaption></figure>

## Message

No matter which target type(s) you have selected, you will have to edit the data template describing how the export message should be structured using **Jinja2** as template engine:\
<https://jinja.palletsprojects.com/en/3.1.x/templates/>

The Log Exporter has access to every field in a log message that is hierarchically located under the`_source` property. It is made available through the `data` object in the **Message** editor.

<figure><img src="https://content.gitbook.com/content/SWU1DQ4UGkqER7uGNUOm/blobs/JQ9x4BUpgEXQRwav8dpf/image.png" alt=""><figcaption></figcaption></figure>

<figure><img src="https://content.gitbook.com/content/SWU1DQ4UGkqER7uGNUOm/blobs/BWzoBPqpsFnZDYH4DIYY/image.png" alt=""><figcaption></figcaption></figure>


# Teams

## Prerequisites

To ingest RADIUSaaS logs into a **Microsoft Teams Channel**, only Microsoft Teams itself as well as privileges to add **connectors** to the relevant **channel** are required.

## Configuration steps

Follow those steps to push RADIUSaaS logs to a **Microsoft Teams Channel**:

1. Navigate to **Microsoft Teams**
2. Click on the **Channel** > **More options** > **Manage team**

<figure><img src="https://1222554226-files.gitbook.io/~/files/v0/b/gitbook-x-prod.appspot.com/o/spaces%2FSWU1DQ4UGkqER7uGNUOm%2Fuploads%2FFJteiikWBQqCMc8apIFE%2Fimage.png?alt=media&amp;token=8b2db213-3b17-4afb-8936-19118f650575" alt=""><figcaption></figcaption></figure>

3. Go to **Apps**
4. Click **+ Get more apps**

<figure><img src="https://1222554226-files.gitbook.io/~/files/v0/b/gitbook-x-prod.appspot.com/o/spaces%2FSWU1DQ4UGkqER7uGNUOm%2Fuploads%2FG7431DeD8Jjb5dMeKaPU%2Fimage.png?alt=media&amp;token=b9c260cb-f511-490e-8508-cbd737183290" alt=""><figcaption></figcaption></figure>

5. Search for "**Incoming Webhook**"
6. Click **Add** then **Add to a team**

<figure><img src="https://1222554226-files.gitbook.io/~/files/v0/b/gitbook-x-prod.appspot.com/o/spaces%2FSWU1DQ4UGkqER7uGNUOm%2Fuploads%2FqoLufwjT4pJrQKoNzXpr%2Fimage.png?alt=media&amp;token=3ba3a625-007a-48f7-9b50-70a038c485dc" alt=""><figcaption></figcaption></figure>

7. Select your team
8. Click **Set up a connector**

<figure><img src="https://1222554226-files.gitbook.io/~/files/v0/b/gitbook-x-prod.appspot.com/o/spaces%2FSWU1DQ4UGkqER7uGNUOm%2Fuploads%2FXFCmaS203kH7E0qbJzJN%2Fimage.png?alt=media&amp;token=b0ca9681-11da-43fd-a3a0-9c2698959d72" alt=""><figcaption></figcaption></figure>

9. Provide a **Name** for the connector
10. Upload a logo
11. Click **Create** to generate the **Webhook Connector URL**

<figure><img src="https://1222554226-files.gitbook.io/~/files/v0/b/gitbook-x-prod.appspot.com/o/spaces%2FSWU1DQ4UGkqER7uGNUOm%2Fuploads%2F7uN1aeO9rs7GbbYz2DwN%2Fimage.png?alt=media&amp;token=fef0810f-7fda-4daa-b1f0-05ab3dd8952e" alt="" width="554"><figcaption></figcaption></figure>

<figure><img src="https://1222554226-files.gitbook.io/~/files/v0/b/gitbook-x-prod.appspot.com/o/spaces%2FSWU1DQ4UGkqER7uGNUOm%2Fuploads%2F9gSZgqzhSLXKti4htP4X%2Fimage.png?alt=media&amp;token=2492e95d-dc1a-4e90-9bab-c1ba17ccfac6" alt=""><figcaption></figcaption></figure>

{% hint style="warning" %}
Make sure you copy the Url.&#x20;
{% endhint %}

Now it is time to configure the export target in the Log Exporter.&#x20;

* Navigate to your **RADIUSaaS Admin Portal > Log Exporter**
* Click **+ Add** > **Teams**
* Provide a **Name** and **Description**
* Configure the **Message Filters** to your needs
* Paste the **Webhook Connector URL** in the field **Teams channel Webhook URL**
* Configure the **Message** to be sent to your Microsoft Teams Channel

<figure><img src="https://1222554226-files.gitbook.io/~/files/v0/b/gitbook-x-prod.appspot.com/o/spaces%2FSWU1DQ4UGkqER7uGNUOm%2Fuploads%2F455PUCprzJ2NfMREnlqz%2Fimage.png?alt=media&amp;token=75591817-40f9-434a-9ffe-b055a55e8df5" alt=""><figcaption></figcaption></figure>


# Log Analytics

## Prerequisites

To ingest RADIUSaaS logs into an **Azure Log Analytics Workspace**, please make sure that a workspace was already created and that you have the following **required values** available:

* Customer ID
* Shared Key
* Event Name

## Configuration steps

Follow these steps to add a **Log Analytics** export target:

* Navigate to your **RADIUSaaS Admin Portal**
* Click **+ Export Target**
* Select **Azure Loganalytics Exporter**
* Provide a **Name** and **Description**
* Configure the **Message Filters** to your needs
* Structure the **Data** to be ingested into your Log Analytics Workspace

{% hint style="warning" %}
Some data which you might send to your Log Analytics workspace will include new line characters. \
To get a valid JSON for every entry, the template engine has a global **tojson** **parser** which will apply for all variables you access.&#x20;

Therefore, **do not quote any jinja variable**.
{% endhint %}

**Correct**

![](https://content.gitbook.com/content/SWU1DQ4UGkqER7uGNUOm/blobs/uq6Vayq4Wd4RpxGmp27v/image.png)

**Wrong**

![](https://content.gitbook.com/content/SWU1DQ4UGkqER7uGNUOm/blobs/5Ls36VIs0q8sUjHGDyra/image.png)


# Generic Webhook

## Prerequisites

To ingest RADIUSaaS logs into a generic **webhook** that accepts **JSON-structured HTTP bodies**, a suitable webhook including a **publicly available URL** are required as well as **authentication credentials,** if applicable.

The RADIUSaaS Log Exporter allows authentication via a **static API key** (URL-, header-, or body-encoded).

## Configuration steps

Follow these steps to add a **Generic Webhook** export target:

* Navigate to your **RADIUSaaS Admin Portal**
* Click **+ Export Target**
* Select **Generic Webhook**
* Provide a **Name** and **Description**
* Configure the **Message Filters** to your needs
* Paste your webhook URL in the field **Webhook URL**
* Specify the **HTTP method** that shall be used for transmitting the data (POST, GET, PUT)
* Add relevant **HTTP headers**, e.g. for authentication purposes
* Configure the message **Body** to be sent to your webhook

<figure><img src="https://1222554226-files.gitbook.io/~/files/v0/b/gitbook-x-prod.appspot.com/o/spaces%2FSWU1DQ4UGkqER7uGNUOm%2Fuploads%2FYUiQRIuRGbEFfDoP5lYw%2Fimage.png?alt=media&amp;token=ed82da02-2313-47fd-9ed4-e4602bef8156" alt=""><figcaption></figcaption></figure>


# Examples

This page provides some real world scenarios giving you guidance on how to configure the Log Exporter for your scenario.

## Example 1: General authentication information

### Scope and assumptions

The scope of the query provided below is as follows:

* the admin is interested in understanding which users/devices are authenticating (accepted or rejected) and to built frequency statistics based on that
* no VLAN tagging is used
* only certificate-based authentication is used (no username-password-based authentication)

### Target

[Log Analytics](/admin-portal/settings/log-exporter/log-analytics) or [General Webhook](/admin-portal/settings/log-exporter/generic-webhook)

### Message Filter configuration

#### Rule Engine

| Log Level | Enabled                               |
| --------- | ------------------------------------- |
| Success   | <mark style="color:red;">False</mark> |
| Failed    | <mark style="color:red;">False</mark> |
| Error     | <mark style="color:red;">False</mark> |

#### Authorization System

| Log Level | Enabled                                |
| --------- | -------------------------------------- |
| Requests  | <mark style="color:red;">False</mark>  |
| Success   | <mark style="color:green;">True</mark> |
| Failed    | <mark style="color:green;">True</mark> |
| Error     | <mark style="color:red;">False</mark>  |

#### Proxy Authentication

| Log Level   | Enabled                               |
| ----------- | ------------------------------------- |
| Connections | <mark style="color:red;">False</mark> |
| Success     | <mark style="color:red;">False</mark> |
| Failed      | <mark style="color:red;">False</mark> |
| Error       | <mark style="color:red;">False</mark> |

### Data Configuration

{% code lineNumbers="true" %}

```json
{
    "Decision": {{ data.get("Packet-Type") }},
    "Level": {{ data.level }},
    "IP": {{ data.get("Packet-Dst-Address") }},
    "Username": {{ data.get("User-Name") }},
    {% if data.get("TLS-OCSP-Cert-Valid") != None %}
        "OCSPStatus": {{ data.get("TLS-OCSP-Cert-Valid") }},
    {% endif %}
    {% if data.level == "warning" %}
      "FailReason": {{ data.get("Module-Failure-Message") }},
    {% endif %}
    "Datetime" : {{ data.Datetime }}
}
```

{% endcode %}

## Example 2: Detailed authentication information&#x20;

### Scope and assumptions

The scope of the query provided below is as follows:

* the admin is interested in understanding which users/devices are authenticating via certificate or username & password (accepted or rejected)
* username and certificate details with OCSP response
* SSID and used Access Point (MAC address)
* RADIUSaaS [Rule](/admin-portal/access-and-rules/rules) that was triggered, if applicable: assigned VLAN
* correlation ID for further investigation

### Target

[Log Analytics](/admin-portal/settings/log-exporter/log-analytics) or [General Webhook](/admin-portal/settings/log-exporter/generic-webhook)

### Message Filter Configuration

#### Rule Engine

| Log Level | Enabled                                |
| --------- | -------------------------------------- |
| Success   | <mark style="color:green;">True</mark> |
| Failed    | <mark style="color:green;">True</mark> |
| Error     | <mark style="color:red;">False</mark>  |

#### Authorization System

| Log Level | Enabled                               |
| --------- | ------------------------------------- |
| Requests  | <mark style="color:red;">False</mark> |
| Success   | <mark style="color:red;">False</mark> |
| Failed    | <mark style="color:red;">False</mark> |
| Error     | <mark style="color:red;">False</mark> |

#### Proxy Authentication

| Log Level   | Enabled                               |
| ----------- | ------------------------------------- |
| Connections | <mark style="color:red;">False</mark> |
| Success     | <mark style="color:red;">False</mark> |
| Failed      | <mark style="color:red;">False</mark> |
| Error       | <mark style="color:red;">False</mark> |

### Data configuration

{% code lineNumbers="true" %}

```json
{
    "Decision": {{ data.get("Engine-Decision") }},
    "Datetime" : {{ data.Datetime }},
    "Level": {{ data.level }},
    "Authtype": {{ data.get("Authtype") }},
    "Client-MAC": {{ data.get("Client-MAC") }},
    "Username": {{ data.get("User-Name") }},
    "Applied-Rule": {{ data.get("Applied-Rule") }},
    "VLAN": {{ data.get("Assigned-VLAN", "No VLAN assigned") }},
    "Auth-Source-Type": {{ data.get("Auth-Source-Type") }},
    {% if data.get("Auth-Source-Type") == "WiFi" %}
        "SSID": {{ data.get("SSID") }},
        "AP-MAC": {{ data.get("AP-MAC") }},
    {% endif %}
    {% if data.get("Authtype") == "Certificate" %}
        "Certificate-CommonName": {{ data.get("Certificate-Details", {}).get("TLS-Cert-Common-Name") }},
        "Certificate-Serial": {{ data.get("Certificate-Details", {}).get("TLS-Client-Cert-Serial") }},
    {% endif %}
    {% if data.get("Verify-Result") != None %}
        "Verify-Result": {{ data.get("Verify-Result") }},
        "Verify-Status": {{ data.get("Verify-Status") }},
        "Verify-Type": {{ data.get("Verify-Type") }},
        "Verify-Description": {{ data.get("Verify-Description") }},
    {% endif %}
    {% if data.get("Reject-Description") != None %}
        "Reject-Description": {{ data.get("Reject-Description") }},
    {% endif %}
    "GKG-Correlation-Id": {{ data.get("GKG-Correlation-Id") }}
}
```

{% endcode %}

## Example 3: General error notifications

### Scope and assumptions

The scope of the query provided below is as follows:

* the admin is interested in receiving pro-active notifications about errors on the RADIUSaaS platform for the operations team.

### Target

[Teams](/admin-portal/settings/log-exporter/teams), or [Log Analytics](/admin-portal/settings/log-exporter/log-analytics) or [General Webhook](/admin-portal/settings/log-exporter/generic-webhook)

### Message Filter Configuration

#### Rule Engine

| Log Level | Enabled                               |
| --------- | ------------------------------------- |
| Success   | <mark style="color:red;">False</mark> |
| Failed    | <mark style="color:red;">False</mark> |
| Error     | <mark style="color:red;">False</mark> |

#### Authorization System

| Log Level | Enabled                                |
| --------- | -------------------------------------- |
| Requests  | <mark style="color:red;">False</mark>  |
| Success   | <mark style="color:red;">False</mark>  |
| Failed    | <mark style="color:red;">False</mark>  |
| Error     | <mark style="color:green;">True</mark> |

#### Proxy Authentication

| Log Level   | Enabled                                |
| ----------- | -------------------------------------- |
| Connections | <mark style="color:red;">False</mark>  |
| Success     | <mark style="color:red;">False</mark>  |
| Failed      | <mark style="color:red;">False</mark>  |
| Error       | <mark style="color:green;">True</mark> |

### Data configuration

#### Teams

{% code lineNumbers="true" %}

```
The RADIUS system has issues!
Message: {{ data.get('message') }}

Raw data:
{{ data }}
```

{% endcode %}

#### Log Analytics or General Webhook

{% code lineNumbers="true" %}

```
{
    "Message": {{ data.get("message") }},
    "Datetime" : {{ data.get("Datetime") }},
    "Level": {{ data.get("level") }},
    "Type": {{ data.get("type", "not applicable") }}
}
```

{% endcode %}


# Access & Rules


# Permissions

Permissions and RADIUSaaS REST API access tokens can be managed under https\://YOURNAME.radius-as-a-service.com/settings/permissions

## Overview

The **Permissions** menu allows you to control access to the RADIUSaaS Admin Portal and the RADIUSaaS REST API.

{% hint style="success" %}
RADIUSaaS supports multiple IDPs for the authentication when logging on to the RADIUSaaS Admin Portal.

RADIUSaaS does not store or manage its own administrator identities.

Therefore, administrators enjoy the comfort of working with their own identities and do not have to setup additional accounts.
{% endhint %}

<figure><img src="https://1222554226-files.gitbook.io/~/files/v0/b/gitbook-x-prod.appspot.com/o/spaces%2FSWU1DQ4UGkqER7uGNUOm%2Fuploads%2Fyyw9ix1TtbjLHiRzREUf%2Fimage.png?alt=media&amp;token=ed499809-b107-4c56-af40-a1505aecf01c" alt=""><figcaption></figcaption></figure>

{% hint style="info" %}
Changes to the role assignments and invalidating user tokens only become effective after clicking on **Save**.
{% endhint %}

## Supported IDPs

Under **Allowed Authentication Providers** any (including multiple) of the IDPs RADIUSaaS supports can be enabled:

* Apple (Apple ID)&#x20;
* DigitalOcean (User Email Address)
* Entra ID (User Principal Name)
* Google (Primary Email Address)

Furthermore, under **Custom OICD Provider** you may configure your own OpenID Connect providers to leverage other IDPs, e.g. Okta or sovereign Azure clouds (GCC, GCC High, ...).

## Roles

### Administrators

Identities or accounts entered here can access the RADIUSaaS Admin Portal with **full read and write permissions** on the service. These permissions include:&#x20;

* View [dashboards and Logs](/admin-portal/insights)
* View, add, change, delete [Users](/admin-portal/users/users)
* View, add, change, delete [RADIUS server certificates](/admin-portal/settings/settings-server#server-certificates) and [trusted certificates](/admin-portal/settings/trusted-roots) for client authentication and RadSec
* View, add, delete [Proxies](/admin-portal/settings/settings-proxy)
* View and change others settings including permissions
* Manage [RADIUSaaS REST API Access Token](#access-tokens)
* Access to all [API endpoints](/other/rest-api) and CRUD operations

### Viewers

Identities or accounts entered here can access the RADIUSaaS Admin Portal with **full read permissions** on the service. These permissions include:&#x20;

* View [dashboards and Logs](/admin-portal/insights)
* View [Users](/admin-portal/users/users)
* View, add, change, delete [RADIUS server certificates](/admin-portal/settings/settings-server#server-certificates) and [trusted certificates](/admin-portal/settings/trusted-roots) for client authentication and RadSec
* View [Proxies](/admin-portal/settings/settings-proxy)
* View others settings (permission cannot be viewed)
* Access to all [API endpoints](/other/rest-api) - **limited to read operations**

### Users

Identities or accounts entered here **cannot** access the RADIUSaaS Admin Portal, however, they can access the [**My Invited Users**](/admin-portal/my-invited-users) portal, where they are able to create [Users](/admin-portal/users/users) for BYOD or guest access.

### Invalidate user tokens

During authentication to the RADIUSaaS Admin Portal, each permitted identity obtains an access (bearer) token that is cached in the browser's cookie store. The lifetime of the token is 30 days. Furthermore, RADIUSaaS has permission to refresh these access tokens.

In a security event, RADIUSaaS Administrators can **invalidate all previously issued access tokens** by setting the minimum issuance date to now.&#x20;

<figure><img src="https://1222554226-files.gitbook.io/~/files/v0/b/gitbook-x-prod.appspot.com/o/spaces%2FSWU1DQ4UGkqER7uGNUOm%2Fuploads%2FLnaGdTdP85UpsJz6nWcd%2Fimage.png?alt=media&amp;token=461f28cd-d067-489b-ac57-568ef308e569" alt="" width="563"><figcaption></figcaption></figure>

## Technical Contacts

{% hint style="info" %}
Please note that this feature is in preparation for a notification feature in a future release of RADIUSaaS.
{% endhint %}

Add up to 5 technical contacts to receive e-mail notifications related to your instance. You can select the event level for each contact.

<table><thead><tr><th width="137">Event level</th><th>Example events</th></tr></thead><tbody><tr><td>Info</td><td>Scheduled updates to your instance.</td></tr><tr><td>Warning</td><td>A certificate is about to expire, or an ISP is experiencing issues that could impact your instance.</td></tr><tr><td>Critical</td><td>Interruption to your instance. </td></tr></tbody></table>

<figure><img src="https://1222554226-files.gitbook.io/~/files/v0/b/gitbook-x-prod.appspot.com/o/spaces%2FSWU1DQ4UGkqER7uGNUOm%2Fuploads%2FGucXrO98ppH2IGFCADSM%2F2024-12-06_11h41_45.png?alt=media&amp;token=5b78dbc4-d079-40f0-9134-a8ad7dda37a6" alt=""><figcaption></figcaption></figure>

## Access Tokens

Access tokens are required to authenticate calls to the [RADIUSaaS REST API](/other/rest-api).

<figure><img src="https://1222554226-files.gitbook.io/~/files/v0/b/gitbook-x-prod.appspot.com/o/spaces%2FSWU1DQ4UGkqER7uGNUOm%2Fuploads%2F3XPgqLQgguUYdUeC3fAB%2Fimage.png?alt=media&amp;token=b365d3dd-38e0-4878-9ee2-eea8e0d8753d" alt=""><figcaption></figcaption></figure>

### Add

Follow these steps to create a new access token:

1. Click on **Add**
2. Provide a meaningful **Name** for the access token
3. Set the permission level by selecting a [**Role**](#roles)
4. Select the lifetime of the access token
5. Click on **Create**\
   ![](https://1222554226-files.gitbook.io/~/files/v0/b/gitbook-x-prod.appspot.com/o/spaces%2FSWU1DQ4UGkqER7uGNUOm%2Fuploads%2Fs4fakstavtZVWVgMVH1K%2Fimage.png?alt=media\&token=5877ff38-7f1c-474a-bdf9-aeab763b49c7)<br>
6. Copy the access token to the clipboard and store it at a secure location.\
   ![](https://1222554226-files.gitbook.io/~/files/v0/b/gitbook-x-prod.appspot.com/o/spaces%2FSWU1DQ4UGkqER7uGNUOm%2Fuploads%2F42kTjdesW5amEcScFa7C%2FScreenshot_2024-05-23_at_18_46_08.jpg?alt=media\&token=d7c71247-eccb-47f1-821f-0ccb1bde55ec)
7. Click on **Close**

### **Delete**

To delete an access token, locate it in the table and click on the bin icon:

<figure><img src="https://1222554226-files.gitbook.io/~/files/v0/b/gitbook-x-prod.appspot.com/o/spaces%2FSWU1DQ4UGkqER7uGNUOm%2Fuploads%2Fly5SYNorElOwmEF0O4Bs%2FScreenshot%202026-02-25%20at%2017.33.02.png?alt=media&amp;token=d6fef168-ecb3-4db0-9de0-e1fe7de4330a" alt=""><figcaption></figcaption></figure>

## Permissions consent

Choose from different identity providers to be able to log into your portal.

{% tabs %}
{% tab title="Entra ID" %}

Microsoft Entra ID (Azure AD) accounts that log on to the RADIUSaaS Admin Portal for the first time must grant RADIUSaaS a limited set of [permissions in their Azure tenant](https://docs.radiusaas.com/admin-portal/access-and-rules/pages/xWuAAd4GID6bXIOu9mQw#id-5.-which-tenant-permissions-do-users-accessing-the-radiusaas-web-portal-have-to-consent-to).

There are two alternative ways to provide consent:

* **User Consent**\
  Each user accepts the consent upon first login to the portal.
* **Admin Consent**\
  An administrator can consent on behalf of the organization for all users.

### User consent

If no consent has been given on behalf of the organization before by an admin, a user will see a permission request dialogue:

<figure><img src="https://content.gitbook.com/content/SWU1DQ4UGkqER7uGNUOm/blobs/Whj6dRSGUJFm7zJUfVjv/image.png" alt=""><figcaption></figcaption></figure>

Users can review or revoke this consent in Microsoft [My Apps](< https://myapps.microsoft.com>).

<figure><img src="https://content.gitbook.com/content/SWU1DQ4UGkqER7uGNUOm/blobs/xjm5mD9gdtNJOZWoQ4Zi/image.png" alt=""><figcaption></figcaption></figure>

Administrators can review & revoke user consents in the Azure Portal (**Microsoft Entra ID** > **Enterprise Applications** > **RADIUS as a Service**):

<figure><img src="https://content.gitbook.com/content/SWU1DQ4UGkqER7uGNUOm/blobs/Hf30pa88xZZZySTcc7gL/image.png" alt=""><figcaption></figcaption></figure>

### Admin consent

Rather than requiring consent from each user, administrators can grant consent for all users on behalf of the organization, when logging in the RADIUSaaS web portal for the first time:

<figure><img src="https://content.gitbook.com/content/SWU1DQ4UGkqER7uGNUOm/blobs/EB1IjdY0ixwIpOm9Ys5C/image.png" alt=""><figcaption></figcaption></figure>

Alternatively, administrators can grant the consent on behalf of the organization in the Azure portal (**Microsoft Entra ID** > **Enterprise Applications** > **RADIUS as a Service**). In Azure Portal, administrators can also review or revoke the consent:

<figure><img src="https://content.gitbook.com/content/SWU1DQ4UGkqER7uGNUOm/blobs/JnCFDpixcJXfZzdCyHx4/image.png" alt=""><figcaption></figcaption></figure>
{% endtab %}

{% tab title="Apple" %}
When using an Apple ID to log into RADIUSaaS, make sure to **not hide** your email address.

<figure><img src="https://1222554226-files.gitbook.io/~/files/v0/b/gitbook-x-prod.appspot.com/o/spaces%2FSWU1DQ4UGkqER7uGNUOm%2Fuploads%2Fe5EuZ59EC1vsOpHA9R0P%2Fimage.png?alt=media&amp;token=6ef2dbf5-4453-4a09-96c3-1148509c9e67" alt=""><figcaption></figcaption></figure>

{% hint style="warning" %}
If you chose to hide your email in this dialog you will not be able to log into your portal. You will then need to remove the RADIUSaaS app on **account.apple.com** in the **Sign in with Apple** section
{% endhint %}
{% endtab %}

{% tab title="Digital Ocean" %}
Digital Ocean will require you to authorize the application on a team to be able to login:

<figure><img src="https://1222554226-files.gitbook.io/~/files/v0/b/gitbook-x-prod.appspot.com/o/spaces%2FSWU1DQ4UGkqER7uGNUOm%2Fuploads%2FxZYfitlR8gTW4MczGSYc%2Fimage.png?alt=media&amp;token=5e9da2a3-5b29-4127-af3c-e1712c858e5e" alt=""><figcaption></figcaption></figure>
{% endtab %}

{% tab title="Google" %}
Google will require you to allow the application to access limited data on your account.

<figure><img src="https://1222554226-files.gitbook.io/~/files/v0/b/gitbook-x-prod.appspot.com/o/spaces%2FSWU1DQ4UGkqER7uGNUOm%2Fuploads%2FTAvDqZsSxfp4cm1JXBtD%2Fimage.png?alt=media&amp;token=03af565c-e409-41c8-bb34-47bb4eeb6827" alt=""><figcaption></figcaption></figure>
{% endtab %}

{% tab title="Custom OIDC Provider (Okta)" %}
The specific information you need to provide for the custom OIDC provider depends on the identity provider you choose. The following **example** is based on **Okta**.

<figure><img src="https://1222554226-files.gitbook.io/~/files/v0/b/gitbook-x-prod.appspot.com/o/spaces%2FSWU1DQ4UGkqER7uGNUOm%2Fuploads%2FuEXUhGcJaXbhYXw7S8Fu%2Fimage.png?alt=media&amp;token=e98d23b2-7ecc-47c0-8fb3-bf45211ec70d" alt=""><figcaption></figcaption></figure>

In the Okta admin console, you will need to create a new app integration with the following details:

| Sign-in method       | OIDC - OpenID Connect                                                                                                                                                                             |
| -------------------- | ------------------------------------------------------------------------------------------------------------------------------------------------------------------------------------------------- |
| Application Type     | Web Application                                                                                                                                                                                   |
| Sign-in redirect URI | <p>Provided in RADIUSaaS dialogue above<br>Example: <a href="https://eu1.radius-as-a-service.com/loginserver/authResponse"><https://eu1.radius-as-a-service.com/loginserver/authResponse></a></p> |

Make sure to assign the integration to the intended user group and save. You can now retrieve the required information from this application to enter in RADIUSaaS:

The **Display Name** can be chosen freely and will be shown during login.

With Okta, the **Authentication URL** is in the following form:

`https://`**`{YourOrga}`**`.okta.com/oauth2/v1/authorize`

The Token URL is also constructed and looks like this:

`https://`**`{YourOrga}`**`.okta.com/oauth2/v1/token`

The **Client ID** and **Client Secret** can be copied and created in the application itself:

<figure><img src="https://1222554226-files.gitbook.io/~/files/v0/b/gitbook-x-prod.appspot.com/o/spaces%2FSWU1DQ4UGkqER7uGNUOm%2Fuploads%2FEVB8IugvO1b3tUQAeatA%2Fimage.png?alt=media&amp;token=8998921b-4b1f-4e47-9db9-233431a838d5" alt=""><figcaption></figcaption></figure>

For the **Client Scope** `openid email` is required. This will tell Okta that we are using an OpenID authentication and need to read the logged in users email address.

After saving and allowing this provider, you should be able to use it to authenticate from the login page:

<figure><img src="https://1222554226-files.gitbook.io/~/files/v0/b/gitbook-x-prod.appspot.com/o/spaces%2FSWU1DQ4UGkqER7uGNUOm%2Fuploads%2F0MRlBRVwq5LiFMOAcSht%2Fimage.png?alt=media&amp;token=0d28e700-3ce1-489f-98ab-9784e9e580cf" alt=""><figcaption></figcaption></figure>
{% endtab %}

{% tab title="Custom OIDC Provider (Entra ID)" %}
If required in certain scenarios (e.g. **GCC High** tenants), you can also use a self-created Entra ID app registration to authenticate to your RADIUSaaS portal.

#### Preparation

Before creating the app registration, make sure to copy the redirect URL from the **Permissions** section of your RADIUSaaS portal. You can find the URL in the top of the **Custom OIDC Provider** editing dialogue:

<figure><img src="https://1222554226-files.gitbook.io/~/files/v0/b/gitbook-x-prod.appspot.com/o/spaces%2FSWU1DQ4UGkqER7uGNUOm%2Fuploads%2F4Xd1vQgzqzKWblLPTO35%2Fimage.png?alt=media&amp;token=0cbcadfc-f1eb-4847-8261-2f16a3b1b139" alt="Click on the Edit button to find the redirect URL"><figcaption></figcaption></figure>

<figure><img src="https://1222554226-files.gitbook.io/~/files/v0/b/gitbook-x-prod.appspot.com/o/spaces%2FSWU1DQ4UGkqER7uGNUOm%2Fuploads%2FpAY9jOJYugXmcuM1UDeQ%2Fimage.png?alt=media&amp;token=40bd205c-1cd8-4a0b-9a25-9da4d11259cc" alt="Copy the redirect URL from the dialogues header"><figcaption></figcaption></figure>

### Create App Registration

In Entra ID, navigate to **App Registrations** and create a new registration:

<figure><img src="https://1222554226-files.gitbook.io/~/files/v0/b/gitbook-x-prod.appspot.com/o/spaces%2FSWU1DQ4UGkqER7uGNUOm%2Fuploads%2Fzg2fyhdDN5pISvI1KjUt%2Fimage.png?alt=media&amp;token=a8d2eeb8-5b05-4d34-894e-ba83e36d3cb7" alt=""><figcaption></figcaption></figure>

Select a descriptive **Name** for the registration and add the redirect URI that you have copied from the previous step as **Web** type.

#### Add API Permissions

In the created registration, navigate to **API permissions** and add `email` and `openid` from Microsoft Graph as **Delegated** permissions. Also make sure to grant admin consent for your tenant:

<figure><img src="https://1222554226-files.gitbook.io/~/files/v0/b/gitbook-x-prod.appspot.com/o/spaces%2FSWU1DQ4UGkqER7uGNUOm%2Fuploads%2FQq24dkHU03MSR6qI0ajP%2Fimage.png?alt=media&amp;token=ccbb60b2-cdb0-4f83-827a-8b2d867465af" alt=""><figcaption></figcaption></figure>

#### Add Client Secret

To allow RADIUSaaS to use this registration, create a client secret in the **Certificates & Secrets** section of the registration. Copy the value of the secret for later.

<figure><img src="https://1222554226-files.gitbook.io/~/files/v0/b/gitbook-x-prod.appspot.com/o/spaces%2FSWU1DQ4UGkqER7uGNUOm%2Fuploads%2Fs7Ujg2gb86TRylYApprk%2Fimage.png?alt=media&amp;token=c9ec97d2-c6a0-48b3-9c68-6727219ba932" alt=""><figcaption></figcaption></figure>

#### Note Registration Details

You will later need the registrations **Client ID** and some URLs specific to your tenant. You can find these in the Overview page of the registration:

<figure><img src="https://1222554226-files.gitbook.io/~/files/v0/b/gitbook-x-prod.appspot.com/o/spaces%2FSWU1DQ4UGkqER7uGNUOm%2Fuploads%2Fd1xpptiKjJyhRfnkKyMT%2Fimage.png?alt=media&amp;token=bbd97ab9-378a-433a-aa7c-e4ed4746e757" alt=""><figcaption></figcaption></figure>

#### Assign Users

For anyone to be able to use this app registration for sign-ins, make sure to add them in the managed enterprise application. You can find this in Entra ID in **Enterprise Applications** having the same name as your app registration. There is also a link to this in the overview of the app registration.

<figure><img src="https://1222554226-files.gitbook.io/~/files/v0/b/gitbook-x-prod.appspot.com/o/spaces%2FSWU1DQ4UGkqER7uGNUOm%2Fuploads%2Fey2lPelBnCcdzk1a9xkc%2Fimage.png?alt=media&amp;token=ed2a9950-31c3-47b9-8492-c06223a3329a" alt="Assign users to allow them to use the application"><figcaption></figcaption></figure>

### Configure the OIDC Provider in RADIUSaaS

Back in the RADIUSaaS portal, navigate to the Permissions section and edit the custom OIDC provider and fill in the required information:

<figure><img src="https://1222554226-files.gitbook.io/~/files/v0/b/gitbook-x-prod.appspot.com/o/spaces%2FSWU1DQ4UGkqER7uGNUOm%2Fuploads%2FSY5LeHQxsb0xkkCecLhb%2Fimage.png?alt=media&amp;token=274f787e-483f-4649-8a0a-0eb0da403ebc" alt=""><figcaption></figcaption></figure>

| Field              | Explanation                                                                             |
| ------------------ | --------------------------------------------------------------------------------------- |
| Display Name       | This name will be shown on the login page                                               |
| Authentication URL | `OAuth 2.0 authorization endpoint (v2)` from the registrations endpoints                |
| Token URL          | `OAuth 2.0 token endpoint (v2)` from the registrations endpoints                        |
| Client ID          | The client ID of the app registration. Can be found on its overview page                |
| Client Secret      | The previously created client secret                                                    |
| Client Scope       | Defines the information requested during the authentication. Enter `openid email` here. |

After saving the configuration make sure to allow the custom provider and add some users for this provider. You should now be able to use the provider to log into your RADIUSaaS portal:

<figure><img src="https://1222554226-files.gitbook.io/~/files/v0/b/gitbook-x-prod.appspot.com/o/spaces%2FSWU1DQ4UGkqER7uGNUOm%2Fuploads%2F83u6Jn9KYrPpnZF2l2j7%2Fimage.png?alt=media&amp;token=6a24c665-472d-4bde-b3a6-7bad0998b868" alt=""><figcaption></figcaption></figure>

{% hint style="warning" %}
It might be necessary for an Entra administrator to initially use this login to consent again for their tenant. This only needs to be done once.
{% endhint %}
{% endtab %}
{% endtabs %}


# Rules

This is the documentation of the RADIUSaaS Rule Engine, which allows you to add another layer of security by defining rules that further restrict network access requests or by assigning VLAN IDs.

## General&#x20;

The Rule Engine is a second layer of security that sits behind credential authentication. Once a device or user presents a valid **certificate** (checked against your **Trusted Roots**) or a valid **Username/Password** pair, the Rule Engine decides whether that specific request is actually allowed onto the network, and what it receives in return, such as a VLAN ID or additional RADIUS attributes.

### Default rule

To avoid disruption of any existing instance or in case you do not want to use the Rule Engine at all, any authentication is allowed if no rule is defined by default. This is realized through our default rule **Any authentication allowed**.

{% hint style="warning" %}
The default rule **Any authentication allowed** still requires the presence of valid authentication credentials for a successful network authentication.
{% endhint %}

### Order of rule execution

Every incoming request is checked against your enabled rules from top to bottom. The first rule whose **medium**, **authentication method** and **filters** all match the request wins, and decides the outcome. Rules positioned below that match are never evaluated for that request.

If you have multiple rules configured, they will be applied in the order you see in your web portal - from top to bottom.&#x20;

The only exception is the **Any authentication allowed** rule, that will be handled as last step in case it is configured. This is especially helpful during a ramp-in scenario, where you might not be certain that your rules cover all use-cases or locations. All authentication request rejected by the prior rules will then still be accepted by the default rule. In the dashboard you are then able to observe the devices/users failing for all other rules and correct/extend the rules accordingly.&#x20;

In case you end up having a large number of rules, we recommend - for the sake of maintaining high performance - to order the rules in a way that the most likely rules are hit first.

## More Information

Find more details on the rules and how to use them in the following pages:

{% content-ref url="/pages/c4M1f9uiuAyD5RqWmtnG" %}
[General Structure](/admin-portal/access-and-rules/rules/general-structure)
{% endcontent-ref %}

{% content-ref url="/pages/Z7cPtVJJOK1Xtn9V5Pqk" %}
[Groups](/admin-portal/access-and-rules/rules/groups)
{% endcontent-ref %}

{% content-ref url="/pages/fCFu0Mb5hbAe21eqB7p6" %}
[Certificate Extensions](/admin-portal/access-and-rules/rules/certificate-extensions)
{% endcontent-ref %}

{% content-ref url="/pages/nr8htn2giI38d0uKa82w" %}
[Attribute Catalogue](/admin-portal/access-and-rules/rules/attribute-catalogue)
{% endcontent-ref %}


# General Structure

Rules allow further restrictions

<figure><img src="https://1222554226-files.gitbook.io/~/files/v0/b/gitbook-x-prod.appspot.com/o/spaces%2FSWU1DQ4UGkqER7uGNUOm%2Fuploads%2FuqYqmbOeQMm3Kt6sqOCd%2Fimage.png?alt=media&amp;token=46329c49-8f32-417c-821f-b913b11c5526" alt=""><figcaption></figcaption></figure>

## Rule Collection

{% hint style="info" %}
We recommend providing descriptive names for your rules, as this will allow them to be clearly identifiable in the Insight [Logs](/admin-portal/insights/log).
{% endhint %}

Every Rule can have a **Name, Description** and is specified for a specific authentication type.\
Currently you can define a rule for **Wi-Fi**, **LAN** and **VPN**. Furthermore, you can **Enable** or **Disable** each rule.

The Rules tab lists every configured rule, its position, its type (Wi-Fi, LAN, VPN or Generic Allow), its **name** and **description**, the **authentication method** it accepts, the **filters** it applies to, what it **grants**, and whether it is enabled.

## Creating a Rule

Clicking **Add rule** lets you pick a medium: Generic Allow, Wi-Fi, LAN, or VPN.

Choosing **Wi-Fi**, **LAN** or **VPN** opens a guided four-step wizard. A live "in plain words" summary at the bottom of the dialog rephrases the rule in plain language as it is built, for example:

> **IN PLAIN WORDS**
>
> A Wi-Fi request authenticating with certificate only from CN=SCEPman-SaaS-CA,O=Contoso matching Cert Subject (DN) matches OU=Printers is granted VLAN 16 (static).

The following steps show the rule editor with a simple example of the above description:

{% stepper %}
{% step %}

### Identity

Just a **Name**, an optional **Description**, and an enable/disable toggle. The medium and authentication method are configured in later steps, so the name only needs to describe intent, e.g. "Corporate Wi-Fi Access" rather than encoding the SSID or VLAN into the name.

<figure><img src="https://1222554226-files.gitbook.io/~/files/v0/b/gitbook-x-prod.appspot.com/o/spaces%2FSWU1DQ4UGkqER7uGNUOm%2Fuploads%2F6Tn0vpMOXCp1JcPRlfN6%2Fimage.png?alt=media&amp;token=d9e7629e-c5ee-41ca-b0ec-950615ef5675" alt=""><figcaption></figcaption></figure>
{% endstep %}

{% step %}

### Who may authenticate (Authentication Methods)

Turn on Certificate-based and/or Username/Password-based authentication; at least one must be enabled. Enabling certificates reveals an optional **Restrict root certificates** toggle, which narrows the rule down to specific Trusted Roots instead of accepting any certificate trusted by the platform.

<figure><img src="https://1222554226-files.gitbook.io/~/files/v0/b/gitbook-x-prod.appspot.com/o/spaces%2FSWU1DQ4UGkqER7uGNUOm%2Fuploads%2FSWdFFR7MVVHQa2YihETQ%2Fimage.png?alt=media&amp;token=be6cb085-f598-4379-8266-589da4ffb053" alt=""><figcaption></figcaption></figure>
{% endstep %}

{% step %}

### Where it applies (Filters)

Filters narrow the rule down and are combined with AND, meaning a request must satisfy every filter listed; leaving this step empty means the rule applies everywhere. The filters on offer depend on the medium, and each filter can take individual values or reference a reusable Group. See the Wi-Fi, LAN and VPN sections below for the specific filters each medium offers and a worked example.

<figure><img src="https://1222554226-files.gitbook.io/~/files/v0/b/gitbook-x-prod.appspot.com/o/spaces%2FSWU1DQ4UGkqER7uGNUOm%2Fuploads%2FoAXR3DnBtKqws4WDsMBX%2Fimage.png?alt=media&amp;token=d1e4b0d0-dceb-459b-9881-82af78edda3a" alt=""><figcaption></figcaption></figure>
{% endstep %}

{% step %}

### What it grants (Assignments)

Defines the access returned when the rule matches: a VLAN and/or additional RADIUS attributes, each either **Static** (a fixed value) or **Dynamic**. Dynamic assignment reads a value out of the certificate, from its Issuer, SAN, DN, or a custom Extension, applies a regex pattern to it, and maps the result to the value that gets granted. This same regex mechanism is also used for Certificate Attribute filters in Step 3. You can also define what happens if no pattern matches: reject the request, or fall back to a default value.

<figure><img src="https://1222554226-files.gitbook.io/~/files/v0/b/gitbook-x-prod.appspot.com/o/spaces%2FSWU1DQ4UGkqER7uGNUOm%2Fuploads%2F76FxD3SSjW9CjxRucRqv%2Fimage.png?alt=media&amp;token=a00c2935-d390-4e42-a7f5-a2683b6f3b5f" alt=""><figcaption></figcaption></figure>
{% endstep %}
{% endstepper %}

***

## Authentication Methods

The authentication methods you can define in "Who may authenticate" restricts the technical medium an authentication needs to use to be accepted.

#### Certificate-based authentication

You can either enable CBA alone to match all such authentications or further limit authentications for certificates signed by specific CAs.

<figure><img src="https://1222554226-files.gitbook.io/~/files/v0/b/gitbook-x-prod.appspot.com/o/spaces%2FSWU1DQ4UGkqER7uGNUOm%2Fuploads%2F8uj6FaXx1Y9wnjJI3r4N%2Fimage.png?alt=media&amp;token=b52dbab5-8b10-49c2-863f-ca8d78727a32" alt=""><figcaption></figcaption></figure>

{% hint style="info" %}
You can further restrict CBA using filters to match on the issuer, SAN, DN or extensions of the certificate used.
{% endhint %}

#### Username/Password-based authentication

Enable this method to allow authentications that do not use certificate-based authentication.

<figure><img src="https://1222554226-files.gitbook.io/~/files/v0/b/gitbook-x-prod.appspot.com/o/spaces%2FSWU1DQ4UGkqER7uGNUOm%2Fuploads%2FXds3gWHKjuVLrtEk4ejG%2Fimage.png?alt=media&amp;token=f2472c65-0893-41f7-995d-85683c51b7de" alt=""><figcaption></figcaption></figure>

{% hint style="info" %}
You can further restrict username/password-based authentication using filters to match on usernames or owners.
{% endhint %}

***

## Filters

Filters can be used to build granular rules that match only under certain circumstances. There are multiple available filters that can be used in different situations:

#### Available for all Rules

* Client IPs
* Certificate Attributes
* Username/Password
* Intune IDs

#### Available for specific Rules

* SSIDs (Wi-Fi Rules)
* Switch MACs (LAN Rules)
* NAS Identitfiers (VPN Rules)
* NAS IPs (VPN Rules)

### Client IPs

Use the Client IPs filter to match a rule on the WAN-IP address of the authentications. You can use single addresses, CIDRs or a defined group.

<figure><img src="https://1222554226-files.gitbook.io/~/files/v0/b/gitbook-x-prod.appspot.com/o/spaces%2FSWU1DQ4UGkqER7uGNUOm%2Fuploads%2FE3pAICCrGZGSXmW390KP%2Fimage.png?alt=media&amp;token=89fd3dc1-978f-4865-9748-78406221ba26" alt=""><figcaption></figcaption></figure>

### Certificate Attributes

Use this filter type to match a rule only if a presented client certificate contains the required information. You can filter for the following attributes:

* Issuer
* SAN (Subject Alternative Name)
* DN (Distinguished Name)
* Extension

<figure><img src="https://1222554226-files.gitbook.io/~/files/v0/b/gitbook-x-prod.appspot.com/o/spaces%2FSWU1DQ4UGkqER7uGNUOm%2Fuploads%2Fm6Unp9GxJi66ve2Sx07b%2Fimage.png?alt=media&amp;token=21ba8b61-da02-4dcf-bd2a-78515b744d29" alt=""><figcaption></figcaption></figure>

#### Examples:

* Use a SAN filter `.*-ext@contoso\.com$` to match `john.smith-ext@contoso.com` → contractor identity cert, VLAN 10.
* Use a DN `OU=Printers` to match the subject `CN=PRINTER07,OU=Printers,O=Contoso` → assign VLAN 16 (printers).
* Use a DN `OU=Finance` to match the subject `CN=jdoe,OU=Finance,O=Contoso` → VLAN 30 (Finance).
* Use a SAN filter `^platform:windows$` to match specific platforms. Use an URI SAN with value of `platform:windows` to match this.

{% hint style="info" %}
Note: The rule engine matches values case-sensitively. `OU=Printers` will not match `OU=printers`
{% endhint %}

### Username/Password

<figure><img src="https://1222554226-files.gitbook.io/~/files/v0/b/gitbook-x-prod.appspot.com/o/spaces%2FSWU1DQ4UGkqER7uGNUOm%2Fuploads%2FHh9k0z7W2eLiQYiS2KF0%2Fimage.png?alt=media&amp;token=77f318e2-6959-49f8-97ff-25dd688827d4" alt=""><figcaption></figcaption></figure>

#### Examples:

* Username `^ext-.*` matches `ext-jsmith` → VLAN 50 (contractor)
* Owner `IT-AssetPool` matches shared/kiosk device tag → Filter-Id `kiosk-acl`

### SSIDs

{% hint style="info" %}
This filter type is only available on Wi-Fi rules
{% endhint %}

To filter for SSIDs, you can choose to match single SSIDs per entry or add a defined group of SSIDs.

<figure><img src="https://1222554226-files.gitbook.io/~/files/v0/b/gitbook-x-prod.appspot.com/o/spaces%2FSWU1DQ4UGkqER7uGNUOm%2Fuploads%2FIE4wj6NbEtM2RQvoN8bW%2Fimage.png?alt=media&amp;token=8df3bca5-11e6-4f1c-8249-9ec1ee732be2" alt=""><figcaption></figcaption></figure>

### Switch MACs

{% hint style="info" %}
This filter type is only available on LAN rules
{% endhint %}

To filter for Switch MACs, you can choose to match single address per entry or add a defined group of Switch MACs.

<figure><img src="https://1222554226-files.gitbook.io/~/files/v0/b/gitbook-x-prod.appspot.com/o/spaces%2FSWU1DQ4UGkqER7uGNUOm%2Fuploads%2FiC3J7Jch7WMVcNeh1WLQ%2Fimage.png?alt=media&amp;token=f358bc05-5ce7-4de1-86c8-3864ed2d5cb9" alt=""><figcaption></figcaption></figure>

### NAS-Identifiers

{% hint style="info" %}
This filter type is only available on VPN rules
{% endhint %}

Similar to other filters, you can choose to match single NAS-Identifiers per entry or add a defined group of NAS-Identifiers.

### NAS IPs

{% hint style="info" %}
This filter type is only available on VPN rules
{% endhint %}

Similar to other filters, you can choose to match single NAS-IPs per entry or add a defined group of NAS-IPs.

### Intune IDs

This is a historical filter. If your clients are authenticating with certificates that your clients received during the AAD-Join, you want to filter for your Intune Tenant ID.

In case you have entered your Tenant IDs as described [here](https://docs.radiusaas.com/admin-portal/settings/trusted-roots#intune-id), the default behaviour of RADIUSaaS is that only machines presenting a certificate with extension OID **1.2.840.113556.5.14** and a whitelisted value for the Tenant ID will get access to the network. With the rule engine, you now have the option to further restrict the access to specific Intune IDs for a specific rule or to ignore the certificate extension. This allows you to have a multi-deployment setup, where some clients come with certificates providing the respective OID and some do not.

<figure><img src="https://1222554226-files.gitbook.io/~/files/v0/b/gitbook-x-prod.appspot.com/o/spaces%2FSWU1DQ4UGkqER7uGNUOm%2Fuploads%2FRwLK1xhjETI3bbmPQKPZ%2Fimage.png?alt=media&amp;token=6853e911-db5a-427b-ace7-6152a7da4a0b" alt=""><figcaption></figcaption></figure>

***

## Assignments

If an authentication is valid and matches a rule, the returned Access-Accept packet can contain specific information to give further instructions to the authenticator.

### VLAN

A VLAN ID can be assigned statically, meaning that all matching authentications will receive this VLAN ID, or dynamically by extracting the desired value from either a certificate attribute or the username/owner.

#### By Certificate Subject (DN)

* You can also assign VLAN IDs based on properties in the Subject Name of your certificate
* Therefore, specify in which property the VLAN ID is stored
* Then, configure which string the VLAN ID is prefixed with
* The VLAN ID is not required to have a prefix. However, it can be required to use a prefix in case your Subject Name carries the same attribute more than once (e.g. several CN's are quite common).

As an example, the following assignment will match the DN attribute of the client certificate using the regex pattern `OU=vlan-(\d+)` and use the first matching group as resulting value.

For a certificate subject (DN) of `CN=CLIENT01,OU=vlan-15` this result in a VLAN assignment of **15**.

<figure><img src="https://1222554226-files.gitbook.io/~/files/v0/b/gitbook-x-prod.appspot.com/o/spaces%2FSWU1DQ4UGkqER7uGNUOm%2Fuploads%2FDHD7alAihmloa8O1XEt6%2Fimage.png?alt=media&amp;token=e5989ef7-01f2-4130-97f0-a9fb293b65b2" alt=""><figcaption></figcaption></figure>

#### By Certificate Extension

{% hint style="info" %}
Currently it is not supported to add custom certificate extensions to SCEP profiles in many MDM systems, including Microsoft Intune and JAMF.

We therefore recommend to use the subject of the certificate instead to add a VLAN assignment.
{% endhint %}

* Select one of your created Certificate Extensions
* Choose a regex pattern to get the desired value

<figure><img src="https://1222554226-files.gitbook.io/~/files/v0/b/gitbook-x-prod.appspot.com/o/spaces%2FSWU1DQ4UGkqER7uGNUOm%2Fuploads%2FN9UlNW9yIpgbinlP5A3z%2Fimage.png?alt=media&amp;token=a4d9dafd-ecca-4365-979d-126a3c1b2373" alt=""><figcaption></figcaption></figure>

### Attributes

RADIUS return attributes allow network administrators to define specific settings for individual users or groups.

For example,

* For User Profile Configuration, an attribute can specify the maximum session duration, allowed services (such as VPN or Wi-Fi), and IP address assignment method.
* For Dynamic IP Address Assignment, an attribute might specify that the user should receive a static IP address or use DHCP for dynamic assignment.
* For Access Control and Authorization, an attribute determines the user’s access level (e.g., guest, employee, administrator) and any restrictions (e.g., time limits).
* For Session Management, an attribute can specify session timeout (how long the user can stay connected), idle timeout (disconnect after inactivity), and maximum simultaneous logins.
* For Quality of Service (QoS), an attribute might prioritize voice traffic over data traffic for a specific user.

Vendors can create their own custom attributes (vendor-specific attributes or VSAs). These allow for additional functionality beyond the standard IETF attributes. VSAs are encapsulated within the standard attribute 26.

In the same manner of VLAN assignments, attributes can be returned either statically or dynamically.

You can choose from different return attributes and extend them in the attribute catalogue:

{% content-ref url="/pages/nr8htn2giI38d0uKa82w" %}
[Attribute Catalogue](/admin-portal/access-and-rules/rules/attribute-catalogue)
{% endcontent-ref %}

#### Example:

Dynamically assign the value of the certificates RDN L to the the return attribute Filter-Id

<figure><img src="https://1222554226-files.gitbook.io/~/files/v0/b/gitbook-x-prod.appspot.com/o/spaces%2FSWU1DQ4UGkqER7uGNUOm%2Fuploads%2F5FXdUmoCWhUkTLLIX77v%2Fimage.png?alt=media&amp;token=bb33b7b7-e9b3-4d67-a5e5-a9c2a50e465f" alt=""><figcaption></figcaption></figure>


# Groups

The Groups tab centralizes reusable named sets of values, so a rule references the group instead of listing raw values directly. RADIUSaaS offers six kinds:

* SSID groups
* Access-point MAC groups
* Switch groups
* NAS identifier groups
* NAS IP address groups
* Client IP groups

Members can be added or removed from a group later without touching any rule that references it.

<figure><img src="https://1222554226-files.gitbook.io/~/files/v0/b/gitbook-x-prod.appspot.com/o/spaces%2FSWU1DQ4UGkqER7uGNUOm%2Fuploads%2FFTjFGMxP8n4cdzkCtj7K%2Fimage.png?alt=media&amp;token=1ad21d6b-41b8-4aea-a475-0b8306f68733" alt=""><figcaption></figcaption></figure>

### Creating a Group

Creating a group asks for a name and an optional description, plus the members themselves, which can be added one at a time or pasted in bulk.

<figure><img src="https://1222554226-files.gitbook.io/~/files/v0/b/gitbook-x-prod.appspot.com/o/spaces%2FSWU1DQ4UGkqER7uGNUOm%2Fuploads%2FSxqG4YVvKYuMA6ZHiJda%2Fimage.png?alt=media&amp;token=d0b3488a-e5ef-46ec-8566-937346dd4b55" alt=""><figcaption></figcaption></figure>

### Paste a List

To enter group members in bulk, you use the "Paste a list..." option to then paste your desired entries. The entries can be either one per line or comma separated.

<figure><img src="https://1222554226-files.gitbook.io/~/files/v0/b/gitbook-x-prod.appspot.com/o/spaces%2FSWU1DQ4UGkqER7uGNUOm%2Fuploads%2F6CwVbsTjOTo6BdNhQqnT%2Fimage.png?alt=media&amp;token=5644b0d6-d71a-4ef6-889f-3554f5b87117" alt=""><figcaption></figcaption></figure>

Clicking Add to list will then deduplicate the entries and add them to the list of members.

### Prefixes

Some of the groups support prefixing to wild-card match multiple values. These are SSIDs, NAS-Identifiers and all MAC-based groups.

Such prefixed members will be shown with the "PREFIX" tag:

<figure><img src="https://1222554226-files.gitbook.io/~/files/v0/b/gitbook-x-prod.appspot.com/o/spaces%2FSWU1DQ4UGkqER7uGNUOm%2Fuploads%2Fqms9h3zrz0kZorUOZWLI%2Fimage.png?alt=media&amp;token=ae2e2706-6131-4431-9715-c1a27ecceb25" alt=""><figcaption></figcaption></figure>

### MAC Addresses

For MAC address-based groups, different formats are supported and will be normalised on save.

Any separator, or none at all, will work as well as prefixing the addresses.

<figure><img src="https://1222554226-files.gitbook.io/~/files/v0/b/gitbook-x-prod.appspot.com/o/spaces%2FSWU1DQ4UGkqER7uGNUOm%2Fuploads%2FnGgli87BmnP9H8tjJek3%2Fimage.png?alt=media&amp;token=13b8917b-7c69-4d49-923c-a64b1d773b71" alt=""><figcaption></figcaption></figure>

### IP Addresses

For IP address-based groups, a single address (10.20.0.11) or a CIDR range (10.30.0.0/16). IPv4 and IPv6 both work.

<figure><img src="https://1222554226-files.gitbook.io/~/files/v0/b/gitbook-x-prod.appspot.com/o/spaces%2FSWU1DQ4UGkqER7uGNUOm%2Fuploads%2FmREcfbj1LJ9NzHfONm62%2Fimage.png?alt=media&amp;token=f252efa6-ee69-4677-890a-ed06de2940b1" alt=""><figcaption></figcaption></figure>


# Certificate Extensions

<figure><img src="https://1222554226-files.gitbook.io/~/files/v0/b/gitbook-x-prod.appspot.com/o/spaces%2FSWU1DQ4UGkqER7uGNUOm%2Fuploads%2FFXR9ws4bhGIDgPOjlkCj%2Fimage.png?alt=media&amp;token=eb7ecb0a-4fb0-4459-ae80-6b114b44dd6b" alt=""><figcaption></figcaption></figure>

Certificate extensions let you register a field carried by your certificates so a rule can read it directly, either a private custom OID issued by your own PKI, or a standard field such as the subject, SAN or an issuer attribute. Once registered, the extension appears as a source in any rule's Certificate Attribute filters or Dynamic assignments.

{% hint style="info" %}
Currently it is not supported to add custom certificate extensions to SCEP profiles in many MDM systems, including Microsoft Intune and Jamf Pro.

We therefore recommend using the Certificate Subject Name instead to [dynamically assign VLANs](https://docs.radiusaas.com/admin-portal/settings/rules#vlan-assignment).
{% endhint %}


# Attribute Catalogue

<figure><img src="https://1222554226-files.gitbook.io/~/files/v0/b/gitbook-x-prod.appspot.com/o/spaces%2FSWU1DQ4UGkqER7uGNUOm%2Fuploads%2F2zuSMUw6nxABZMD0FRCK%2Fimage.png?alt=media&amp;token=85f01acd-1b32-41c7-85e6-8994b47e43cb" alt=""><figcaption></figcaption></figure>

The Attribute catalogue is a picker list of the RADIUS attributes your rules are allowed to return: standard VLAN/tunnel attributes (DHCP-IEEE-802.1Q-VLAN-ID, SN-Assigned-VLAN-ID, Egress-VLANID and vendor-specific equivalents) plus other RADIUS attributes such as Filter-Id, Class, Framed-MTU, Tunnel-Password, or vendor-specific ones like Cisco-AVPair and Fortinet-Group-Name. Adding an attribute here only makes it selectable in a rule's assignments; it does not apply it anywhere by itself. Attributes not already listed can be added by searching the RADIUS dictionary.


# User Settings

## Overview

With the User Settings page, you are able to configure how your website will handle User creation/deletions.&#x20;

Because there are two ways to create users, some settings only affect the **My Users** portal.

<figure><img src="https://1222554226-files.gitbook.io/~/files/v0/b/gitbook-x-prod.appspot.com/o/spaces%2FSWU1DQ4UGkqER7uGNUOm%2Fuploads%2FvoRLUioPum0e4pCYbU9m%2F2024-12-05_14h54_42.png?alt=media&amp;token=e8df9f63-ac7b-463c-8280-05a3af242519" alt=""><figcaption><p>Showing user settings</p></figcaption></figure>

### System

Upload your business' logo to show users upon sign in.&#x20;

These settings affect all users on the platform.

### My Users Portal

These settings only affect the **My Users** portal.

### Passwords

These settings are used to configure password complexity.


# Users


# All Users

User management is available under https\://YOURNAME.radius-as-a-service.com/users

## General

{% hint style="info" %}
RADIUSaaS **does not provide** any **integration** with Identity Providers (IDPs) for username/password-based network authentication. All username/password accounts used for network authentication with RADIUSaaS must be managed on the RADIUSaaS Admin Portal.
{% endhint %}

RADIUSaaS offers username/password-based authentication as an **alternative** to certificate-based authentication whenever the usage of certificates is technically hard to reach or not feasible. Such scenarios may include:

* Bring your own Device (BYOD)
* [Guest Access ](/admin-portal/my-invited-users)
* Devices lacking EAP-TLS support for 802.1X (e.g. printers, TVs, ...)

## Protocols

Devices that use username and password for network authentication have to speak one of the following Protocols:&#x20;

* EAP-TTLS-PAP
* EAP-TTLS-MSCHAPv2
* PEAP-MSCHAPv2

## Add

To **Add** a new User, click **Add** and provide **Username** and **Password** and choose your **Validity**. After entering all details, click **Create**.

{% hint style="info" %}
A username can be just a simple name such as "jack" or as complex as your UPN, however, be sure not to use your actual Entra ID UPN **and** the password associated with it for RADIUS authentication. While you may use the UPN or email address, please choose a different password.&#x20;
{% endhint %}

## Bulk User Import

To import your users from a supported file format (.xlsx, .xls or .csv file), click **Import** and follow the steps as shows below.

{% hint style="info" %}
The required columns are **Username, Password** and **Owner**.
{% endhint %}

<figure><img src="https://1222554226-files.gitbook.io/~/files/v0/b/gitbook-x-prod.appspot.com/o/spaces%2FSWU1DQ4UGkqER7uGNUOm%2Fuploads%2Fn6l5U9bFkOUek1ZjfNyZ%2F2025-02-21_16h11_28.gif?alt=media&amp;token=f23d6ca3-4d22-4ec0-8c82-d6f5fbdbadad" alt=""><figcaption></figcaption></figure>

## Delete

To **Delete** users, select all users which should be deleted in the list, click **Delete and** confirm your choice.

## Update

To change a user's password, disable/re-enable a user or select a new validity period, simply click on the **eye** symbol next to the user entry, change all needed entries and save them.

<figure><img src="https://1222554226-files.gitbook.io/~/files/v0/b/gitbook-x-prod.appspot.com/o/spaces%2FSWU1DQ4UGkqER7uGNUOm%2Fuploads%2FAinOe3h2jUompzDLBl6O%2Fimage.png?alt=media&amp;token=a17d2207-1c6f-45dd-8b35-679985add932" alt=""><figcaption><p>Showing update of a user</p></figcaption></figure>


# My Invited Users

Any identity or accounts that has been assigned the [**Users**](/admin-portal/access-and-rules/permissions#users) role, is able to create [username/password accounts](/admin-portal/users/users) with [certain constraints](/admin-portal/access-and-rules/user-settings).&#x20;

Those accounts are typically used for BYOD or guest access scenarios, enabling a self-sponsored access approach not requiring any administrator interaction. The [Rule Engine](/admin-portal/insights/rule-engine) can be leveraged to segregate such devices from more privileged network segments, e.g. using VLAN tagging.

UPNs that have only been assigned the Users role have access to the **My Invited Users** only and thus have below RADIUSaaS Admin Portal experience:&#x20;

<figure><img src="https://1222554226-files.gitbook.io/~/files/v0/b/gitbook-x-prod.appspot.com/o/spaces%2FSWU1DQ4UGkqER7uGNUOm%2Fuploads%2FZqnllWpei0r4rxElm3oO%2Fimage.png?alt=media&amp;token=4683d0e6-f037-41a1-a5d2-d97d472e73c3" alt=""><figcaption></figcaption></figure>


# Microsoft Intune

{% content-ref url="/pages/-MYxiLd7JIp6ZsqGaDol" %}
[Server Trust](/profile-deployment/microsoft-intune/trusted-root)
{% endcontent-ref %}

{% content-ref url="/pages/-MYxiZmAIpyMYZXLfOdl" %}
[WiFi Profile](/profile-deployment/microsoft-intune/wifi-profile)
{% endcontent-ref %}

{% content-ref url="/pages/-MYxvNFJUncToXBdPvsu" %}
[Wired Profile](/profile-deployment/microsoft-intune/wired-profile)
{% endcontent-ref %}


# Server Trust

{% hint style="info" %}
This is only required if you are using a RADIUS server certificate that was issued by a CA that your clients do not already trust. For example, this is not needed if you are bringing your own server certificate issued by SCEPman.
{% endhint %}

### Part 1: Download the RADIUS Server Certificate

When [downloading](/admin-portal/settings/settings-server#download) the Server certificate, use only the green-marked certificate. This will download the root CA certificate of the issuing CA.

<figure><img src="https://1222554226-files.gitbook.io/~/files/v0/b/gitbook-x-prod.appspot.com/o/spaces%2FSWU1DQ4UGkqER7uGNUOm%2Fuploads%2F6PAKr5RsefmaAKR44h8i%2Fimage.png?alt=media&amp;token=a7738e9d-f974-4162-a99a-e7c2b68b4b40" alt=""><figcaption></figcaption></figure>

### Part 2: Adding a Trusted certificate profile for your endpoint devices&#x20;

{% hint style="warning" %}
Ensure, you have reviewed [Part 1](#edit-your-downloaded-certificate).
{% endhint %}

1. Log in to [Microsoft Intune](https://intune.microsoft.com/)
2. Navigate to **Devices** and subsequently **Configuration profiles**
3. Then click **Create > New policy**
4. Select the correct **Platform** for your device
5. Search the **Profile type** templates for **Trusted certificate** and select it
6. Click **Create** and provide a descriptive name and optional **Description**
7. In the second step, upload the \*.cer file containing the RADIUS server certificate/trusted root the server certificate was signed with.

![](https://content.gitbook.com/content/SWU1DQ4UGkqER7uGNUOm/blobs/brqevWf8XzBgPh5fhlAj/image.png)


# WiFi Profile

Please follow below guides to configure WiFi profiles in Intune for different endpoint device types.

{% hint style="warning" %}
We strongly recommend to **not use any spaces** or **special characters** in your **SSID**.
{% endhint %}

## Windows

{% content-ref url="/pages/-MYxico0PQd5\_S4AzQW6" %}
[Windows](/profile-deployment/microsoft-intune/wifi-profile/windows)
{% endcontent-ref %}

## Apple

{% content-ref url="/pages/-MYxkE0cj6JDXvxkscEi" %}
[iOS/iPadOS & macOS](/profile-deployment/microsoft-intune/wifi-profile/apple-devices)
{% endcontent-ref %}

## Android

{% content-ref url="/pages/-MYxkT9LzlFSIDjxhMwZ" %}
[Android](/profile-deployment/microsoft-intune/wifi-profile/android)
{% endcontent-ref %}


# Windows

This guide is applicable for both scenarios: using user- or device-type certificates for WiFi authentication.

## Configuration steps

1. Log in to [Microsoft Intune](https://intune.microsoft.com/)
2. Navigate to **Devices** and subsequently **Configuration profiles**
3. Then click **Create > New policy**
4. As **Platform** select **Windows 10 and later**
5. Search the **Profile type** templates for **Wi-Fi** and select it
6. Click **Create** and provide a descriptive name and optional **Description**
7. As **Wi-Fi type** select **Enterprise**
8. Enter your **SSID**. The **Connection Name** can assume the same name.
9. Configure the **Authentication Method** to **User** if you want to use user-type certificates for authentication or **Machine** if you would like to use device-type certificates for authentication.
10. Then for **EAP type** choose **EAP - TLS**
11. Next, as **Certificate server names** add the **Subject Alternative Name (SAN)** of your *active* RADIUS [**Server Certificate**](/admin-portal/settings/settings-server#server-certificates). This property can be found by expanding the active server certificate and copying the relevant value.

<figure><img src="https://1222554226-files.gitbook.io/~/files/v0/b/gitbook-x-prod.appspot.com/o/spaces%2FSWU1DQ4UGkqER7uGNUOm%2Fuploads%2FWjCvT0AdgrbSCI1xV6Cb%2F2026-03-24_11h46_26.png?alt=media&amp;token=d7253d1c-28c9-4907-9d4b-c050763490bc" alt=""><figcaption></figcaption></figure>

{% hint style="warning" %}
The Subject Alternative Name (SAN) is **case-insensitive** when used for hostname verification.
{% endhint %}

12. For the **Root certificates for server validation** select the Trusted certificate profile you have previously created for the RADIUS Server Certificate.
13. Under **Client Authentication** select **SCEP certificate as** **Authentication method**&#x20;
14. Finally for **Client certificate for client authentication (Identity certificate),** select the SCEP profile you would like to use for authentication.

    All other settings can be configured according to your own needs and preferences.

<figure><img src="https://1222554226-files.gitbook.io/~/files/v0/b/gitbook-x-prod.appspot.com/o/spaces%2FSWU1DQ4UGkqER7uGNUOm%2Fuploads%2FiT1T9N8KVs6lbNoK4fV7%2F2024-05-13_15h20_31.png?alt=media&amp;token=7c7b78b2-52eb-4f31-b44c-47c58a102bcc" alt=""><figcaption><p>Showing Wi-Fi profile configuration 1/2</p></figcaption></figure>

<figure><img src="https://1222554226-files.gitbook.io/~/files/v0/b/gitbook-x-prod.appspot.com/o/spaces%2FSWU1DQ4UGkqER7uGNUOm%2Fuploads%2FWz6hpqW8NlcSIMhZDAIP%2Fimage.png?alt=media&amp;token=2d704c20-63ff-496d-b7e3-f16b47b610f7" alt=""><figcaption></figcaption></figure>

### Fast roaming

{% hint style="info" %}
These are **optional** settings.
{% endhint %}

For a (usually) better experience when roaming between access points, we recommend enabling the following **Fast roaming settings** in the WiFi profile:

| **Enable pairwise master key (PMK) caching** | Yes | Defines whether Pairwise Master Key (PMK) caching is to be used by this profile to connect to a WLAN. |
| -------------------------------------------- | --- | ----------------------------------------------------------------------------------------------------- |
| **Maximum time a PMK is stored in cach**     | 720 | Defines the length of time, in minutes, that a Pairwise Master Key (PMK) cache will be kept.          |
| **Maximum number of PMK's stored in cache**  | 128 | Defines the number of entries in the Pairwise Master Key (PMK) cache on the client.                   |
| **Enable pre-authentication**                | Yes | Defines whether pre-authentication will be used by the client                                         |
| **Maximum pre-authentication attempts**      | 3   | Defines the number of pre-authentication attempts to try on neighboring access points (AP)            |

For further details on Pairwise Master Key caching, please refer to its specification in [IEEE 802.11i](https://standards.ieee.org/getieee802/download/802.11i-2004.pdf).

**Important**: The reliability and effectiveness of this feature may also depend on the specific implementation by the WAP vendor. In the same cases, customers with PMK caching enabled, have reported frequent access-point toggling although the device's location was static.

## Common configuration issues

See [Troubleshooting](/other/troubleshooting#intune-configuration-issues).


# iOS/iPadOS & macOS

This guide is applicable for both scenarios: using user- or device-type certificates for WiFi authentication.

## Configuration steps

1. Log in to [Microsoft Intune](https://intune.microsoft.com/)
2. Navigate to **Devices** and subsequently **Configuration profiles**
3. Then click **Create > New policy**
4. As **Platform** select **iOS/iPadOS** or **macOS**
5. Search the **Profile type** templates for **Wi-Fi** and select it
6. As **Profile type** select **Wi-Fi**
7. Click **Create** and provide a descriptive name and optional **Description**
8. As **Wi-Fi type** select **Enterprise**
9. Enter your **SSID**. The **Network name** can assume the same name.
10. Select the applicable **Security type** (iOS/iPadOS only)
11. Then for **EAP type** choose **EAP - TLS**
12. Next, as **Certificate server names** add the **Subject Alternative Name (SAN)** of your *active* RADIUS [**Server Certificate.**](/admin-portal/settings/settings-server#server-certificates) This property can be found by expanding the active server certificate and copying the relevant value.&#x20;

    <figure><img src="https://1222554226-files.gitbook.io/~/files/v0/b/gitbook-x-prod.appspot.com/o/spaces%2FSWU1DQ4UGkqER7uGNUOm%2Fuploads%2FSZNCAJFQ2ZiXibpWb1bj%2F2024-05-23_15h40_00.png?alt=media&amp;token=fda98022-4d6b-434b-a223-f059090b6e30" alt=""><figcaption></figcaption></figure>
13. For the **Root certificates for server validation** select the Trusted certificate profile you have previously created for the RADIUS Server Certificate.
14. Under **Client Authentication** select **Certificates** as **Authentication method**&#x20;
15. Finally, under **Certificates** select the SCEP profile you would like to use for authentication.

All other settings can be configured according to your own needs and preferences.

<figure><img src="https://1222554226-files.gitbook.io/~/files/v0/b/gitbook-x-prod.appspot.com/o/spaces%2FSWU1DQ4UGkqER7uGNUOm%2Fuploads%2FYH5TCvFjijYZaVyDRZPI%2Fimage.png?alt=media&amp;token=7b0bafe0-3caf-458a-932d-d8a309939891" alt=""><figcaption><p>Showing iOS/iPad Wi-Fi Profile</p></figcaption></figure>

## Common configuration issues

See [Troubleshooting](/other/troubleshooting#intune-configuration-issues).


# Android

## Configuration steps

1. Log in to [Microsoft Intune](https://intune.microsoft.com/)
2. Navigate to **Devices** and subsequently **Configuration profiles**
3. Then click **Create > New policy**
4. As **Platform** select your Android device type
5. Search the **Profile type** templates for **Wi-Fi** and select it
6. Click **Create** and provide a descriptive name and optional **Description**
7. As **Wi-Fi type** select **Enterprise**
8. Enter your **SSID**
9. As **EAP type** choose **EAP - TLS**
10. Next, as **Radius server name** add the&#x20;
    * **Subject Alternative Name (SAN)** of your *active* RADIUS [**Server Certificate**](/admin-portal/settings/settings-server#server-certificates) . This property can be found by expanding the active server certificate and copying the relevant value.

<figure><img src="https://1222554226-files.gitbook.io/~/files/v0/b/gitbook-x-prod.appspot.com/o/spaces%2FSWU1DQ4UGkqER7uGNUOm%2Fuploads%2Fmlf1NEaRWyUDpAtLW83r%2Fimage.png?alt=media&amp;token=f9aad1bc-bf7f-4dc8-8776-9f05cfc5161c" alt=""><figcaption><p>Showing certificate details</p></figcaption></figure>

11\. For the **Root certificates for server validation** select the Trusted certificate profile you have previously created for the RADIUS Server Certificate.

12\. Under **Client Authentication** select **Certificates** as **Authentication method**&#x20;

13\. Finally, under **Certificates** select the SCEP profile you would like to use for authentication.

All other settings can be configured according to your own needs and preferences.

{% hint style="info" %}
Some Android kiosk devices require a value for **Identity privacy (outer identity)**. Please consider this when you are having issues authenticating against the WiFi network with such devices.
{% endhint %}

![](https://1222554226-files.gitbook.io/~/files/v0/b/gitbook-x-prod.appspot.com/o/spaces%2FSWU1DQ4UGkqER7uGNUOm%2Fuploads%2FTilY5Sqamt8u8GhSb8Sv%2F2024-06-03_21h31_46.png?alt=media\&token=df601531-cdaa-44a1-982a-4384b20e004b)

## Common configuration issues

See [Troubleshooting](/other/troubleshooting#intune-configuration-issues).


# Wired Profile

Please follow below guides to configure profiles for your wired access policies in Intune and different endpoint device types.

## Windows

{% content-ref url="/pages/-MYxvXQ\_1DsFMZk16xGd" %}
[Windows](/profile-deployment/microsoft-intune/wired-profile/windows)
{% endcontent-ref %}

## Apple

{% content-ref url="/pages/-MYxw0VIvq4euyEYpTKl" %}
[macOS](/profile-deployment/microsoft-intune/wired-profile/mac)
{% endcontent-ref %}


# Windows

## Configurations steps

1. Log in to [Microsoft Intune](https://intune.microsoft.com/)
2. Navigate to **Devices** and subsequently **Configuration profiles**
3. Then click **Create > New policy**
4. As **Platform** select **Windows 10 and later**
5. Search the **Profile type** templates for **Wired network** and select it
6. Click **Create** and provide a descriptive name and optional **Description**
7. fill out the **Configuration settings** as it suits your environment
8. Configure the **Authentication Method** to **User** if you want to use user-type certificates for authentication or **Machine** if you would like to use device-type certificates for authentication.
9. Under **802.1X** make sure, that **Do not enforce** is selected. This way your network adapter will continue to work in environments (e.g. home office), where 802.1X is not available.
10. For **EAP Type** choose **EAP-TLS**
11. Next, as **Certificate server names** add the **Subject Alternative Name (SAN)**

    of your *active* RADIUS [**Server Certificate.**](/admin-portal/settings/settings-server#server-certificates) This can be found by expanding the active server certificate and copying the value for SAN.&#x20;

    <figure><img src="https://1222554226-files.gitbook.io/~/files/v0/b/gitbook-x-prod.appspot.com/o/spaces%2FSWU1DQ4UGkqER7uGNUOm%2Fuploads%2Fy3uzMEi7YeKf1QNmEv3Q%2F2024-05-13_15h04_32.png?alt=media&amp;token=481b6d10-7f27-430a-a56f-dfde96f57c4e" alt=""><figcaption></figcaption></figure>
12. For the **Root certificates for server validation** select the Trusted certificate profile you have previously created for the RADIUS Server Certificate.
13. Under **Client Authentication** select **SCEP certificate** as **Authentication method**&#x20;
14. Finally, for **Client certificate for client authentication (Identity certificate),** select the SCEP profile you would like to use for authentication.

All other settings can be configured according to your own needs and preferences.

![Showing wired profile](https://1222554226-files.gitbook.io/~/files/v0/b/gitbook-x-prod.appspot.com/o/spaces%2FSWU1DQ4UGkqER7uGNUOm%2Fuploads%2FsPcGYRlydnwopP88aq12%2F2024-05-13_15h48_55.png?alt=media\&token=11358487-b38e-4cd2-b78c-b4cf1eb65cf0)


# macOS

## Configuration steps <a href="#before-creating-the-wi-fi-profile-create-a-trusted-root-certificate-profile-as-described-here-change" id="before-creating-the-wi-fi-profile-create-a-trusted-root-certificate-profile-as-described-here-change"></a>

1. Log in to [Microsoft Intune](https://intune.microsoft.com/)
2. Navigate to **Devices** and subsequently **Configuration profiles**
3. Then click **Create > New policy**
4. As **Platform** select **macOS**
5. Search the **Profile type** templates for **Wired network** and select it
6. Click **Create** and provide a descriptive name and optional **Description**
7. Choose your **Network Interface**
8. As **EAP type** choose **EAP - TLS**
9. Next, as **Certificate server names** add the **Subject Alternative Name (SAN)** of your *active* RADIUS [**Server Certificate.**](/admin-portal/settings/settings-server#server-certificates) This property can be found by expanding the active server certificate and copying the relevant values.

<figure><img src="https://1222554226-files.gitbook.io/~/files/v0/b/gitbook-x-prod.appspot.com/o/spaces%2FSWU1DQ4UGkqER7uGNUOm%2Fuploads%2F0n7K2XAYF0K4yK14zShb%2Fimage.png?alt=media&amp;token=f0f7936a-f177-4514-9d8e-01056bbc0a71" alt=""><figcaption></figcaption></figure>

1. For the **Root certificates for server validation** select the Trusted certificate profile you have previously created for the RADIUS Server Certificate.
2. Finally, under **Client Authentication** select **Certificates as** **Authentication method**&#x20;

<figure><img src="https://1222554226-files.gitbook.io/~/files/v0/b/gitbook-x-prod.appspot.com/o/spaces%2FSWU1DQ4UGkqER7uGNUOm%2Fuploads%2F9qYLZwPkTb0pP04ZssJn%2Fimage.png?alt=media&amp;token=abe0334e-0d3a-4e4f-920a-25f2416abf83" alt=""><figcaption><p>Showing wired network profile for macOS</p></figcaption></figure>


# Jamf Pro

## General

{% hint style="success" %}
We strongly recommend to configure all 802.1X-relevant payloads in a **single** Configuration Profile in Jamf - and one Configuration Profile per assignment type (Computers, Devices, Users).&#x20;
{% endhint %}

To fully configure 802.1X, this typically means you require the following payloads:

* Network payload(s) (WiFi and/or LAN)
* Certificate payload(s)
  * Root CA certificate of the SCEP-issuing CA
  * Root CA certificate of the RADIUS server certificate issuing CA (can be the same as the SCEP issuing CA)
* SCEP payload (client authentication certificate)

<figure><img src="https://content.gitbook.com/content/SWU1DQ4UGkqER7uGNUOm/blobs/3ExgDEVV8kyAxBxpWcKV/image.png" alt=""><figcaption></figcaption></figure>

## Payloads

{% content-ref url="/pages/qedLmVD2hg2xuGDaUALd" %}
[Server Trust](/profile-deployment/jamf-pro/server-trust)
{% endcontent-ref %}

{% content-ref url="/pages/JjbQKqgciZW4eAVVBjtC" %}
[WiFi Profile](/profile-deployment/jamf-pro/wifi-profile)
{% endcontent-ref %}

{% content-ref url="/pages/R7rgEshgHnAaJ937nOLg" %}
[Wired Profile](/profile-deployment/jamf-pro/wired-profile)
{% endcontent-ref %}


# Server Trust

{% hint style="info" %}
This is only required if you are using a RADIUS server certificate that was issued by a CA that your clients do not already trust. For example, this is not needed if you are bringing your own server certificate issued by SCEPman.
{% endhint %}

### Part 1: Download the RADIUS Server Certificate

When [downloading](/admin-portal/settings/settings-server#download) the Server certificate, use only the green-marked certificate. This will download the root CA certificate of the issuing CA.

<figure><img src="https://1222554226-files.gitbook.io/~/files/v0/b/gitbook-x-prod.appspot.com/o/spaces%2FSWU1DQ4UGkqER7uGNUOm%2Fuploads%2FCCicA16DG5HjkCuAS1Di%2Fimage.png?alt=media&amp;token=2058f3d5-5176-4784-a80b-64aaccee240c" alt=""><figcaption><p>Showing download of root CA</p></figcaption></figure>

### Part 2: Trust the Server Certificate

1. Log in to your Jamf Pro instance.
2. Choose your correct deployment scope (Computers, Devices or Users). In this example, we have chosen a macOS device (Computers).
3. Navigate to an existing Configuration Profile or create a new one and give the profile a meaningful name, e.g. "Corp-WiFi-802.1X".
4. Add a **Certificate** payload
5. Provide a meaningful **Certificate Name**, e.g. "RADIUSaaS Server Root CA"
6. Under **Select Certificate Option** select **Upload**
7. Upload the \*.cer file containing the certificate you have downloaded in Part 1. A password is not required, since it is only the public key part that is contained in the file and that needs to be uploaded.
8. Select **Allow all apps access**
9. Unselect **Allow export from keychain**
10. Click **Save**
11. Under **Scope** assign the profile to the relevant audience

<figure><img src="https://1222554226-files.gitbook.io/~/files/v0/b/gitbook-x-prod.appspot.com/o/spaces%2FSWU1DQ4UGkqER7uGNUOm%2Fuploads%2FjA0MMTDKNrj9p10UUtWO%2Fimage.png?alt=media&amp;token=df42b71f-9a8e-4588-b841-7fe299b64b7e" alt=""><figcaption></figcaption></figure>


# WiFi Profile

{% hint style="warning" %}
We strongly recommend to **not use any spaces** or **special characters** in your **SSID**.
{% endhint %}

To configure a WiFi profile in Jamf, please follow these instructions:

1. Log in to your Jamf Pro instance
2. Choose your correct deployment scope (Computers, Devices or Users). In this example, we have chosen a macOS device (Computers).
3. Navigate to the existing Configuration Profile from the previous step ([Trusted Root](/profile-deployment/jamf-pro/server-trust))
4. Add a **Network** payload
5. As **Network Interface** select **Wi-Fi**
6. Provide your **Service Set Identifier (SSID)**
7. As **Security Type** select **Any (Enterprise)**

<figure><img src="https://1222554226-files.gitbook.io/~/files/v0/b/gitbook-x-prod.appspot.com/o/spaces%2FSWU1DQ4UGkqER7uGNUOm%2Fuploads%2FbTMF3mH9dgFcnC5aJg8A%2Fimage.png?alt=media&amp;token=7900181d-135e-4d64-8e3b-f711efb6ec97" alt=""><figcaption></figcaption></figure>

8. Under **Network Security Settings** and **Protocols** select **TLS**

<figure><img src="https://1222554226-files.gitbook.io/~/files/v0/b/gitbook-x-prod.appspot.com/o/spaces%2FSWU1DQ4UGkqER7uGNUOm%2Fuploads%2FdMwG2y7f3Tool5xLvQgn%2Fimage.png?alt=media&amp;token=f0f9f839-1846-4d73-b899-1da03d3e44f3" alt=""><figcaption></figcaption></figure>

9. Navigate to **Network Security Settings** **>** **Trust**
10. As **Identity Certificate** select the client authentication certificate you have configured in your SCEP payload of this Configuration Profile before. In case you are using SCEPman as CA, please select the SCEP Proxy you have previously set up during the [configuration](https://docs.scepman.com/certificate-deployment/jamf/general) of SCEPman.
11. Under **Trusted Certificates** all certificates you have configured as **Certificate** payloads, will appear here. Check them all.
12. Next, under **Trusted Server Certificate Names** add the&#x20;
    * **Subject Alternative Name (SAN)**
    * and **Common Name (CN)** \
      \
      of your *active* RADIUS [**Server Certificate.**](/admin-portal/settings/settings-server#server-certificates) Those properties can be found by expanding the active server certificate and copying the relevant values.&#x20;

{% hint style="warning" %}
Note that the Common Name is case-sensitive.&#x20;

Please make sure there are no spaces or hidden characters at the beginning or end of the Trusted Server Certificate Names input field in the JAMF interface.
{% endhint %}

<figure><img src="https://1222554226-files.gitbook.io/~/files/v0/b/gitbook-x-prod.appspot.com/o/spaces%2FSWU1DQ4UGkqER7uGNUOm%2Fuploads%2FJStIctSBg4qjnPNfOf94%2Fimage.png?alt=media&amp;token=7151402c-59ac-4c01-9596-50831ed7f2f9" alt=""><figcaption></figcaption></figure>

13. Unselect **Allow Trust Exceptions**
14. Configure all other options as per your requirements.
15. Click **Save**
16. Under **Scope** assign the profile to the relevant audience

<figure><img src="https://1222554226-files.gitbook.io/~/files/v0/b/gitbook-x-prod.appspot.com/o/spaces%2FSWU1DQ4UGkqER7uGNUOm%2Fuploads%2FEXnSNgB2LZM7QRocYPpp%2Fimage.png?alt=media&amp;token=0bc788ad-6148-487d-b68f-7497936b2d12" alt=""><figcaption></figcaption></figure>


# Wired Profile

To configure a Wired network profile in Jamf, please follow these instructions: configure all other options as per your requirements.

1. Log in to your Jamf Pro instance
2. Choose your correct deployment scope (Computers, Devices or Users). In this example, we have chosen a macOS device (Computers).
3. Navigate to the existing Configuration Profile from the previous step ([Trusted Root](/profile-deployment/jamf-pro/server-trust)).
4. As **Network Interface** select the relevant ethernet, e.g. **First Active Ethernet**
5. Under **Network Security Settings** and **Protocols** select **TLS**

<figure><img src="https://1222554226-files.gitbook.io/~/files/v0/b/gitbook-x-prod.appspot.com/o/spaces%2FSWU1DQ4UGkqER7uGNUOm%2Fuploads%2FdVY4xqJ0NcCk5d2idH2T%2Fimage.png?alt=media&amp;token=cd39c762-3b7b-493e-98e6-962f28cb8c1c" alt=""><figcaption></figcaption></figure>

6. Navigate to **Network Security Settings** **> Trust**
7. As **Identity Certificate** select the client authentication certificate you have configured in your SCEP payload of this Configuration Profile before. In case you are using SCEPman as CA, please select the SCEP Proxy you have previously set up during the [configuration](https://docs.scepman.com/certificate-deployment/jamf/general) of SCEPman.
8. Under **Trusted Certificates** all certificates you have configured as **Certificate** payloads, will appear here. Check them all.
9. Next, under **Trusted Server Certificate Names** add the&#x20;
   * **Subject Alternative Name (SAN)**
   * and **Common Name (CN)** \
     \
     of your *active* RADIUS [**Server Certificate**](/admin-portal/settings/settings-server#server-certificates). Those properties can be found by expanding the active server certificate and copying the relevant values. **Please consider, that the common name is case-sensitive.**

<figure><img src="https://1222554226-files.gitbook.io/~/files/v0/b/gitbook-x-prod.appspot.com/o/spaces%2FSWU1DQ4UGkqER7uGNUOm%2Fuploads%2FwWDNRy9Oesw6HT0UMaf5%2Fimage.png?alt=media&amp;token=eca7054f-1dec-4d70-b019-39e8fb3150b2" alt=""><figcaption></figcaption></figure>

10. Unselect **Allow Trust Exceptions**
11. Configure all other options as per your requirements.
12. Click **Save**
13. Under **Scope** assign the profile to the relevant audience

<figure><img src="https://1222554226-files.gitbook.io/~/files/v0/b/gitbook-x-prod.appspot.com/o/spaces%2FSWU1DQ4UGkqER7uGNUOm%2Fuploads%2FoFyCzgTtqnHMOV3buywD%2Fimage.png?alt=media&amp;token=aa441970-fc4a-4954-901c-7b0382f17b30" alt=""><figcaption></figcaption></figure>


# Google Workspace


# Server Trust

{% hint style="info" %}
This is only required if you are using a RADIUS server certificate that was issued by a CA that your clients do not already trust. For example, this is not needed if you are bringing your own server certificate issued by SCEPman.
{% endhint %}

## Part 1: Download the RADIUS Server Certificate

When [downloading](/admin-portal/settings/settings-server#download) the Server certificate, use only the green-marked certificate. This will download the root CA certificate of the issuing CA.

<figure><img src="https://docs.radiusaas.com/~gitbook/image?url=https%3A%2F%2F1222554226-files.gitbook.io%2F%7E%2Ffiles%2Fv0%2Fb%2Fgitbook-x-prod.appspot.com%2Fo%2Fspaces%252FSWU1DQ4UGkqER7uGNUOm%252Fuploads%252F6PAKr5RsefmaAKR44h8i%252Fimage.png%3Falt%3Dmedia%26token%3Da7738e9d-f974-4162-a99a-e7c2b68b4b40&#x26;width=768&#x26;dpr=4&#x26;quality=100&#x26;sign=c7ddd6d1&#x26;sv=1" alt=""><figcaption></figcaption></figure>

## Part 2: Adding a Trusted certificate profile for your endpoint devices

{% hint style="warning" %}
Ensure, you have reviewed [Part 1](#part-1-download-the-radius-server-certificate).
{% endhint %}

In your Google **Admin console** (admin.google.com)  navigate to **Menu** > **Devices** > **Network** > **Certificates** > **ADD CERTIFICATE**

<figure><img src="https://1222554226-files.gitbook.io/~/files/v0/b/gitbook-x-prod.appspot.com/o/spaces%2FSWU1DQ4UGkqER7uGNUOm%2Fuploads%2Fd3ARhPxw8V7mZxzWmueO%2Fimage.png?alt=media&amp;token=cd39055e-31ef-48f1-8cfd-a3b5202a79bf" alt=""><figcaption></figcaption></figure>


# WiFi Profile

{% hint style="warning" %}
We strongly recommend to **not use any spaces** or **special characters** in your **SSID**.
{% endhint %}

To configure a WiFi profile in Google Workspaces for your Chromebooks, please follow these instructions:

1. In your Google **Admin console** (at admin.google.com)  > Go to **Menu** > **Devices** > **Network** > **Create a Wi-Fi network**.
2. In the **Platform access** section, check the box for **Enabled for Chromebooks (by device)**.
3. In the **Details** section, set the following:

| Details                                    | Value                                                                                                                                                                                                                                                                                                                                                                                                            |
| ------------------------------------------ | ---------------------------------------------------------------------------------------------------------------------------------------------------------------------------------------------------------------------------------------------------------------------------------------------------------------------------------------------------------------------------------------------------------------- |
| **Name**                                   | Your WiFi name (we recommend to match it with the SSID).                                                                                                                                                                                                                                                                                                                                                         |
| **SSID**                                   | Your SSID.                                                                                                                                                                                                                                                                                                                                                                                                       |
| **Automatically connect**                  | Enable the checkbox.                                                                                                                                                                                                                                                                                                                                                                                             |
| **Security Type**                          | **WPA/WPA2/WPA3 Enterprise (802.1X)**                                                                                                                                                                                                                                                                                                                                                                            |
| **Extensible Authentication Protocol**     | **EAP-TLS**                                                                                                                                                                                                                                                                                                                                                                                                      |
| **Maximum TLS Version**                    | **1.2**                                                                                                                                                                                                                                                                                                                                                                                                          |
| **Username**                               | Anonymous                                                                                                                                                                                                                                                                                                                                                                                                        |
| **Server Certificate Authority**           | Reference the certificate profile containing your [RADIUS server certificate root CA](/profile-deployment/google-workspace/server-trust).                                                                                                                                                                                                                                                                        |
| **Server Certificate Domain Suffix Match** | <p>Add the</p><ul><li><strong>Subject Alternative Name (SAN)</strong></li><li>and <strong>Common Name (CN)</strong></li></ul><p>of your <em>active</em> RADIUS <a href="/admin-portal/settings/settings-server#server-certificates"><strong>Server Certificate.</strong></a> These properties can be found by expanding the active server certificate and copying the relevant values. See screenshot below.</p> |
| **SCEP profile**                           | Reference your [SCEP certificate profile](https://docs.scepman.com/certificate-deployment/static-certificates/google-workspace/chromeos#add-a-scep-profile).                                                                                                                                                                                                                                                     |

<figure><img src="https://1222554226-files.gitbook.io/~/files/v0/b/gitbook-x-prod.appspot.com/o/spaces%2FSWU1DQ4UGkqER7uGNUOm%2Fuploads%2FRcahQBaWo6B93ETXbwZu%2Fimage.png?alt=media&amp;token=6656edd3-468c-4884-8e05-4466ef031292" alt=""><figcaption><p>Showing <strong>Subject Alternative Name (SAN)</strong> and <strong>Common Name (CN)</strong> </p></figcaption></figure>

4. Click **Save**.

<figure><img src="https://1222554226-files.gitbook.io/~/files/v0/b/gitbook-x-prod.appspot.com/o/spaces%2FSWU1DQ4UGkqER7uGNUOm%2Fuploads%2FBIrphYaMPl1A83i982tZ%2Fimage.png?alt=media&amp;token=c6b190be-4ddf-448c-9753-e3f2fb5dfc3d" alt=""><figcaption></figcaption></figure>

<figure><img src="https://1222554226-files.gitbook.io/~/files/v0/b/gitbook-x-prod.appspot.com/o/spaces%2FSWU1DQ4UGkqER7uGNUOm%2Fuploads%2FRJyoECB5x2QphBPxDNdN%2Fimage.png?alt=media&amp;token=e2c56d60-43af-49cd-a046-4a4ef3fa4336" alt=""><figcaption></figcaption></figure>

<figure><img src="https://1222554226-files.gitbook.io/~/files/v0/b/gitbook-x-prod.appspot.com/o/spaces%2FSWU1DQ4UGkqER7uGNUOm%2Fuploads%2FHVBOZwivnKaISE3gNxFu%2Fimage.png?alt=media&amp;token=b3826b63-e30a-4f26-8d94-e8b84ed644b0" alt=""><figcaption></figcaption></figure>


# Troubleshooting

## Connection Issues

### Client view

#### Wrong XML&#x20;

{% hint style="warning" %}
Can't connect because you need a certificate to sign in. Contact your IT support person.
{% endhint %}

![](https://content.gitbook.com/content/SWU1DQ4UGkqER7uGNUOm/blobs/k8FhkMHpqVOne7UXpLzC/image.png)

Check that your client has a certificate to authenticate and that you are using the correct [WiFi configuration profile](/profile-deployment/microsoft-intune/wifi-profile) or [XML](/admin-portal/settings/trusted-roots#xml).

#### Trusted root issues&#x20;

{% hint style="warning" %}
Can't connect to this network.
{% endhint %}

![](https://content.gitbook.com/content/SWU1DQ4UGkqER7uGNUOm/blobs/g3XbpcPNSLDJPrr96nYr/image.png)

Check that you've done the following:&#x20;

* Told your RADIUS Server which certificates are allowed to connect as described [here](/admin-portal/settings/trusted-roots#add)
* Imported the active RADIUS Server certificate as trusted root on your client as described [here](/profile-deployment/microsoft-intune/trusted-root#to-add-a-trusted-root-profile-for-your-clients)
* Check your [Logs](/admin-portal/insights/log#logs). There is a detailed description of the error. Maybe it's [this](/other/troubleshooting#fatal-decrypt-error) issue.

#### Continue connecting?

{% hint style="warning" %}
Continue connecting? \
If you expect to find Corporate WiFi in this location, go ahead and connect. Otherwise, it may be a different network with the same name.&#x20;

Show certificate details.
{% endhint %}

If your clients need to verify on connecting the first time, and you're seeing this dialog:

![](https://content.gitbook.com/content/SWU1DQ4UGkqER7uGNUOm/blobs/8uYG1oXtvKS2IJkLbQyL/image.png)

Make sure that you have referenced the RADIUS server certificate in your WiFi profile and provided the server certificate's SAN attribute (FQDN) and common name (CN):

<figure><img src="https://1222554226-files.gitbook.io/~/files/v0/b/gitbook-x-prod.appspot.com/o/spaces%2FSWU1DQ4UGkqER7uGNUOm%2Fuploads%2FnGm2WIeddAuswGilqRcF%2Fimage.png?alt=media&amp;token=a5186af0-375c-4fc7-a2fe-24741adf14d7" alt=""><figcaption><p>Showing server certificate's SAN attribute (FQDN) and common name (CN)</p></figcaption></figure>

### Server view

#### Unknown CA

If your [Logs](/admin-portal/insights/log#logs) contain error messages similar to the ones shown below

```
ERROR: (14872) eap_tls: ERROR: SSL says error 20 : unable to get local issuer certificate
ERROR: (14872) eap_tls: ERROR: TLS Alert write:fatal:unknown CA
Error: tls: TLS_accept: Error in error
Auth: (14872) Login incorrect (eap_tls: SSL says error 20 : unable to get local issuer certificate): [host/8dc38402-20fb-41db-a8f3-4e4e95637173/<via Auth-Type = eap>] (from client contoso port 1 cli 18-9K-EA-0H-7F-C5)
```

it can have the following root causes:&#x20;

* Client throws error `TLS Alert read:fatal:unknown CA`
  * Your Client doesn't know the **Server certificate** and rejects the connection. Check that you've added your **Server certificate** as described [here](/profile-deployment/microsoft-intune/trusted-root#adding-a-trusted-root-profile-for-your-clients).
  * You've changed/added a new **Server certificate** and your XML profile on the client is using the old one. In that case, please double-check that you've either updated your WiFi/Wired profile or re-generated your [XML](/admin-portal/settings/trusted-roots#xml) after adding the certificates and pushed that to your clients.&#x20;
* Server throws error `TLS Alert write:fatal:unknown CA`
  * Your RADIUS server doesn't know the issuer of the certificate which was used for authentication. Add your CA as described [here](/admin-portal/settings/trusted-roots#add).

#### Certificate unknown

If you use macOS (and possibly other Apple platforms) and if your [Logs](/admin-portal/insights/log#logs) contain error messages similar to the one shown below

```
eap_tls: (TLS) TLS - Alert read:fatal:certificate unknown
```

it can have the following root causes:

* There is a space character somewhere in the **Certificate server name** in your [WiFi](/profile-deployment/microsoft-intune/wifi-profile/apple-devices) or [Wired](/profile-deployment/microsoft-intune/wired-profile/mac) configuration profile.

#### Decrypt error | Access denied

If your [Logs](/admin-portal/insights/log#logs) contain error messages similar to the ones shown below

```
Auth: (312) Login incorrect (eap_tls: TLS Alert write:fatal:decrypt error): [host/00128t09-cbna-469c-9768-2783d28eikl9/<via Auth-Type = eap>] (from client contoso port 1 cli 84-FD-D1-8C-0E-33)
ERROR: (320) eap_tls: ERROR: TLS Alert write:fatal:decrypt error
Error: tls: TLS_accept: Error in error
```

... then it is probably a bug of the TPM software on your Windows machines. More information on that can be found in the [SCEPman documentation](https://docs.scepman.com/certificate-deployment/microsoft-intune/windows-10#key-storage-provider-ksp-enroll-to-trusted-platform-module-tpm-ksp-otherwise-fail).

If you see something like this in your [Logs](/admin-portal/insights/log#logs)

```
ERROR: (95878) eap_tls: ERROR: (TLS) Alert read:fatal:access denied
Auth: (95878) Login incorrect (eap_tls: (TLS) Alert read:fatal:access denied): [host/kad933-161d-4aa8-aeaa-b5a4d3d53b12]
ERROR: (95717) eap_tls: ERROR: (TLS) Alert read:fatal:access denied
```

... there can be two reasons. One is that your WiFi profile is referencing the wrong root certificate for server validation. Please make sure that your profile is setup correctly. If it is and you are still facing this issue, try to set your KSP to [**Software KSP**](https://docs.scepman.com/certificate-deployment/microsoft-intune/windows-10#key-storage-provider-ksp-enroll-to-trusted-platform-module-tpm-ksp-otherwise-fail).&#x20;

{% hint style="warning" %}
The setting Key Storage Provider (KSP) determines the storage location of the private key for the end-user certificates. Storage in the TPM is more secure than software storage, because the TPM provides an additional layer of security to prevent key theft. However, there is **a bug in some older TPM firmware versions** that invalidates some signatures created with a TPM-backed private key. In such cases, the certificate cannot be used for EAP authentication as it is common for Wi-Fi and VPN connections. Affected TPM firmware versions include:

* STMicroelectronics: 71.12, 73.4.17568.4452, 71.12.17568.4100
* Intel: 11.8.50.3399, 2.0.0.2060
* Infineon: 7.63.3353.0
* IFX: Version 3.19 / Specification 1.2

If you use TPM with this firmware, either update your firmware to a newer version or select "Software KSP" as key storage provider.
{% endhint %}

#### Cannot continue, as the peer is misbehaving

If your Logs contain rejections with the error *"Cannot continue, as the peer is misbehaving"*  this indicates that the client stopped communicating with the RADIUS service, mostly because the trust settings are incorrect. In this case, please verify the certificates on the affected devices.

#### Wrong Shared RADIUS Secret

If your (proxy) [Logs](/admin-portal/insights/log#logs) contain error messages similar to the ones shown below

```
- message authenticator, wrong value
- buf2radmsg: message authentication failed
- radsrv: ignoring request from default (8.222.246.231), validation failed
```

then one of your access points or switches that is trying to connect to your RADIUSaaS instance via a [RADIUS Proxy](/admin-portal/settings/settings-proxy) is using a mismatched [Shared Secret](/admin-portal/settings/settings-server#properties-1).

To identify the affected access point or switch, first determine the RADIUS proxy by expanding the error message and searching for the `proxyip` property. Now that you know the proxy, use your inventory and knowledge of specific locations or groups of devices that cannot connect to your network to identify the misconfigured network device. Finally, update the shared secret to match the value configured in your RADIUSaaS instance for that proxy.

### Troubleshooting Connection Issues with CAPI2 Logs

Windows clients use the **Cryptographic API (CAPI2)** subsystem to handle certificate operations during EAP-TLS authentication. When a connection fails and neither the client UI nor the RADIUSaaS server logs provide a clear indication of the root cause, enabling CAPI2 logging on the affected device can reveal certificate validation failures, chain-building errors, or private-key access issues that would otherwise be invisible.

***

#### **Step 1: Enable CAPI2 Logging**

CAPI2 logging is disabled by default. To turn it on:

1. Open **Event Viewer**: press **Win + R**, type `eventvwr.exe`, and press **Enter**.
2. In the left-hand tree, expand **Applications and Services Logs**.
3. Expand **Microsoft → Windows → CAPI2**.
4. Right-click **Operational** and select **Enable Log**.

Once enabled, Windows will start recording all CAPI2 events. Reproduce the connection failure. Now try to connect to the Wi-Fi or wired network, then move on to the next step.

> **Tip:** Disable the log again after collecting the data (**right-click Operational → Disable Log**) to avoid unnecessary disk usage.

***

#### **Step 2: Locate the Relevant Events**

After reproducing the issue, look for events in the following log sources:

| Log source          | Path in Event Viewer                                                                 |
| ------------------- | ------------------------------------------------------------------------------------ |
| **CAPI2**           | Applications and Services Logs → Microsoft → Windows → CAPI2 → Operational           |
| **WLAN AutoConfig** | Applications and Services Logs → Microsoft → Windows → WLAN-AutoConfig → Operational |

Focus on events that were recorded **at the time of the failed connection attempt**. Useful indicators include:

* **CAPI2** — errors related to certificate chain building, revocation checks, or private-key access (e.g., Event IDs 11, 70, 90).
* **WLAN-AutoConfig** — events describing the 802.1X negotiation outcome (e.g., Event IDs 8001, 8002, 12013).

***

#### **Step 3: Export and Send the Logs**

To send us the logs for review:

1. In Event Viewer, right-click the **Operational** log under **CAPI2** and select **Save All Events As…**
2. Save the file as an **Event Log (\*.evtx)** file and name it something descriptive, e.g. `CAPI2_<device-name>_<date>.evtx`.
3. Repeat the same steps for the **WLAN-AutoConfig → Operational** log.
4. Send both `.evtx` files to our support team at <https://www.radius-as-a-service.com/help/> along with a brief description of the affected device, OS version, and when the issue occurs.

## Certificate issues

### Certificate chain could not be verified

<figure><img src="https://content.gitbook.com/content/SWU1DQ4UGkqER7uGNUOm/blobs/4S5eHRu1C0h4kGOUJlzl/image.png" alt=""><figcaption></figcaption></figure>

When you want to use your own server certificate, your RADIUS server requires the complete certificate chain in order to let other participants (Proxy, RadSec clients, endpoints that try to connect) verify the server's identity.  \
If you see this message, either copy & paste the CA certificate below the server certificate in the textfield or create a PCKS8 certificate bundle which includes all certificates from the lead to the root.

## Admin Portal issues

### Login

In order to log in to the RADIUSaaS web portal ("RADIUSaas Admin Portal"), the following requirements have to be met:

* The UPN/email address you provided as technical admin has to be authenticatable against **some** Microsoft Entra ID (Azure AD) (it does not have to be an identity from the tenant whose users will leverage RADIUSaaS for network authentication).
* The UPN/email address you provided as technical admin must have been registered on your RADIUSaaS instance as described [here](/admin-portal/access-and-rules/permissions). In case it is the initial admin, please [contact us](https://www.radius-as-a-service.com/help/) if you believe we registered the wrong user.
* The Microsoft Entra ID (Azure AD) user object behind the UPN/email address has to be entitled to grant the RADIUSaaS Enterprise Application the following permissions (see screenshot below):
  * **Read** the Basic User Profile
  * **Maintain** access to data you have given it access to (allow request of refresh token)\
    ![](https://content.gitbook.com/content/SWU1DQ4UGkqER7uGNUOm/blobs/zBRh87CJ75R1N8hz7mZF/Screenshot_2022-04-11_at_09_31_26.png)
* In case your Microsoft Entra ID (Azure AD) user has no rights to grant the required permissions, no corresponding **Enterprise Application** will be auto-created in your Microsoft Entra ID (Azure AD). To circumvent this, ask your IT department to grant your user the needed permissions.

## Intune configuration issues

### Profile assignment

Wi-Fi configuration does not get deployed if Wi-Fi, SCEP and Trusted certificate profiles are assigned to different groups. They might show up as "Pending" or there is no status at all. Please use the **same group or "All devices" resp. "All users"** for **all linked profiles**.

You can assign the SCEP Root certificate profile to both "All users" and "All devices" if you have a device (assigned to "All devices)" and user certificate (assigned to "All users") in use.

### SCEP certificate

#### Android

Android seems to require an UPN in Subject alternative name in newer versions (even for device certificates). Please add this in your SCEP profile (e.g. {{DeviceId}}@contoso.com):

<figure><img src="https://1222554226-files.gitbook.io/~/files/v0/b/gitbook-x-prod.appspot.com/o/spaces%2FSWU1DQ4UGkqER7uGNUOm%2Fuploads%2FvzOjRbRuXtYp866efU2w%2Fimage.png?alt=media&amp;token=9180ae03-2a52-4dbc-b2f8-cba97afb8af7" alt=""><figcaption></figcaption></figure>

### Wi-Fi profile

#### Android

Common error codes: 0xc7d24fc5 or -942518331

Key points are:

* select the **Root CA certificate** for **server validation** (important: do not upload the server certificate of the RADIUSaaS)\
  **- and -**
* define a **radius server name**
  * Note: There seems to be a character limit for this field. To solve possible issues, you might just use the domain part without subdomain like "radius-as-a-service.com" (instead of "contoso.radius-as-a-service.com").
  * [Android developers](https://developer.android.com/guide/topics/connectivity/wifi-enterprise) states: "\[...] must configure **both a Root CA certificate**, and either a **domain suffix match** or an alternate subject match". So, the MDM can use "setAltSubjectMatch" or "setDomainSuffixMatch" after adding a root certificate to the Wi-Fi configuration. Intune seems to use "setDomainSuffixMatch" as just "radius-as-a-service.com" is sufficient.
* sometimes **identity privacy** is needed (e.g. seen on Android kiosk devices / Android Enterprise dedicated)


# Solving EAP Fragmentation: The Key to Reliable RADIUS Authentication

In network security, the **Maximum Transmission Unit (MTU)** is a critical networking parameter that defines the largest packet size that can be transmitted over a network link without being fragmented. While most users don't need to think about MTU, it becomes an important troubleshooting factor in specific scenarios, particularly with RADIUS and EAP-TLS authentication. This article explores how MTU affects the RADIUS protocol, especially when dealing with large payloads like the certificates used in EAP-TLS, and why this can lead to authentication failures.

***

## Introduction to MTU and Fragmentation

The **MTU** is the largest packet size that a network can handle without breaking it into smaller pieces. The standard MTU for most Ethernet networks is 1500 bytes. When a packet is too large for a network link, it must be either dropped or broken into smaller, acceptable pieces, a process called **IP fragmentation**. The destination host is responsible for reassembling all the fragments back into the original packet.

***

## EAP vs. IP Fragmentation: Why This Distinction Matters

The distinction between EAP and IP fragmentation is crucial for understanding authentication issues.

* **IP Fragmentation (Network Layer)**: This is where a router breaks a single UDP datagram into multiple, smaller IP packets. This happens below the RADIUS application, which is unaware that its packet was fragmented.
* **EAP Fragmentation (Application Layer)**: The EAP protocol itself does not support fragmentation, but it provides a framework where individual EAP methods, such as EAP-TLS, can implement their own fragmentation mechanisms. When a large EAP-TLS message (e.g., a certificate) is too large for the MTU, it can be broken into multiple EAP fragments. Each fragment is then encapsulated within its own RADIUS packet and sent individually.

The key difference is that **IP fragmentation** relies on the network to reassemble packets, a process that often fails. **EAP fragmentation** relies on the client and server to handle reassembly, which is a more robust process that avoids network-level issues.

***

## The Authenticator's Role in Fragmentation

The RADIUS client, or Authenticator, is a key player in this process. While it acts as a proxy, it can be configured to fragment EAP messages to avoid IP fragmentation. This is the preferred method for handling large payloads. For example, an Authenticator can be configured to break down a large EAP message received from a supplicant before encapsulating it in a RADIUS packet and sending it to the server. This ensures the packet is properly sized for the network path.

***

## Framed-MTU vs. EAP Fragmentation Size

The Framed-MTU is often confused with EAP fragmentation. The Framed-MTU is an attribute usually sent in an `Access-Accept` message from the RADIUS server to the RADIUS client. Its purpose is to set the IP MTU for the user's data session after they have been successfully authenticated. It cannot solve fragmentation issues that occur during the authentication handshake itself, which is when EAP fragmentation is needed.

In a less common scenario, the Framed-MTU attribute can also be sent from the RADIUS client to the server in an `Access-Request` message to signal the MTU that the client is capable of supporting or would prefer to use. It's a hint or a suggestion, not a command. The RADIUS server is free to ignore this value or use it as a factor when deciding on the MTU for the session, however, this is not a standard mechanism for negotiating EAP fragment size.

***

## Why EAP Fragmentation is the Better Solution

EAP fragmentation must be configured on both the Authenticator and the RADIUS server to ensure a reliable and successful EAP-TLS authentication. Since the EAP-TLS process is a two-way conversation, both sides must be capable of fragmenting large payloads. It is also a best practice to configure both sides with the same EAP fragment size to ensure consistency and prevent authentication failures.

Given this necessity, when a large certificate causes authentication to fail, it's often due to IP fragmentation. Firewalls or CGNAT devices may drop fragmented packets, causing the authentication to time out. Instead of a blanket reduction of the MTU for all network traffic, the best practice is to configure **EAP fragmentation on the authenticator and RADIUS server.**

This approach offers several key advantages:

* **Targeted Fix**: Configuring a specific EAP fragment size on the authenticator or RADIUS server directly solves the problem at its source. It ensures that the large authentication packets are broken into smaller, acceptable pieces before being sent over the network, preventing IP fragmentation without affecting other traffic.
* **No Significant Performance Impact on the Overall Network**: Reducing the global MTU for an interface affects all network traffic, which can lead to increased overhead and a decrease in network efficiency. By using EAP fragmentation, the rest of the network's traffic continues to use the standard MTU, preserving optimal performance. While EAP fragmentation does create more smaller packets for the same payload and may introduce slight latency due to more roundtrips, this has a negligible performance impact on the overall network and is a necessary trade-off for a successful authentication.
* **Protocol-Specific Design**: EAP methods that support fragmentation are designed to handle large payloads. Relying on this built-in feature is a more reliable and standards-based approach than relying on a network-layer workaround.

Common appliances with RADIUS client capabilities (like switches and access points from Cisco, Aruba, and Juniper) have a feature to configure EAP fragmentation. Similarly, RADIUS servers like FreeRADIUS have a `fragment_size` setting to control the maximum EAP fragment size.&#x20;

It is important to note that not all vendors provide this functionality. For example, Meraki does not offer a user-configurable EAP fragmentation setting in its dashboard, which can be a significant limitation.

***

## Why Fragmentation Fails with CGNAT

IP fragmentation is a common cause of authentication failures, especially on networks using Carrier-Grade NAT (CGNAT), such as Starlink.

* **Fragment Dropping**: Many firewalls and CGNAT devices are not designed to handle fragmented packets efficiently. For security or performance reasons, they may drop the fragments or fail to reassemble them correctly.
* **Packet Loss**: If even one fragment is lost during transit, the entire original UDP datagram cannot be reassembled by the server. Since UDP is connectionless and has no retransmission mechanism, the RADIUS server never receives a complete `Access-Request`, and the authentication fails.

The lack of a retransmission mechanism for fragmented UDP traffic is the core reason IP fragmentation is an unreliable solution for authentication. This is why configuring EAP fragmentation is the correct solution. It ensures that the EAP messages are already in small pieces, preventing them from being fragmented at the IP layer. This bypasses the fragmentation issues caused by firewalls or CGNAT devices that drop fragmented traffic.

***

## Conclusion

The interaction between large EAP-TLS certificate payloads and a network's MTU can be a hidden cause of authentication failures. While the RADIUS protocol relies on the network to handle fragmentation, firewalls and CGNAT devices often drop fragmented packets. By understanding the distinction between EAP and IP fragmentation, and by implementing the best practice of configuring EAP fragmentation on the authenticator and RADIUS server, you can ensure that authentication packets traverse the network intact. This deliberate, application-layer approach provides a robust and reliable solution, preventing common and frustrating connectivity issues.


# FAQs


# General

## Authentication

#### How often is a device typically authenticating against RADIUSaaS?

This is difficult to answer as it depends on the behavior of your users, clients, and networking gear (APs, NACs, switches). Additionally, it is **important** to note that RADIUSaaS will neither

* trigger an authentication nor
* send a termination request via its accounting port to the client, potentially triggering a re-authentication.

If you feel your devices are authenticating very frequently (multiple times an hour) without the user constantly restarting the client, then this could be for the following reasons:

* The network controller doesn't authenticate the client fast enough for the client to join the network, so the client attempts to authenticate again. Check the network controller to see if/when it is receiving an answer from RaaS.&#x20;
* The network controller is re-initiating authentication. Check the network controller for what might be causing this.&#x20;

## RADIUSaaS Admin Portal

#### How can I add the RADIUSaaS Admin Portal to My Apps?

**Create the App**

First, you have to create an Enterprise app. To do this via the Azure portal, follow these steps:

1. Login to your [Azure](https://portal.azure.com/) account
2. Go to **Microsoft Entra ID**
3. Select **Enterprise applications**
4. Click **+ New Application**

<figure><img src="https://1222554226-files.gitbook.io/~/files/v0/b/gitbook-x-prod.appspot.com/o/spaces%2FSWU1DQ4UGkqER7uGNUOm%2Fuploads%2FgXoin0duf0npCttHlP3g%2F2024-05-13_16h39_30.png?alt=media&amp;token=c438d135-1e5d-4df7-b057-5b5092ad3f39" alt=""><figcaption><p>Showing creation of a new application</p></figcaption></figure>

5. Click **+ Create your own application**
6. Give a name for the app (e.g. RADIUSaaS Portal)
7. Choose **Integrate any other application you don’t find in the gallery** and&#x20;
8. Click **Create**

<figure><img src="https://1222554226-files.gitbook.io/~/files/v0/b/gitbook-x-prod.appspot.com/o/spaces%2FSWU1DQ4UGkqER7uGNUOm%2Fuploads%2Fwo0K6KYFFPQuEe65F472%2Fimage.png?alt=media&amp;token=7e15934b-7ac4-4264-b7bc-380e9629fbc3" alt=""><figcaption></figcaption></figure>

After that the app is set up, we now need to add users to it and configure the logo and link

**Add Users and a Logo**

1. Under **Manage** go to **User and groups** - Add all users/groups who should be able to view/use your new URL tile and save

   <figure><img src="https://content.gitbook.com/content/SWU1DQ4UGkqER7uGNUOm/blobs/hyH1icrfXF4mBd3nXLxZ/image.png" alt=""><figcaption><p>Click "User and groups"</p></figcaption></figure>
2. Click **Properties** - Upload an image logo of your choice and save

   <figure><img src="https://content.gitbook.com/content/SWU1DQ4UGkqER7uGNUOm/blobs/u7ykwx7srqap3BW41Hmx/image.png" alt=""><figcaption><p>Click "Properties"</p></figcaption></figure>
3. Click **Single Sign-on** - Select **Linked** mode - Then enter the URL you want and save.

   <figure><img src="https://content.gitbook.com/content/SWU1DQ4UGkqER7uGNUOm/blobs/c6rZSCMxFjxXTvgwVbSN/image.png" alt=""><figcaption><p>Click Single Sign-on - Select "Linked" mode</p></figcaption></figure>

<figure><img src="https://1222554226-files.gitbook.io/~/files/v0/b/gitbook-x-prod.appspot.com/o/spaces%2FSWU1DQ4UGkqER7uGNUOm%2Fuploads%2F6u2t9T6oS6YSumklqcbZ%2Fimage.png?alt=media&amp;token=29a26b98-59c1-494d-bc71-a4b09b555796" alt="Enter your RADIUSaaS instance URL"><figcaption><p>Enter your RADIUSaaS instance URL</p></figcaption></figure>

**Access My Apps**

Your users should now be able to access the newly created link tile via [My Apps](https://myapps.microsoft.com/).

## RADIUS Return Attributes

#### Which VLAN-related attributes does RADIUSaaS return by default?

{% hint style="info" %}
In case you require other VLAN attributes than returned by default, please [contact our support](https://www.radius-as-a-service.com/help/).
{% endhint %}

If VLAN tagging is enabled by configuring and enabling a relevant [Rule](/admin-portal/access-and-rules/rules#vlan-assignment), RADIUSaaS returns the following generic VLAN attributes

`"Tunnel-Type": "VLAN"`&#x20;

`"Tunnel-Medium-Type": "802"`

`"Tunnel-Private-Group-ID"`

along with the other commonly used vendor-specific VLAN attributes:

`"WiMAX-VLAN-ID"`

`"Nexans-Port-Default-VLAN-ID"`

`"Dlink-VLAN-ID"`

`"UTStarcom-VLAN-ID"`

`"DHCP-IEEE-802.1Q-VLAN-ID"`

`"Motorola-WiMAX-VLAN-ID"`

`"Telrad-C-VLAN-ID"`

`"Telrad-S-VLAN-ID"`

`"SN-Assigned-VLAN-ID"`

`"Extreme-VM-VLAN-ID"`

`"Ruckus-VLAN-ID"`

`"Mikrotik-Wireless-VLANID"`

`"Egress-VLANID"`

`"HP-Egress-VLANID"`

## Secondary Instance and Failover

#### How does a secondary instance behave in terms of failover?

A secondary instance means that you have at least a secondary RadSec server that works independently of your main instance but has the same configuration. If you have one, you can see multiple IP Addresses under [RadSec IP Addresses](/admin-portal/settings/settings-server#properties).

**RadSec Connection**

Since the RadSec servers are independent of each other, they will not handle any kind of failover. You should add both IP addresses/DNS entries to your Network controller which decides to which server the authentication requests are forwarded.&#x20;

**RADIUS Connection**

With your RADIUS proxies, it's a little different: Your proxies are aware of each of your RadSec instances and their health states and thus will handle failover if the primary server fails.

## Timers & Timeouts

#### What EAP parameters and timeouts should be configured?

Not every access point or switch (authenticator) provides you with the same amount of configuration options for EAP and general (RADIUS server) timeout parameters. Below overview presents the maximum set of parameters known to us and how they should be configured to allow for maximum reliability of the connection between the authenticator and RADIUSaaS.

**RADIUS Server Timeout**

5 seconds

**EAP Parameters**

<table data-header-hidden><thead><tr><th width="261"></th><th></th></tr></thead><tbody><tr><td>EAP timeout</td><td>15 s</td></tr><tr><td>EAP max retries</td><td>5</td></tr><tr><td>EAP identity timeout</td><td>10 s</td></tr><tr><td>EAP identity retries</td><td>5</td></tr><tr><td>EAPOL key timeout</td><td>2000 ms</td></tr><tr><td>EAPOL key retries</td><td>4</td></tr></tbody></table>

## Logs

#### How can I identify the public IP address of the site from which an authentication originates?

To identify the public IP of the authenticating site for a particular authentication, the approach depends on whether you are using a RADIUS connection (via the RADIUS proxies) or a direct RadSec connection:

**RadSec Connection**

* Navigate to **Insights > Logs**.
* Configure the relevant timerange / search window.
* Set the **Logtype** filter to **details**.
* Identify the relevant authentication (by correlating the timestamp and username).
* Identify an `Access-Request` message (**message > Packet-Type** = **Acess-Request**) that belongs to the authentication under investigation.
* Expand the respective log entry.
* The public IP can be extracted from the **message > Packet-Src-IP-Address** property of the log entry.<br>

  <figure><img src="https://1222554226-files.gitbook.io/~/files/v0/b/gitbook-x-prod.appspot.com/o/spaces%2FSWU1DQ4UGkqER7uGNUOm%2Fuploads%2FBlBphRDGAIwN5VGTNkEV%2Fimage.png?alt=media&amp;token=cf1e517e-5751-4c3a-b2db-126bb1ec6a49" alt=""><figcaption></figcaption></figure>

**RADIUS Connection**

* Navigate to **Insights > Logs**.
* Configure the relevant time range / search window.
* Set the **Log-type** filter to the **proxy**.
* Identify the relevant authentication (by correlating the timestamp and username).
* The public IP can be extracted from the **message** property of the log entry:<br>

  <figure><img src="https://1222554226-files.gitbook.io/~/files/v0/b/gitbook-x-prod.appspot.com/o/spaces%2FSWU1DQ4UGkqER7uGNUOm%2Fuploads%2F02LVmspjS7FxGb7GjVQe%2Fimage.png?alt=media&amp;token=0355cfbc-ce0d-41e4-ab79-079391277db0" alt=""><figcaption></figcaption></figure>

## Does RADIUSaaS support WPA3 Enterprise?

Yes, RADIUSaaS supports WPA3 Enterprise. It also supports WPA3 Enterprise 192-bit mode with the following limitation:

**Windows 11 24H2** introduced stricter certificate requirements for WPA3-Enterprise 192-bit encryption, leading to authentication failures if the entire certificate chain does not meet specific cryptographic strength standards. This update mandates RSA key lengths of at least 3072-bits or ECDSA with the P-384 curve for all certificates involved in the authentication process. Organizations using certificates with weaker parameters, such as RSA 2048-bit, may encounter issues.&#x20;

While SCEPman supports 4096-bit RSA keys for Windows, this is limited to the Software Key Storage Provider (KSP), as the hardware TPM does not support this key size.&#x20;

If after upgrading to Windows 11 24H2 you experience authentication issues, look for "SEC\_E\_ALGORITHM\_MISMATCH" errors in the Event Viewer (System Logs and CAPI2) as an indicator for incompatibility in the cryptographic algorithms between the client and the server.&#x20;

### What can I do if I want to use WPA3-Enterprise authentication on Windows?

Your current option moving forward is to address the certificate requirements for WPA3-Enterprise 192-bit on your Windows 11 24H2 clients. This includes updating the Leaf Certificate to meet the new minimum requirements.&#x20;

Please note that Intune does not currently include an option in its SCEP profile to specify a key size of 3072-bits which could be stored in the Trusted Platform Module (TPM) of the receiving computer. Due to this limitation, currently the only feasible solution for Windows clients is to use 4096-bit RSA key enrolled in Software Key Storage Provider (KSP).&#x20;

{% hint style="success" %}
As Intune's WiFi profile only provides WPA2-Enterprise you will need to use an external tool to create a WPA3-Enterprise WiFi profile. For convenience, RADIUSaaS includes this tool [here](https://docs.radiusaas.com/admin-portal/settings/trusted-roots#xml).
{% endhint %}

## Identity Providers

### **Does RADIUSaaS support Okta as an identity provider?**

* **Yes** for admin & users login to the web-console
* **No** for authentication via the RADIUS protocol

#### **User and admin Portal (web-console) login**

Okta is fully supported as an identity provider for signing in to the RADIUSaaS Web Portal. RADIUSaaS does not maintain its own administrator identities and instead delegates authentication to your existing identity provider, so administrators, viewers, and invited users can log in with their Okta accounts. Okta is integrated through the **Custom OIDC Provider** option in the [Permissions](/admin-portal/access-and-rules/permissions#custom-oidc-provider-okta) section. Step-by-step setup instructions, including the required redirect URI, authentication and token URLs, client ID, client secret, and `openid email` scope, are documented in the [Permissions](/admin-portal/access-and-rules/permissions#overview) article.

#### **RADIUS protocol authentication (Wi-Fi, wired 802.1X, VPN)**

Okta is **not** supported as an identity provider for authentication that takes place over the RADIUS protocol. As described in the [Users](/admin-portal/users/users) section, RADIUSaaS does not integrate with any external IDP for username/password-based network authentication. All username/password accounts used for RADIUS authentication must be created and managed directly in the RADIUSaaS Admin Portal.

{% hint style="info" %}
For RADIUS-based network authentication, we generally recommend **against** username/password approaches that rely on an external identity provider. Such setups require credentials to be transmitted or relayed during the network authentication and broaden the attack surface in ways we consider a relevant security risk. Wherever possible, use **certificate-based authentication** (EAP-TLS) instead. For background and a detailed explanation of the risks of password-based network authentication, see [Certificate-Based Network Authentication](https://www.scepman.com/certificate-network-authentication/).
{% endhint %}


# Log & Common Errors

This page gives you guidance on how to interpret one of the below error messages.

## No EAP session matching state

{% hint style="info" %}
Severity: Low / No Impact
{% endhint %}

<figure><img src="https://content.gitbook.com/content/SWU1DQ4UGkqER7uGNUOm/blobs/pn86ZeX9DFirKA2Wy9mC/image.png" alt=""><figcaption></figcaption></figure>

Corresponding error messages:

* "No EAP session matching state"
* "Unable to set parent list"

The RADIUS protocol is stateless and since it is normally transmitted over UDP, it has to validate if all packages have arrived, if their integrity persists, if they can be correctly assembled in the correct order, etc., essentially mitigating the flaws of the UDP protocol.

Each authentication request goes through a process of steps that must be performed (e.g. association, request, challenge, challenge-response). For these steps, both sides (client and server) have a state that is included in the packet sent and a state that is stored locally. These states must match the step that client and server are currently in, respectively.

The error message indicates that one of the actors (client, server) has sent or received a packet that does not match the expected state. These errors happen from time to time as UDP cannot guarantee that packets are always delivered (correctly or at all). In most cases this is not a problem  because the RADIUS protocol handles these errors and re-initiates the connection without the computer that is trying to log in noticing.

If the devices are able to connect eventually without noticeable delays, such errors can be ignored. If this is not the case, try [increasing your EAP timeouts](/other/faqs/general#what-eap-parameters-and-timeouts-should-be-configured).

## Proxy Session Resumption

{% hint style="info" %}
Severity: Low / No Impact
{% endhint %}

<figure><img src="https://content.gitbook.com/content/SWU1DQ4UGkqER7uGNUOm/blobs/c0LmEk4HAZmXfb6GlZb5/image.png" alt=""><figcaption><p>tlsclientrd: connection to server server-tls-secondary3 lost</p></figcaption></figure>

Your proxies will create a TCP session with your RadSec server(s). These sessions have to be reinitiated every 30 seconds. As long as there is no error within those messages, these log entries are expected.

## Error in error

{% hint style="info" %}
Severity: Low / No Impact
{% endhint %}

<figure><img src="https://1222554226-files.gitbook.io/~/files/v0/b/gitbook-x-prod.appspot.com/o/spaces%2FSWU1DQ4UGkqER7uGNUOm%2Fuploads%2F5WTjzyTG3aPJ7JYsAuyA%2Fimage.png?alt=media&amp;token=695ca4e6-f1cb-48e7-9052-0ee0174e662f" alt=""><figcaption></figcaption></figure>

Since your RadSec server(s) are globally available, anyone on the Internet can try to connect to them, e.g. using a TCP handshake. If no valid (mututal) TLS connection can be established (which only works if the connecting entity presents a trusted RadSec client certificate), this error message is generated and expcted.&#x20;

Since RADIUSaaS cannot distinguish between someone crawling/port-scanning servers on the internet and a legit authenticator that is simply misconfigured, RADIUSaaS does not suppress these log entries. This means, if your infrastructure is working fine, you may ignore these log entries.

## Certificate status was revoked previously

{% hint style="info" %}
Severity: Low / No Impact
{% endhint %}

<figure><img src="https://1222554226-files.gitbook.io/~/files/v0/b/gitbook-x-prod.appspot.com/o/spaces%2FSWU1DQ4UGkqER7uGNUOm%2Fuploads%2Fz2RwaZM8xexUTMYvoPXh%2Fimage.png?alt=media&amp;token=21559e04-6e68-4bf2-bcfa-8e3a745da399" alt=""><figcaption></figcaption></figure>

If a certificate is found to be revoked, this status will be cached for 2 minutes. Additional attempts to authenticate this certificate will directly be rejected without performing another OCSP request. This is done to reduce the load on the OCSP responder.

The `Verify-Description` field will contain the correlation ID of the initial rejected request.&#x20;

<figure><img src="https://1222554226-files.gitbook.io/~/files/v0/b/gitbook-x-prod.appspot.com/o/spaces%2FSWU1DQ4UGkqER7uGNUOm%2Fuploads%2FuY3h9lLlAlIJEuuwxwTs%2Fimage.png?alt=media&amp;token=66f376ca-27ed-4179-8606-c4471dc289eb" alt=""><figcaption></figcaption></figure>


# MAC Authentication Bypass

This article aims to clarify what MAC Authentication Bypass is, how it differs from MAB-to-EAP, and which one works with RADIUSaaS.

{% hint style="danger" %}
Since **MAC addresses can be easily spoofed**, implementing a MAC authentication bypass is **strongly discouraged** unless absolutely necessary and the administrator has weighed the risk associated with implementing such a bypass against the convenience and budgetary constraints of upgrading outdated hardware.
{% endhint %}

## Overview

**MAC Authentication Bypass (MAB)** is a feature that enables devices unable to perform standard 802.1X enterprise authentication (such as legacy printers, simple sensors, or embedded systems) to connect to an otherwise secure network. MAB grants access by using a device's unique MAC address as its sole identifier against an authorised list maintained by a RADIUS server.&#x20;

The legacy implementation of MAB is **vulnerable to MAC address spoofing both on** the connection between the authenticating and the network device and on the connection between the network device and the RADIUS server. To eliminate the second attack vector, a stronger implementation of MAB, called **MAB-to-EAP**, can be used, which effectively ensures the integrity of the MAC address transmitted to the RADIUS server (the MAC address can still be spoofed on the link between the authenticating and network device).

This guide details the differences between the insecure legacy method **Pure MAB** and the modern, transport-secured workaround.

## MAB Terminology and Implementations&#x20;

**MAB:** MAC Authentication Bypass

**EAP:** Extensible Authentication Protocol

**Supplicant:** The entity (such as a laptop, phone, or network interface) that initiates the authentication process with an Authenticator to gain access to a network.

**Authenticator:** A network entity (such as a switch, wireless access point, or VPN gateway) that enforces authentication before granting a Supplicant access to the network.

**Authentication Server:** A trusted network entity (such as RADIUS server) responsible for verifying the identity of Supplicants by checking their credentials (such as usernames, passwords, or digital certificates) and determining whether they are authorised to access the network.

**Pure MAB** (Legacy Implementation): This method involves the Authenticator sending the client's MAC address to a RADIUS server, usually in the `Calling-Station-Id`  RADIUS attribute. The RADIUS server performs a simple lookup and returns an `Access-Accept` or `Access-Reject`. The MAC address acts as the identifier, not a true credential.

**MAB-to-EAP** (Secured Implementation): Because Pure MAB lacks cryptographically secure transport, many modern services (like RADIUSaaS) require a stronger approach. In this method, the Authenticator uses the client's MAC address as both the username and password and then attempts to authenticate to the RADIUS server using a secure EAP protocol (e.g., EAP-TTLS-PAP, PEAP-MSCHAPv2). The client device remains oblivious that any authentication has occurred.

## How Pure MAB Works (External RADIUS Database)

When the MAC address database is maintained by an external RADIUS server (the common enterprise setup), the following sequence applies for Pure MAB:

1. A non-802.1X client connects and requests network access.
2. The Authenticator detects the connection and, seeing no 802.1X negotiation, initiates an MAB attempt.
3. The Authenticator takes the client's MAC address (e.g., `00:11:22:33:44:55`) and forwards it to the RADIUS server in an `Access-Request` message. The MAC address is typically parsed into the `Calling-Station-Id` RADIUS attribute.
4. The RADIUS server checks its configured database for the presence of the MAC address.
5. It returns an `Access-Accept` message if the MAC is found (Match) or an `Access-Reject` if it is not found (No Match).
6. If `Access-Accept` is received, the Authenticator authorises the port and allows the client to join the network.

<img src="https://1222554226-files.gitbook.io/~/files/v0/b/gitbook-x-prod.appspot.com/o/spaces%2FSWU1DQ4UGkqER7uGNUOm%2Fuploads%2FHoRumYsZZ6117ly74RWs%2Ffile.excalidraw.svg?alt=media&amp;token=6a1045d9-2d07-44e6-b19a-854d1f7d406b" alt="" class="gitbook-drawing">

### Security Considerations

In general, **MAB provides little to no security** and should be used with extreme caution.&#x20;

* **MAC Spoofing:** MAC addresses are easily changed (spoofed) on most modern computers and network cards. A malicious actor can observe the MAC address of an authorised device and configure their own device to use it, thereby gaining unauthorised access.
* **Identification, Not Authentication:** MAB is merely a form of device identification. It only confirms which device is connecting, not who owns it or if it is cryptographically secure.

Because of these weaknesses, most modern cloud-based authentication services (like RADIUSaaS) do not support Pure MAB or legacy protocols like PAP or CHAP. Instead, they require the MAB-to-EAP method where the MAC address is used as credentials within a cryptographically strong EAP tunnel.&#x20;

## MAB Implementation with EAP (a RADIUSaaS Approach to MAB)

When MAB is configured on an Authenticator and a legacy device that does not support 802.1X tries to request network access, the switch or AP will pretend to be that device and takes over the authentication on behalf of the client by authenticating to RADIUSaaS using one of the supported EAP [protocols](https://docs.radiusaas.com/admin-portal/users#protocols): EAP-TTLS-PAP or PEAP-MSCHAPv2. As part of this process, RADIUSaaS will check if the MAC address is listed in the RADIUSaaS database in the form of a manually added [User](/admin-portal/users/users). (username = password = MAC address), If so, then an `Access-Accept` message is returned, and the EAP-based authentication completes giving the legacy device network access. Since the Authenticator is establishing a TLS connection to RADIUSaaS, it must trust the [Server Certificate](/admin-portal/settings/settings-server#server-certificates) RADIUSaaS uses.

The use of the MAC address as username/password to trigger EAP is a specific workaround implemented by the Authenticator to simulate MAB while utilising stronger EAP protocols.

### Does MAB work with RADIUSaaS?

MAB in its original implementation using PAP or CHAP does not work with RADIUSaaS. With the above definitions in mind, the current implementation of RADIUSaaS can support MAB as long as your Authenticator can authenticate via one of the aforementioned protocols. Keep in mind that as soon as these supported protocols are used in the authentication, we no longer bypass authentication, and this is when the more specific term of MAB-to-EAP is used.&#x20;

### Configuration

**MAB** requires configuration on both the Authenticator and the Authentication Server.&#x20;

**Authenticator:**

* Enable 802.1X and MAC Authentication Bypass (MAB) on the specific access ports/SSIDs meant for non-802.1X devices.
* Trust the [RADIUS server certificate](/admin-portal/settings/settings-server#download).
* *Note: Configuration steps are vendor-specific; refer to your device documentation.*

**Authentication Server:**

* When implementing MAB-to-EAP, you must create an explicit authorisation rule on RADIUSaaS to assign all devices authenticating via this method to a fallback VLAN with minimal network access. This is essential to enforce the principle of least privilege, preventing a bad actor who has spoofed a valid MAC address from accessing critical network resources. The rule should be configured based on your environment's authentication policies:&#x20;
  * If MAB-to-EAP is the only use for username/password-based authentication: Create a broad authorisation rule (LAN/Wi-Fi) that assigns any device using this credentials type to the fallback VLAN.&#x20;
  * If username/password is used for other clients (e.g., users): This rule must be carefully tuned using regular expressions to specifically match the pattern of a MAC address in the username field (e.g., `00:11:22:33:44:55`). This ensures only MAB-to-EAP traffic is isolated to the fallback VLAN.
* To support MAB-to-EAP, you must [add](/admin-portal/users/users#add) users formatted as: Username = Password = MAC address. Example: `00:11:22:33:44:55` = `00:11:22:33:44:55`.
* The MAC address format (colon, hyphen, or none) must exactly match the format your Authenticator sends in the EAP credentials. We recommend using colon notation (e.g., `00:11:22:33:44:55`) for consistency.
* If you have multiple users, you can import them in bulk using a [CSV](/admin-portal/users/users#csv-import) file.

<figure><img src="https://1222554226-files.gitbook.io/~/files/v0/b/gitbook-x-prod.appspot.com/o/spaces%2FSWU1DQ4UGkqER7uGNUOm%2Fuploads%2FjobhFo9ZsrzXeck9Chm3%2F2025-11-04_15h19_53.png?alt=media&amp;token=d84d9b45-2b03-496d-b711-707eebba2d3c" alt=""><figcaption></figcaption></figure>


# Blast-RADIUS Vulnerability

## What is this about?

Earlier this year, a group of RADIUS experts identified a vulnerability in the RADIUS protocol. Hackers can exploit this vulnerability to gain access to networks protected by RADIUS systems.

For more information about this vulnerability, visit <https://www.blastradius.fail/>. This site also contains a comprehensive paper on the background called "RADIUS/UDP Considered Harmful".

The vulnerability is also documented as [CVE-2024-3596](https://cve.mitre.org/cgi-bin/cvename.cgi?name=CVE-2024-3596):

> RADIUS Protocol under RFC 2865 is susceptible to forgery attacks by a local attacker who can modify any valid Response (Access-Accept, Access-Reject, or Access-Challenge) to any other response using a chosen-prefix collision attack against MD5 Response Authenticator signature.

## Is RADIUSaaS affected?

{% hint style="success" %}
RADIUSaaS is not affected by the Blast-RADIUS vulnerability.
{% endhint %}

RADIUSaaS only supports EAP-based authentication protocols. If EAP is properly implemented in all components of your infrastructure, the mechanism described in this vulnerability will not be effective.

## Since RADIUSaaS is not affected, is my whole environment OK?

It is important that all components in your environment have proper implementations. We recommend that you check with your network equipment vendor to ensure that they have updated their systems, if needed.


# OCSP Soft-fail Consequences

This page provides an overview on the pros and cons in the terms of OCSP Soft-fail mechanism.

Before we dive into the pros and cons let's start by quickly recapping what the setting means:

Please note: All of those examples describe the behaviour of an authentication where the supplicant has a valid certificate (not expired, issued by a trusted CA).

#### Soft-fail = Enabled

If a problem occurs when querying the OCSP responder such as a timeout or incorrect data, the application treats the certificate revocation status as '**good**'.

#### Soft-fail = Disabled

If a problem occurs when querying the OCSP responder such as a timeout or incorrect data, the application treats the certificate revocation status as '**revoked**'.&#x20;

If you use **OCSP-Autodetect** and the client certificate does not include an OCSP responder URL, the application treats the certificate revocation status as '**revoked**'.&#x20;

## Pros and Cons

### Soft-fail Enabled

#### Pros

1. **Higher Availability & Fewer Disruptions**
   * Users are less likely to experience sudden authentication failures due to transient network issues or temporary OCSP responder outages.
   * Improves user experience and reduces support calls related to “can’t connect” issues caused solely by OCSP connectivity or service problems.
2. **Better Tolerance of OCSP Service Outages**
   * If the OCSP hosting provider experiences downtime or certificate-related issues, authentications will still succeed.
3. **Minimal Impact on Business Continuity**
   * Especially important in environments where downtime has a high cost (e.g., critical infrastructure, emergency services, or 24/7 businesses).

#### Cons

1. **Security Risk: Revoked Certificates May Be Accepted**
   * A failure in the RADIUS server's revocation status verification, due to OCSP unavailability or other issues, will result in the acceptance of a revoked certificate.
   * This undermines the trust model of certificate-based authentication and can be exploited if an attacker deliberately forces OCSP failures.
2. **Lack of Visibility Into System-wide Issues**
   * If the system silently bypasses revocation checks, administrators might not immediately notice that an OCSP responder is down or misconfigured, prolonging the vulnerability window.

### Soft-fail Disabled

#### Pros

1. **Higher Security Assurance**
   * Ensures that any certificate that cannot be positively validated against the OCSP responder is rejected.
   * Protects against usage of revoked, or otherwise compromised certificates.
2. **Clear Operational Signals**
   * If authentication suddenly starts failing, it forces quick attention to OCSP availability or configuration problems.
   * Administrators become immediately aware of any connectivity or trust chain issues because no user can authenticate unless the OCSP check is successful.

#### Cons

1. **Single Point of Failure**
   * If the OCSP responder is down, DDOS attacked, unreachable, or misconfigured, **all** valid certificate authentications fail.
   * Can cause significant business disruption and a flood of support calls.
2. **Reliance on OCSP Service Uptime**
   * Implies your OCSP service must be highly available and robustly monitored.
   * Requires thorough failover planning (e.g., multiple OCSP responders, load balancing, or redundancy) to prevent massive outages.
   * Requires planning for updating the responder
3. **Possible Frustration for Users**
   * Users can’t connect even when they have perfectly valid certificates, simply because the OCSP check can’t complete.


# Security & Privacy

This chapter provides an overview on frequently asked questions surrounding information security, privacy and quality assurance.

## Data Processing and Permissions

### 1. From what data center is RADIUSaaS operating?

RADIUSaaS' core service can currently be deployed in the following regions:

* Australia
* Europe
* United Kingdom
* United States of America

In case RADIUS proxies are required, they can be deployed in the following countries/regions:

| Continent     | Region                                                              |
| ------------- | ------------------------------------------------------------------- |
| Africa        | Johannesburg                                                        |
| Asia          | <p>Bangalore<br>Singapore<br>TelAviv<br>Tokio<br>Seoul<br>Osaka</p> |
| Australia     | <p>Sydney<br>Melbourne</p>                                          |
| Europe        | <p>Frankfurt<br>London<br>Madrid<br>Stockholm</p>                   |
| North America | <p>Dallas<br>New York<br>Seattle<br>Toronto</p>                     |
| South America | <p>Santiago<br>São Paulo</p>                                        |

### 2. Which data is processed by RADIUSaaS?

#### **Certificates**

RADIUSaaS processes X.509 user or device certificates to validate the authenticity of the authentication request. As part of the certificate, every attribute can be processed, potentially containing information such as:

* Username
* Email
* UPN

#### **RADIUS Protocol**

RADIUSaaS relies on the RADIUS protocol, e.g. the following data is visible to RADIUSaaS:

* Client MAC address
* NAS (e.g. access point, switch, ...) MAC address
* WiFi SSID
* Vendor-specific data (e.g. VLAN, tunneling-group, ...)
* NAS IP address
* ISP-assigned public IP address
* RADIUS Shared Secret (only relevant if RadSec is not natively supported)
* Private key of the RADIUS server certificate

#### **Miscellaneous**

RADIUSaaS (optionally) provides functionality to generate username + password pairs for network access. Those credentials are stored and processed by the service as well.

### 3. Which data is persistently stored by/on behalf of RADIUSaaS and how?

1. Permissions

   The RADIUSaaS platform stores UPN/email information on the users that are allowed to access the platform. **No passwords are stored or processed by RADIUSaaS.**
2. Logging

   For troubleshooting and analysis purposes, the RADIUSaaS platform logs all relevant data it processes (see [Question 2](#2.-which-data-is-processed-by-radiusaas) except for the RADIUS Shared Secret and the private key of the server certificate).

   The logs are stored directly on the RADIUSaaS platform within an *Elasticsearch* database and segregated for every client via a dedicated space.\
   \
   **Log retention time: 75 days.**
3. Certificates

   RADIUSaaS requires several server certificates as well as root certificates to facilitate proper operation. All those certificates are securely **stored in an Azure KeyVault**.
4. The optional username + password credentials mentioned in [Question 2](#2.-which-data-is-processed-by-radiusaas) are **stored in an Azure KeyVault**.
5. Other secrets and configuration data

   Other secret data, e.g. the RADIUS Shared Secret as well as the service's configuration are securely **stored in an Azure KeyVault**.

### 4. Is there an archiving mechanism for logs?

There is no built-in log archiving mechanism. However, the [Log Exporter](/admin-portal/settings/log-exporter) feature can be used to ingest RADIUS logs into your own logging and archiving services.

### 5. Which tenant permissions do users accessing the RADIUSaaS web portal have to consent to?

1. `Basic User Profile`:

   With this permission RADIUSaaS retrieves the user's UPN that tries to log on to the RADIUSaaS Admin Portal.
2. `Maintain access to data you have given it access to`

   With this permission RADIUSaaS receives the right to request a refresh token so that the user can stay logged-on.

Please see [here](/admin-portal/access-and-rules/permissions#permissions-consent) for details.

### 6. What data is made available by granting the consent(s) from 5.?

1. `Basic User Profile`:

   For details on what data can be retrieved, please refer to this article: <https://docs.microsoft.com/en-us/azure/active-directory/develop/v2-permissions-and-consent#profile>&#x20;
2. `Maintain access to data you have given it access to`

   No specific data is made available by granting consent to this permission.

### &#x20;     7. Which externally accessible endpoints does RADIUSaaS expose?

1. RADIUS Server Backend API
   * Provides configuration information to the RadSec proxy.
2. RADIUS and RadSec Server Ports
   * To facilitate network authentication from anywhere on the internet, these authentication interfaces have to be publicly exposed.
3. RADIUSaaS Admin Portal
   * A web portal which facilitates the administration of the service.
4. Kubernetes Cluster Management API
   * Required to operate the service.

### 8. How are the endpoints from Question 7 protected?

1. RADIUS Server Backend API
   * Secured via JWT access tokens that can be managed (issued, deleted, revoked) by the customer.
2. RADIUS Proxy and RadSec Server Ports
   * RadSec server ports: TLS-secured (>= version 1.2).
   * RADIUS proxy server ports: Protected via the RADIUS Shared Secret.
3. RADIUSaaS Admin Portal
   * Secured via OAuth 2.0 authentication against one of our [supported IDPs](/admin-portal/access-and-rules/permissions#supported-idps).
4. Kubernetes Cluster Management API
   * TLS-secured (>= version 1.2).

### 9. What ports and protocols are used by the endpoints from Question 7?

* RADIUS Server Backend API
  * HTTPS (TCP / 443)
* RADIUS Proxy and RadSec Server Ports &#x20;
  * RadSec server ports: RadSec (TCP / 2083)
  * RADIUS proxy server ports: RADIUS (UDP / 1812, 1813)
* RADIUSaaS Admin Portal
  * HTTPS (TCP / 443)
* Kubernetes Cluster Management API
  * HTTPS (TCP / 443)

## Identity

### 1. What authorization schemes are used to gain access to RADIUSaaS?

* Administrative access is realized through OAuth 2.0 authentication against an [IDP](/admin-portal/access-and-rules/permissions#supported-idps) for identities or accounts that are registered on the platform.

### 2. Are there conditional access / role-based access controls in place to protect RADIUSaaS?

* Yes. The RADIUSaaS Admin portal provides features to assign roles to every user (available roles: administrator, viewer, guest).
* In order to properly operate and maintain the service, there are super-admin accounts for a limited circle of glueckkanja AG employees, that have full access to all client instances of the RADIUSaaS service.

### 3. Can access credentials be recovered? If yes, how?

* Login credentials: Depends on the configured Microsoft Entra ID (Azure AD) policies in the customer tenant.
* Username + password credentials as well as all certificates for network access can be recovered from Azure KeyVault with a retention policy of 90 days after they have been deleted.

### 4. What to do to recover lost access to the RADIUSaaS instance?

* If your business lost access to RADIUSaaS instance because the previous administrator(s) left or the UPN / domain has changed, the easiest way to recover access is to re-create a user account that matches the existing UPN at RADIUSaaS > Permissions > Administrators. This is by far the fastest approach, since it does not require any actions on our side.
* If the above is not feasible, recovering access to the portal will be subject to a rigorous identity verification process that is not only time-consuming but will require significant effort from both sides. There is a one-time fee of 420.00 EUR (excl. VAT) for this process. To start the process, please create a technical support ticket.
* To prevent loss of access to your RADIUSaaS tenant, please follow our best practices by carefully working through each step of our [Getting Started Guides](/configuration/get-started).

## Data Protection

### 1. How is *data at-rest* protected against unauthorized access?

#### **Configuration Data and Secrets**

* Configuration data is stored in Azure KeyVault and protected via access credentials that are in turn stored as *Kubernetes Secrets*.

#### **Kubernetes Service**

* The volumes and disks used to host our service are [encrypted](https://learn.microsoft.com/en-us/azure/aks/enable-host-encryption).

#### **Logs**

* The Elasticsearch Database is hosted on the encrypted Kubernetes Service disks.
* The logs are stored in an Elasticsearch Database and segregated via dedicated spaces.
* Access to those spaces is given via username + password credentials that are in turn stored as *Kubernetes Secrets*.
* The Elasticsearch Database itself is not encrypted.

### 2. How is *data in transit* protected against unauthorized access?

* The authentication flows of the device trying to access the network are wrapped into a TLS-tunnel (>= TLS 1.2).
* The association between NAS and the RADIUS server is obfuscated via the RADIUS Shared Secret (MD5 hash algorithm).

### 3. How are customer tenants separated from each other?

#### Backend

RADIUSaaS backend services run on multiple Kubernetes clusters that are distributed worldwide. Every customer's RADIUSaaS instance has their own K8s namespace, logging space and dedicated public IP. There is an Elasticsearch instance with dedicated customer accounts for logging and reading per cluster.

#### RADIUS proxies

Every RADIUSaaS proxy runs on its own VM with dedicated public IP.

## Security by Design

### 1. Does RADIUSaaS employ a defense in depth strategy?

RADIUSaaS relies on well-established protocols to handle network authentication flows (RADIUS, RadSec, EAP-TLS, EAP-TTLS-X). Due to the strong focus on certificate-based authentication, capturing the traffic is meaningless as long as the eavesdropper does not have access to a trusted certificate.

### 2. Is the UDP-based RADIUS protocol secure?

We are recommending to use the modern [RadSec](/overview#what-is-radsec) protocol to authentication against RADIUSaaS. However, there are many network infrastructure components still out there, which do not support RadSec.

The following diagram shows the RADIUS authentication flow:

![](https://content.gitbook.com/content/SWU1DQ4UGkqER7uGNUOm/blobs/byiGM49uzq0vRK6ny2KM/radius-authentication-sequence.png)

In the first part of the authentication sequence, the communication is secured by an MD5-based hashing algorithm (partially encrypted with the shared secret). **No secrets** are transported in this phase.

In the second part of the authentication sequence, a TLS-based EAP (e.g. EAP-TLS) encrypts the traffic. The EAP-TLS traffic is then transported via UDP to the RADIUS proxy. This is the phase when credentials such as the certificate or the password is exchanged with RADIUSaaS. If you use certificate-based authentication, no secrets are transported in this phase as only the public key is exchanged. The private key remains on the client device at all times.

A comprehensive comparison between RADIUS and RadSec in terms of transport security is provided [here](/other/faqs/security-and-privacy/transport-security-in-radius-vs.-radsec).

{% hint style="success" %}
Conclusion: UDP-based RADIUS authentication with RADIUSaaS is secure, since&#x20;

* the relevant traffic is encrypted\
  and
* additionally there are no secrets transported, if certificate-based authentication is used.
  {% endhint %}

### 3. What technologies, stacks, platforms were used to design RADIUSaaS?

* `Kubernetes`
* `EFK Stack (Elasticsearch, Filebeats, Kibana)`
* `Python`
* `Azure (KeyVault)`
* `TerraForm`
* `Git CI`

## GDPR and Data-residency <a href="#user-content-gdpr-and-data-residency" id="user-content-gdpr-and-data-residency"></a>

### 1. Is data leaving Europe?

* Core Services: Depends on configuration
  * RADIUSaaS's core services can be hosted in the data centers described in [Question 1](#1.-from-what-data-center-is-radiusaas-operating).
  * If the service is hosted in a European data center, then no data leaves the European Union.
* RadSec Proxy: Depends on configuration
  * If you require a RadSec proxy due to limitations of the network gear in regards to native RadSec support, you may select a proxy from various regions, Europe amongst others. In that case, your data stays within the borders of the European Union.

### 2. What 3rd-Party cloud-providers does RADIUSaaS rely on and why?

| Company                                        | Services                                                         | Contact                                                                                   | Purpose                                                         |
| ---------------------------------------------- | ---------------------------------------------------------------- | ----------------------------------------------------------------------------------------- | --------------------------------------------------------------- |
| Microsoft Corporation                          | Cloud Services (Azure)                                           | <p>Building 3, Carmanhall Road Sandyford,<br>Industrial Estate 18, Dublin,<br>Ireland</p> | Kubernetes Service, networking, storage                         |
| Digital Ocean, Inc.                            | Cloud Services                                                   | <p>Y101 6th Ave,<br>New York City,<br>NY 10013,<br>United States</p>                      | Kubernetes Service, networking, storage, VMs for RADIUS proxies |
| Vultr (trademark of The Constant Company, LLC) | Cloud Services                                                   | <p>319 Clematis Street - Suite 900<br>West Palm Beach, FL 33401,<br>United States</p>     | VMs for RADIUS proxies                                          |
| GitLab, Inc.                                   | git code repository, integration, testing and release automation | <p>268 Bush Street #350, </p><p>San Francisco, </p><p>CA 94104-3503, United States </p>   | Code repository, CI/CD pipeline.                                |

## Miscellaneous <a href="#user-content-miscellaneous" id="user-content-miscellaneous"></a>

### 1. Is RADIUSaaS part of a bug-bounty program?

No

### 2. What QA measures are in place?

* There are dedicated RADIUSaaS labs for development purposes
* The deployment and installation of the service is realized through TerraForm, ensuring consistency and idempotence of each instance deployment
* Kibana APM is used for service health measurement and alert management
* Digital Ocean monitoring supervising the RadSec proxies
* Each production release must go through the internal channel first, passing the relevant QA hurdles as part of our CI process
  * Unit tests
  * Peer review (six-eye-principle)
  * Integration tests
  * Stress tests
  * Experience-based testing

### 3. Do you regularly perform penetration tests?

No.

As part of our Secure Development Practices, we employ tools (e.g. static code analysis) that scan the code base for CVEs and other common exploits (including dependencies such as 3rd party libraries) that could impact the security of the endpoints RADIUSaaS exposes. Before any release, any relevant findings are assessed and remediated, to ensure RADIUSaaS remains free from any known vulnerabilities. We neither perform penetration tests ourselves, nor do we use 3rd party "Penetration Test-as-a-Service" tools. For the former, we see an inherent conflict of interest. For the latter, since typical penetration test services often simply check the exposed endpoints against CVEs and other known exploits, we do not see any added value to the checks we already perform using static code analysis. If you wish to perform your own penetration tests, please [reach out to us](https://support.radiusaas.com/support/tickets/new?ticket_form=technical_support_request_%28radiusaas%29) and tell us about your requirements.

### 4. Is there a patching process in place?

Yes.&#x20;

Patches, hot-fixes, bugfixes and feature updates are introduced using our CI/CD process that leverages different testing pipelines to ensure that only code that satisfies our QA hurdles gets released. Newly released code is automatically made available to all our customers. Using Infrastructure as Code (Terraform) enables us to deliver consistent, reproducible and high-quality updates to our customers.

The Kubernetes-based architecture of our service ensures that code updates are seamless for our customers and do not lead to any service outages.&#x20;

### 5. What are the SLAs for patches?

* Patches for CVEs / security vulnerabilities: Once the vulnerability becomes public knowledge or as soon as we identify a vulnerability within our own code, a hot-fix will be provided no longer than 24 hours after we have become aware of the vulnerability.&#x20;
* Other patches: No SLA.

### 6. Does RADIUSaaS perform backups?

#### Secrets and configuration data

We leverage Azure KeyVault to securely store secrets (e.g. certificates) and all other configuration data of the service. Azure KeyVault is a highly-available [geo-redundant service](https://learn.microsoft.com/en-us/azure/key-vault/general/disaster-recovery-guidance) that replicates all of its content in a second datacenter, thus providing implicit back-up services.&#x20;

#### RADIUS and RadSec servers

Stateless. No back-up required.

#### Logs

Currently not backed-up.

### 7. Are there backup restore tests?

Yes.&#x20;

The restoration from back-ups is tested with every update/release of the service. There are approximately 4 - 8 releases per year.


# Transport Security in RADIUS vs. RadSec

When deploying secure authentication using Extensible Authentication Protocol (EAP), the choice of transport protocol - RADIUS over UDP vs. RADIUS over TLS (RadSec) - plays a critical role in determining how securely metadata and protocol elements are transmitted across the network.

Both RADIUS and RadSec can carry EAP messages including those used in common methods like EAP-TLS, PEAP, and EAP-TTLS. While the inner workings of the EAP method remain the same, the transport protocol impacts visibility, integrity, confidentiality of metadata, and operational behaviour.

This document compares how RADIUS and RadSec affect EAP transport - focusing on encryption, shared secret usage, attribute exposure, logging implications, and deployment considerations.

***

### Transport Security: Core Differences

EAP methods such as EAP-TLS, PEAP, and EAP-TTLS provide authentication mechanisms between clients (supplicants) and authentication servers. However, these methods do not inherently encrypt the transport of metadata between intermediate nodes. This role falls to the transport layer protocol:

* RADIUS (UDP) transmits EAP messages and RADIUS attributes in plaintext.
* RadSec (TLS) encrypts the entire RADIUS packet, securing all attributes and protocol headers during transit.

The table below summarises these differences which affects confidentiality of attributes such as outer identity, NAS IP, calling station ID, and more. While EAP methods may encrypt user credentials (e.g., certificates or passwords), metadata remains exposed over standard RADIUS unless RadSec is used.

| Protocol                 | RADIUS                                   | RadSec                                |
| ------------------------ | ---------------------------------------- | ------------------------------------- |
| Transport Layer Protocol | UDP (typically)                          | TLS over TCP                          |
| Encryption               | No transport encryption                  | Full transport encryption             |
| Default Port\*           | UDP 1812                                 | TCP 2083                              |
| Notes                    | Stateless; may be filtered by firewalls. | Stateful; establishes secure tunnels. |

\*While these ports are the recognised standards, some deployments may customise them for local policy or infrastructure reasons.

***

### The Role of the RADIUS Shared Secret in Both Protocols

The RADIUS shared secret is used for packet integrity and legacy encryption behaviours. This applies regardless of whether the transport is standard RADIUS or RadSec.

**Key uses:**

* **Message-Authenticator AVP**: Ensures packet integrity using HMAC-MD5.
* **User-Password AVP (legacy methods)**: Encrypts credentials using the shared secret.
* **RadSec compatibility**: Even in RadSec, the shared secret is maintained for compatibility with RADIUS semantics and intermediate systems.

{% hint style="info" %}
**Note:** The shared secret is never transmitted over the network - it is used locally for HMAC operations and AVP validation.
{% endhint %}

***

### Data Element Visibility: RADIUS vs. RadSec

This table compares key data elements when using EAP-TLS over RADIUS (UDP) and RadSec (TLS), grouped by visibility risk during transmission.

<table data-full-width="false"><thead><tr><th width="151.4000244140625">Data Element</th><th width="175.0001220703125">RADIUS (UDP)</th><th width="175.80010986328125">RadSec (RADIUS over TLS)</th><th>Example / Notes</th></tr></thead><tbody><tr><td><strong>Outer RADIUS packet</strong></td><td>Clear text (over UDP or TCP).</td><td>Encrypted (over TLS).</td><td>Includes both headers and AVPs. E.g., packet visible in Wireshark or tcpdump.</td></tr><tr><td><strong>User identity (outer identity)</strong></td><td>Sent in clear text.</td><td>Encrypted (over TLS).</td><td><code>anonymous@organisation.com</code> used for realm routing.</td></tr><tr><td><strong>RADIUS AVPs (Attributes)</strong></td><td>Some in clear text (e.g., NAS-IP, User-Name).</td><td>Fully encrypted in TLS.</td><td><p><code>NAS-IP-Address,</code></p><p> <code>Calling-Station-Id</code></p></td></tr><tr><td><strong>RADIUS headers</strong></td><td>Clear text</td><td>Encrypted in TLS</td><td><p>Code (<code>Access-Request</code>), <code>Identifier,</code> </p><p><code>Length,</code> </p><p><code>Authenticator</code></p></td></tr><tr><td><strong>RADIUS shared secret</strong></td><td>Not transmitted (used internally)</td><td>Not transmitted (used internally)</td><td>Used for AVP encryption and <code>Message-Authenticator</code> validation.</td></tr><tr><td><strong>EAP payload</strong> </td><td>Encrypted between client and server</td><td>Encrypted in TLS</td><td>Includes TLS handshake, certificate validation, etc.</td></tr><tr><td><strong>User credentials (certificates/keys)</strong></td><td>Encrypted in EAP tunnel</td><td>Encrypted in EAP-tunnel + TLS</td><td>Applies to certificate-based (EAP-TLS) and password-based (PEAP) methods. Client certificate with subject <code>CN=jsmith, OU=IT</code></td></tr><tr><td><strong>Password (e.g., PEAP or MSCHAPv2)</strong></td><td>Encrypted in tunnelled method (e.g., PEAP)</td><td>Encrypted in EAP tunnel + TLS</td><td>Applies to password-based methods.</td></tr></tbody></table>

***

### Identity Privacy: Outer vs. Inner Identity

EAP methods that use tunnelling or certificates (e.g., PEAP, EAP-TTLS, EAP-TLS) support outer and inner identities:

* **Outer Identity**: Sent in the clear in the User-Name AVP to facilitate realm routing. Often anonymised (e.g.,  `anonymous@domain.com`).
* **Inner Identity**: Carried securely inside the encrypted EAP tunnel (e.g., username/password, certificate CN).

#### Behaviour across transports:

* In **RADIUS**, the outer identity is sent in plaintext and is visible on the wire.
* In **RadSec**, the entire packet including the outer identity is encrypted.

Privacy concerns related to the Outer Identity being transmitted in plaintext with RADIUS can be mitigated by configuring identity privacy or leveraging device certificates that do not contain PII data in the common name attribute

{% hint style="info" %}
**Note**: Some platforms, like Windows’ native EAP client, may not support identity privacy by default in methods like EAP-TLS, potentially exposing the real identity in the outer layer.
{% endhint %}

#### Outer Identity

The table below provides an overview on the typical values various OS platforms populate the Outer Identity with.

| Credential Type    | Outer Idenity                                                                                                                                                                                               | Applicable OS                                                                                                                                                           |
| ------------------ | ----------------------------------------------------------------------------------------------------------------------------------------------------------------------------------------------------------- | ----------------------------------------------------------------------------------------------------------------------------------------------------------------------- |
| Username/Password  | <p><br><br>Typically:<br>- <code>UPN</code><br>- <code>Email Address</code></p>                                                                                                                             | <ul><li>Windows<br>(can be anonymised)</li><li>iOS, iPadOS, macOS<br>(can be anonymised)</li><li>Android<br>(can be anonymised)</li></ul>                               |
| Device Certificate | <p>Common name (CN) property of the client certificate's subject name. <br><br>Typically:<br>- <code>DeviceName</code><br>- <code>Intune Device ID</code> (GUID)<br>- <code>AAD Device ID</code> (GUID)</p> | <p></p><ul><li>Windows<br>(<strong>cannot be anonymised</strong>) \*</li><li>iOS, iPadOS, macOS<br>(can be anonymised)</li><li>Android<br>(can be anonymised)</li></ul> |
| User Certificate   | <p>Common name (CN) property of the client certificate's subject name. <br><br>Typically:<br>- <code>UPN</code><br>- <code>Email Address</code></p>                                                         | <p></p><ul><li>Windows<br>(<strong>cannot be anonymised</strong>)\*</li><li>iOS, iPadOS, macOS<br>(can be anonymised)</li><li>Android<br>(can be anonymised)</li></ul>  |

\*The EAP client used in Windows does not support identity privacy for EAP-TLS.

***

### Logging and Deployment Considerations

#### RadSec (TLS)

RadSec encrypts the entire RADIUS packet, which prevents passive eavesdropping. This shifts logging and diagnostics from network inspection to the application or RADIUS server level, as these are the endpoints that terminate the TLS session. Organizations transitioning to RadSec should evaluate monitoring workflows to accommodate encrypted traffic.

#### RADIUS (UDP)

The plaintext transmission of attributes (User-Name, NAS-IP-Address, etc.) simplifies troubleshooting and live diagnostics, enabling packet capture with minimal tooling. However, this increases the exposure risk of sensitive metadata during transit.

#### Network Support

Support for RadSec is not universal across all network devices and infrastructure. Many network switches, wireless access points, and firewalls support only traditional RADIUS. In mixed environments, a RadSec-to-RADIUS proxy may be needed to bridge modern and legacy components. Infrastructure assessments are recommended before deploying RadSec in production.

***

### Conclusion and Key Takeaways

Transporting EAP methods over either RADIUS or RadSec offers the same strong end-to-end protection for user credentials but differs significantly in how metadata and protocol elements are exposed during transit.

* **EAP End-to-End Protection**: EAP provides strong protection for user credentials over both RADIUS and RadSec.
* **Primary Difference**: RADIUS uses UDP and does not encrypt the RADIUS packet itself, while RadSec wraps the entire packet in TLS, hiding all attributes and headers from the wire.
* **Metadata Confidentiality**: RadSec encrypts all metadata (headers, attributes, and Outer Identity), preventing network-level exposure.
* **Shared Secret**: The Shared Secret is never transmitted. It is only used locally to compute message integrity checks and verify authenticity.
* **Trade-Offs**: RadSec provides enhanced confidentiality but complicates diagnostics due to encryption, and its support is not universal across all network equipment.

***

### Standards and RFC References

For further detail on protocols and specifications:

* EAP (Extensible Authentication Protocol): RFC 3748
* EAP-TLS: RFC 5216
* RADIUS (Remote Authentication Dial-In User Service): RFC 2865
* RadSec (RADIUS over TLS): RFC 6614


# REST API

The REST API documentation is available under https\://YOURNAME.radius-as-a-service.com/docs/api

RADIUSaaS exposes a REST API that allows you to automate most actions that would otherwise have to be performed through the RADIUSaaS Admin Portal UI.

{% hint style="warning" %}
Before executing any API call that leads to a configuration change, ensure you fully understand the implications. Incorrect use of the API may break the configuration of your service.
{% endhint %}

## Authentication

To authenticate a call to the REST API, populate an HTTP `Authorization` header with each request. This header must contain a valid [access token](/admin-portal/access-and-rules/permissions#access-tokens):

```
Authorization: Bearer
               <Access Token>
```

## API Reference

The API documentation contains a complete Swagger-based API reference for each API endpoint including

* available HTTP methods,
* HTTP response codes,
* JSON schemas / form data for request (bodies),
* JSON schemas of response bodies, and
* Request-response examples for some endpoints.

{% hint style="info" %}
It is not possible to trigger API calls directly through the API Reference.
{% endhint %}

<figure><img src="https://1222554226-files.gitbook.io/~/files/v0/b/gitbook-x-prod.appspot.com/o/spaces%2FSWU1DQ4UGkqER7uGNUOm%2Fuploads%2FyrjaWH8wAIOQrsCLO9IP%2Fimage.png?alt=media&amp;token=1c649dc2-b62e-494e-a640-d1042e4bb754" alt=""><figcaption></figcaption></figure>

## Scenarios

### Manage Username/Password Accounts for BYOD or Guest Access

The REST API can be used to automate the management of username/password accounts for BYOD or guest access scenarios.&#x20;

This may include the automatic provisioning of (WiFi) credentials during on-boarding of new students, tenants in a co-working space, ... as well as the automatic retirement of those accounts.

An example on how to use the REST API to provision a username/password account can be found in your API Reference under the **User** endpoints.

### Implement External Monitoring

To monitor the service availability and uptime of your RADIUSaaS instance with an external system, or to monitor expiry of your RADIUS Server Certificate, please refer to the following guide:

{% content-ref url="/pages/GXG4KTUIewEO2czvRIBs" %}
[External Monitoring](/other/rest-api/external-monitoring)
{% endcontent-ref %}

## cURL Examples

In general, there are two different content types for the REST API, either form data or JSON. You can find out which media type is required in the API documentation.&#x20;

If you are not familiar with the curl syntax, you can find two examples here:

#### JSON

```bash
curl -X "METHOD" "https://YOURNAME.radius-as-a-service.com/api/ROUTE/PATH" \
    -H 'Authorization: Bearer ACCESS_TOKEN' \
    -H 'Content-Type: application/json' \
    -d $'{
            NEEDED JSON DATA. Have a look at the documentation
        }'
```

#### Form Data

```bash
curl -X "METHOD" "https://YOURNAME.radius-as-a-service.com/api/ROUTE/PATH" \
    -H 'Authorization: Bearer ACCESS_TOKEN' \
    -F 'KEY=VALUE'\
    -F 'KEY=VALUE'
```


# External Monitoring

This article demonstrates how to use the provided API for external monitoring of your RADIUSaaS instance.

## Overview

The monitoring endpoint of your RADIUSaaS instance allows you to perform the following tasks in your own 3rd party monitoring solution:

* Monitor uptime of your RadSec endpoints.
* Monitor uptime of your RADIUS proxies.
* Monitor expiry of your RADIUS Server Certificate and its issuing CA.

If feasible in your monitoring solution, aggregation and metrics can be built around those monitors to trigger automated alerts.&#x20;

## API Schema Defition

Please refer to the [API documentation](/other/rest-api#api-reference) in your RADIUSaaS Admin Portal for detailed information on the schema of the `/status` endpoint.

## API Examples

{% hint style="info" %}
Please note that we are unable to provide support for 3rd party monitoring solutions and you will need to bring your own expertise beyond the scope of this article.&#x20;
{% endhint %}

{% stepper %}
{% step %}

### Create an Access Token as described [here](/admin-portal/access-and-rules/permissions#access-tokens).

{% endstep %}

{% step %}

### Retrieve Data

To retrieve data from the API endpoint, authenticate your requests using the access token created previously:

{% tabs %}
{% tab title="PowerShell" %}

1. **Store the Access Token**

Store the access token in a PowerShell variable for easy reference. Replace `your_access_token` with the actual token.

```powershell
$accessToken = "your_access_token"
```

2. **Make the API Request**

Use PowerShell's `Invoke-RestMethod` to send a request to the desired API. Ensure to include the access token in the request header.

```powershell
$url = "https://contoso.radius-as-a-service.com/api/status"
$headers = @{
    Authorization = "Bearer $accessToken"
}
$response = Invoke-RestMethod -Uri $url -Headers $headers -Method Get
```

{% endtab %}

{% tab title="cURL" %}

```
curl -i https://contoso.radius-as-a-service.com/api/status \ -H "Authorization: Bearer [your_access_token]"
```

{% endtab %}

{% tab title="Python" %}

```
import requests

url = "https://contoso.radius-as-a-service.com/api/status"
headers = {
    "Authorization": "Bearer your_access_token"
}

response = requests.get(url, headers=headers)

print(response.status_code)
print(response.text)
```

{% endtab %}
{% endtabs %}
{% endstep %}

{% step %}

### Process the data according to your needs

#### Example 1 - Show information about the RadSec servers:

```
$response.radsecservers

cluster_name                     : eu1
ip                               : 20.113.8.151
name                             : radius-server-contoso-main
radius-server-contoso-main-state : True
state                            : True
```

#### Example 2 - Show information about the RADIUS proxies:

```
$response.proxies

ip                                       : 142.93.161.44
location                                 : Europe (Frankfurt)
name                                     : radius-proxy-contoso-142.93.161.44
radius-proxy-contoso-142.93.161.44-state : True
state                                    : True

ip                                     : 209.38.81.0
location                               : Australia (Sydney)
name                                   : radius-proxy-contoso-209.38.81.0
radius-proxy-contoso-209.38.81.0-state : True
state                                  : True
```

#### Example 3 - Show certificate information:

```
$response.certificates | Format-List

contoso-certificate--Proxycertificate-state : True
name                                        : contoso-certificate--Proxycertificate
state                                       : True
validity_days_left                          : 2570

contoso-certificate-Customer-CA-state : True
name                                  : contoso-certificate-Customer-CA
state                                 : True
validity_days_left                    : 6900
```

{% hint style="info" %}
Please consider that the **certificates** will be **checked every 10 hours,** and the **data** is **cached for 60 seconds**. Consequently, after renewing an expired certificate, it may take several hours for the status to be updated.
{% endhint %}
{% endstep %}
{% endstepper %}


# Changelog

{% hint style="success" %}
If you'd like to **stay up to date on the latest changes and news in the RADIUSaaS changelog**, you can subscribe to our email update service. Subscribers will receive **email notifications** when there are new updates to the changelog.

[**Please click here to sign up for email notifications.**](https://feedback.radiusaas.com)
{% endhint %}

## Versions

### August 2026 Release

#### **Schedule**

* Roll-out start: 2026-08-13
* Roll-out end: 2026-08-20

#### **Fixes**

* Fixed CA certificate download under Server Certificates returning the server certificate instead
* Fixed MAC groups not being updatable
* Reduced noisy client error entries in RADIUS server logs
* Bug fixes in SCEPman SaaS Jamf Pro integration

#### **New Features**

* Reworked Admin Portal UI/UX
* Comprehensive Rule Engine update:
  * Match on client certificate attributes
  * Match on Client (WAN) IP addresses
  * Flexible assignment of VLAN IDs and attributes using regular expressions incl. fallback values
  * Backup and restore of rule sets
* Support for RSASSA-PSS-signed CRLs
* SCEPman SaaS:
  * Active Directory Enrollment
  * REST Enrollment API
* RADIUS Proxy: real Client (WAN) IP address is forwarded to the RADIUS server (available for Rule Engine matching)

### April 2026 Release&#x20;

#### Schedule

* Roll-out start: 2026-03-26
* Roll-out end: 2026-04-01

#### Fixes

* Stability update

#### New Features

* [SCEPman-as-a-Service](/admin-portal/scepman-saas/status) GA

### March 2026 Release

{% hint style="info" %}
**Action required** (for customers using RADIUSaaS Proxies)**:**\
The current release includes an update to the RADIUSaaS proxies that must be initiated by customers **before the end of April**. This is the final step of the proxy IP address migration announced last year.\
Before starting, make sure your network equipment is prepared for the new proxy IP addresses.\
Then run the Proxy Update. **After the update, legacy proxy IPs will stop working.**\
For details, please see [here](/other/changelog/final-notice-radius-proxy-ip-migration-required-before-10-july-2026).
{% endhint %}

#### Schedule

* Roll-out start: 2026-02-26
* Roll-out end: 2026-03-05

#### Fixes

* Fixed VLAN-related attributes not being populated in an RFC-compliant way
* Fixed incorrect expiration date in access token table
* Several bug fixes in configuring the [SCEPman Connection](/admin-portal/settings/settings-server#scepman-connection)

#### New Features

* [VLAN](/admin-portal/access-and-rules/rules/general-structure#vlan-attributes) and [additional return attributes (VSAs)](/admin-portal/access-and-rules/rules/general-structure#radius-attributes) can now be managed directly via the RADIUSaaS Admin Portal
* Removed RADIUS server certificate slot limitation
* Popup Notifications:
  * Added certificate expiry and other important alerts
  * Added configuration improvement recommendations

### January 2026 Release

#### Schedule

* Roll-out start: 2026-01-21
* Roll-out end: 2026-01-28

#### Fixes

* RADIUS Server: Remove all attributes from Access-Reject to ensure RFC compliance
* RADIUS Server: Set Framed-MTU to value of last request
* Allow CSV import of AP and switch groups
* Fix issue when launching RaaS from MyApps

#### New Features

* SCEPman-as-a-Service (Public beta). Please [contact us](https://support.scepman.com/support/tickets/new?ticket_form=drop_a_question_%28scepman%29&_gl=1*1ufiojk*_ga*MTEzNjMwODM1MC4xNzY5MDUyMzAy*_ga_BRDGXLVK3H*czE3NjkwNTIzMDEkbzEkZzAkdDE3NjkwNTIzMDEkajYwJGwwJGgw) to get access.
* Automatic server certificate management using [SCEPman](/admin-portal/settings/settings-server#scepman-connection)
* Allow adding multiple instances of the same return attribute

### July 2025 Release

#### Schedule

* Roll-out start: 2025-07-14
* Roll-out end: 2025-07-17

#### New Features

* More [IDP options](/admin-portal/access-and-rules/permissions#supported-idps) for administrative SSO
* [Revoked certificate cache](/other/faqs/log-and-common-errors#certificate-status-was-revoked-previously)
* Directly [create tickets or report incidents](/admin-portal/home#help) from the RADIUSaaS Admin Portal
* Improved [notification system](/admin-portal/home#notifications)

#### Upcoming Service Updates

* Preparation for [upcoming IP address change of RADIUS Proxies](/other/changelog/final-notice-radius-proxy-ip-migration-required-before-10-july-2026)

### February 2025 Release

#### Schedule

* Roll-out start: 2025-02-27
* Roll-out end: 2025-03-06

#### Fixes

* RADIUS Server: Incoming traffic is not processed in some rare scenarios
* RADIUS Proxy: Version update / increased stability

#### New Features

* Status endpoint that enables the usage of external monitoring systems (certificates, proxies and RadSec servers)
* Optimized handling of invalid OCSP responses
* Support for [Authorized Responders](https://docs.scepman.com/advanced-configuration/application-settings/ocsp#appconfig-ocsp-useauthorizedresponder) in OCSP
* Display CRL download issues
* WPA2/WPA3 selector for XML generator

### December 2024 Release

* Custom logo experience for invited users in web UI
* Technical contacts can be configured per RADIUSaaS tenant. This is a preparation for a notification feature in a future release of RADIUSaaS.
* Support for FreshestCRL (DeltaCRL) in Trusted Certificates
* Support for parentheses in CRL URL
* Updated default templates for LogExporter
* Fixed: On rare occasions, the RADIUSaaS instances may be affected by a performance bottleneck for authentications.

### June 2024 Release

* Updated UI (reactive design, improved [Rule Engine](/admin-portal/access-and-rules/rules) structure, separation of [RADIUS server certificates](/admin-portal/settings/settings-server#server-certificates) from [Trusted Certificates](/admin-portal/settings/trusted-roots) for client authentication and RadSec)
* Certificate verification can now be configured individually for each trusted CA (client authentication, RadSec) using OCSP, **CRL** or OCSP auto-detect (based on the certificate's AIA extension)
* OCSP Soft-Fail / Hard-Fail is now configurable on a per trusted CA basis.
* Introduction of [RADIUSaaS REST API documentation](/other/rest-api) and [API access tokens](/admin-portal/access-and-rules/permissions#access-tokens).
* Improved logging:&#x20;
  * Added Accounting and [RadSec connection logs](/admin-portal/insights/log#log-types).


# FINAL NOTICE: RADIUS Proxy IP Migration Required Before 10 July 2026

As part of the ongoing RADIUSaaS Proxy IP address migration, all customers using RADIUSaaS Proxies are required to complete the proxy update before **10 July 2026.**

This is a **mandatory change**. Customers who have not completed the migration by this date will no longer be able to use the existing (legacy) RADIUS Proxy IP addresses.

## Required action

Before 10 July 2026:

1. Review your network configuration and ensure your network equipment is prepared for the new RADIUS Proxy IP addresses.
2. Complete the Proxy Update from the RADIUSaaS Admin Portal.
3. Verify that your network devices are configured to communicate with the new proxy IP addresses.

## Important notice

The previous proxy IP addresses will be retired after **10 July 2026**. After this date, they will no longer be supported and authentication traffic using the legacy addresses may fail.

No further extensions or exceptions to this deadline will be provided. Customers who do not complete the migration before the deadline will need to update their configuration before RADIUS authentication can resume.

We recommend completing this change as soon as possible to avoid any potential service disruption.

***

## Proxy Update

As part of the [**March 2026 Release**](/other/changelog#march-2026-release), we are finalizing the migration of our managed **RADIUSaaS proxies**. Administrators using RADIUSaaS proxies will see a pop-up window titled **“Proxy Infrastructure Update”** with three options: ***Postpone***, ***Go To Proxies***, and ***Update***.

<figure><img src="https://1222554226-files.gitbook.io/~/files/v0/b/gitbook-x-prod.appspot.com/o/spaces%2FSWU1DQ4UGkqER7uGNUOm%2Fuploads%2FEP6ECd8b8qS3HYGsXk6n%2Fimage.png?alt=media&amp;token=c67ae9cd-2679-44aa-b426-f99920a18ece" alt=""><figcaption></figcaption></figure>

If you haven’t already, ensure your network equipment is configured for the new proxy IP addresses (see [How to check if you are affected](#how-to-check-if-you-are-affected) for details).&#x20;

When you click ***Update***, your tenant’s proxies will be updated. **Once the update completes, the legacy proxy IP addresses will no longer work**.&#x20;

***Go To Proxies*** open the **Proxy Settings** page to review your configuration.

## What You Need to Do

If your configuration uses one of the affected RADIUS proxies, you must:

1. **Update your network equipment** to use the new RADIUS proxy IP address.
2. **Run the** [**Proxy Update**](#proxy-update) (latest by **10 July 2026**).

## How to check if you are affected

{% hint style="info" %}
In general, only customers using the **RADIUS protocol** may be affected. If you are using **RadSec only**, no action is required, since you are not using the RADIUSaaS Proxy services.

Note that not every proxy server requires an IP address change.
{% endhint %}

You can verify whether your proxy configuration is impacted by logging into the **RADIUSaaS Admin Web Portal**:

* Navigate to your **proxy configuration**.
* If your proxy is affected, you will see:
  * A **new IP address** is listed.
  * A **legacy IP address** is shown in parentheses, labeled with the word **"legacy"**.

In the following example, the proxy with the region "Europe (London)" is affected, while the proxy with the region "North America (Dallas)" is not affected. The customer is required to change the IP address for the Europe (London) proxy in their network equipment, while 165.227.229.49 is the old IP address and 139.59.200.190 is the new address:

<figure><img src="https://1222554226-files.gitbook.io/~/files/v0/b/gitbook-x-prod.appspot.com/o/spaces%2FSWU1DQ4UGkqER7uGNUOm%2Fuploads%2FJrTbRQuOwy9tmyywXu0d%2Fimage.png?alt=media&amp;token=d92cd528-926f-4f56-88c1-2b2fb8d7969e" alt=""><figcaption></figcaption></figure>

## Need Help?

If you have any questions or need assistance updating your configuration, please contact our support team via the [RADIUSaaS Support Portal](https://support.radiusaas.com/support/tickets/new?ticket_form=technical_support_request_%28radiusaas%29).


# Licensing

{% hint style="success" %}
The subscription for RADIUSaaS is **user-based**.&#x20;
{% endhint %}

{% hint style="info" %}
RADIUSaaS does not display your license consumption. Please ensure compliance with the licensing terms below by monitoring the profile assignments in your MDM solution on a regular basis.
{% endhint %}

## User definition

The subscription of a "user" is required for each user, who is enabled to authenticate against RADIUSaaS on at least one device. "Enabled" refers to the devices ability to authenticate against the network using RADIUSaaS, regardless if the device is currently being used or switched off.

{% hint style="info" %}
In many cases the required number of RADIUSaaS users equals the amount of users, who are assigned to the corresponding network profile (e.g. WIFI profile) in the management system (e.g. Microsoft Endpoint Manager).
{% endhint %}

The minimum amount of users that can be subscribed for one organization is 50.

A user subscription is bound to a single user for at least one calendar month and cannot be shared with other users.

## Device limits per user

One single *User* may be assigned to up to

* five stationary devices (PC, laptop)\
  and
* five mobile devices (mobile phone, tablet).

## Subscription scope

A RADIUSaaS subscription may be used for the clients and users of **one** organization.&#x20;

It is **not** allowed to&#x20;

* Use one RADIUSaaS subscription for multiple organizations
* Split one RADIUSaaS subscription and/or re-sell it to multiple organizations


# Microsoft Marketplace

## Prerequisites

In order to purchase solutions from independent software vendors (ISV) you must fulfil the following requirements:

1. You have an active Azure subscription in one of the following countries: Armenia, Australia, Austria, Bulgaria, Belgium, Canada, Chile, Colombia, Croatia, Cyprus, Czechia, Denmark, Estonia, Finland, France, Germany, Greece, Hungary, Iceland, India, Indonesia, Ireland, Italy, Kenya, Latvia, Liechtenstein, Lithuania, Luxembourg, Malaysia, Malta, Monaco, Netherlands, New Zealand, Nigeria, Norway, Poland, Portugal, Puerto Rico, Romania, Saudi Arabia, Serbia, Singapore, Slovakia, Slovenia, South Africa, South Korea, Spain, Sweden, Switzerland, Taiwan, Thailand, Türkiye, United Arab Emirates, United Kingdom, United States, Vietnam.
2. The account you want to purchase our solution with must have the **Owner** or **Contributor** role assigned on the Azure subscription you are going to pay with.
3. The billing account linked to your Azure subscription is properly set up. Depending on your billing account type (Microsoft Customer Agreement or Enterprise Agreement), you might need to enable marketplace purchases in the Azure portal first.

## How to purchase RADIUSaaS or a Solution Bundle?

{% hint style="info" %}
Deploying a RADIUSaaS or [Solution Bundle](#solution-bundles) subscription via Microsoft Marketplace **will not result** **in a re-deployment of RADIUSaaS (or SCEPman) if you already have an active trial or production deployment**. Instead, we will assign the license obtained as part of this subscription to your existing deployments.

For **new customers**, we will provision a new instance of RADIUSaaS once below steps are completed. Please allow up to 1 business day for us to complete the provisioning.
{% endhint %}

To get started with your RADIUSaaS or Solution Bundle subscription, follow below steps:

{% stepper %}
{% step %}

### Locate the product version on the Microsoft Marketplace

Choose between the following:

* [RADIUSaaS](https://portal.azure.com/#view/Microsoft_Azure_Marketplace/GalleryItemDetailsBladeNopdl/id/glueckkanja-gabag.radiusaas-transactable-prod)
* [RADIUSaaS & SCEPman Enterprise Bundle](https://portal.azure.com/#view/Microsoft_Azure_Marketplace/GalleryItemDetailsBladeNopdl/id/glueckkanja-gabag.radiusaas-scepman-bundle-prod)
* [RADIUSaaS & SCEPman SaaS Bundle](https://portal.azure.com/#view/Microsoft_Azure_Marketplace/GalleryItemDetailsBladeNopdl/id/glueckkanja-gabag.radiusaas-scepman-saas-bundle-prod)

In case we have extended a **Private Offer** to you or your MSP/distribution has extended a **Multiparty Offer (MPO)** to you, navigate to **Marketplace** in your **Azure Portal** and then to **Private Offer Management** to locate the Private Offer.

* More details on Private Offers and MPOs can be found in Microsoft's documentation.
  * [Private Offer](https://learn.microsoft.com/en-us/marketplace/private-offers-purchase)
  * [Multiparty Offer](https://www.youtube.com/watch?v=TANUlgLuVqI)
* Select the **Subscription** where RADIUSaaS should be billed to
* Select the **Plan** (monthly or yearly) based on your preferred renewal interval
* Click **Subscribe**.

<figure><img src="https://1222554226-files.gitbook.io/~/files/v0/b/gitbook-x-prod.appspot.com/o/spaces%2FSWU1DQ4UGkqER7uGNUOm%2Fuploads%2F9mxkkCeqyb6cmqtC9H9w%2FBildschirmfoto%202026-08-06%20um%2011.16.09.png?alt=media&amp;token=8bcc7fdb-1566-4746-9f23-e7dfdb8b637b" alt=""><figcaption></figcaption></figure>
{% endstep %}

{% step %}

### Subscribe to RADIUSaaS / bundle version

* Create or select the **Resource group** you would like to deploy the subscription to.
* Assign a descriptive **Name** to later identify your subscription.
* We recommend to keep **Recurring billing** **On** so that you do not have to worry about an automatic termination of your subscription.
* Click **Review + subscribe** and then **Subscribe** to deploy the **SaaS** resource to your **Resource group**.

<figure><img src="https://1222554226-files.gitbook.io/~/files/v0/b/gitbook-x-prod.appspot.com/o/spaces%2FSWU1DQ4UGkqER7uGNUOm%2Fuploads%2FtoOTh5F6PT0GoUg4DEpA%2Fimage.png?alt=media&amp;token=46ec345c-3cbf-4670-a55a-8d2b19242e63" alt=""><figcaption></figcaption></figure>

{% hint style="info" %}
The random order of **Base Fees** und **Additional Users** under the **Price** information is attributed to limitations of the Microsoft Marketplace. Later during the the enrolment process, we will provide you with transparent information on the expected licensing fees.
{% endhint %}
{% endstep %}

{% step %}

### Configure your account

Once the deployment is complete, please navigate to our platform to complete the checkout. Therefore click **Configure account now**.

<figure><img src="https://1222554226-files.gitbook.io/~/files/v0/b/gitbook-x-prod.appspot.com/o/spaces%2FSWU1DQ4UGkqER7uGNUOm%2Fuploads%2FwMciH3UcRj7nP9GMwngb%2Fimage.png?alt=media&amp;token=33aabde7-d72e-4ae1-98e1-a10f8bc610a5" alt=""><figcaption></figcaption></figure>
{% endstep %}

{% step %}

### Add additional information

After authenticating on our platform using your Microsoft credentials, you will be prompted for additional information, such as the desired total **User** amount and a **Technical contact**.

{% hint style="info" %}
The **Technical contact** must have a mailbox connected to it, so we are able to notify you in case there are relevant issues with RADIUSaaS. By default, we also configure the **Technical contact** as initial administrator on your RADIUSaaS instance. In case you'd like to change that, please [let us know](https://www.radius-as-a-service.com/help/).
{% endhint %}

{% hint style="success" %}
If the plan contains chargeable add-ons, you can select them under **Extras**. For example, the RADIUSaaS & SCEPman Enterprise Bundle plans allow you to purchase the optional [SCEPman Setup Support](https://docs.scepman.com/support#scepman-setup-support) package.
{% endhint %}

<figure><img src="https://1222554226-files.gitbook.io/~/files/v0/b/gitbook-x-prod.appspot.com/o/spaces%2FSWU1DQ4UGkqER7uGNUOm%2Fuploads%2FSB5c5jnuOhP28MTzXFRw%2Fimage.png?alt=media&amp;token=dda30863-d6fc-4fc2-83a5-073c2c4e4a89" alt=""><figcaption></figcaption></figure>

Based on the amount of users provided, we will charge the relevant base fee for your user segment as well as additional users, in case you require more than the included amount in your base fee. **The platform automatically selects the best price / tier**.

The platform will show you the licensing fees you have to expect under **Cost Projection**.

If you are happy with it, please click **Review & Submit** for a final review and a fee summary.

Complete the checkout by confirming your choice and clicking **Submit**.

This triggers us to deploy your RADIUSaaS instance (and issue a SCEPman Enterprise Edition license key if the RADIUSaaS and SCEPman Bundle is purchased). We will inform you via email with all relevant information on the next steps once the instance (and license key) is available for you. This won't take any longer than one business day.

{% hint style="info" %}
You will only be charged by Microsoft, once you have completed the enrolment on our platform and received our welcome email.
{% endhint %}
{% endstep %}
{% endstepper %}

## Pricing Model

* RADIUSaaS is offered as a **monthly or** **annual subscription plan** with different [User Segments](#user-segments). The correct **user segment** is automatically selected by our platform based on the amount of desired users.
* All subscription plans consist of a **base fee** which includes a certain amount of users per subscription cycle - depending on the **user segment**. For example, the **base fee** for the user segment *RADIUSaaS (M) 50* includes 50 users per month.
* If more than the included amount of users is required, **additional users** can be added to the plan. For each additional user, we charge an additional per-user fee.

## Invoicing

* During the first subscription interval, your subscription fees are not immediately due after completing the subscription enrolment. Instead we will start billing once your cancellation grace period has expired.
* Upon every renewal date, you will be billed immediately.
* You will always be billed for the entire subscription cycle in advance.
* The related items should appear on your Microsoft Azure invoice (Pay-As-You-Go or Enterprise Agreement) the month after we have reported your fees to Microsoft.
* In the PDF invoice you will receive from Microsoft, all RADIUSaaS fees are lumped into an item called "SaaS". The related Publisher is "glueckkanja".<br>

  <figure><img src="https://1222554226-files.gitbook.io/~/files/v0/b/gitbook-x-prod.appspot.com/o/spaces%2FSWU1DQ4UGkqER7uGNUOm%2Fuploads%2FFQLZfvirA9LEtV7Zd08p%2Fimage.png?alt=media&amp;token=91752e84-abe2-4012-9122-2bd55b154f8c" alt=""><figcaption></figcaption></figure>

{% hint style="info" %}
For a more detailed cost breakdown of your base and additional user fees, please refer to the invoice in your Azure portal.
{% endhint %}

## Plan Overview

Subscriptions for RADIUSaaS are available based on a **monthly** or **annual** renewal interval.

{% hint style="info" %}
The annual plan is discounted by 10% in comparison to the monthly plan (calculated over the period of 12 months).
{% endhint %}

| **Plan**      | **Renewal Interval** |
| ------------- | -------------------- |
| RADIUSaaS (M) | Monthly              |
| RADIUSaaS (Y) | Annually             |

### User Segments

The following user segments are available for both, monthly and annual plans:

<table data-header-hidden><thead><tr><th width="240.02162801098973">Plan</th><th width="244.07580174927114">Included Users</th><th></th></tr></thead><tbody><tr><td><strong>User Segment</strong></td><td><strong>Included Users in Base Fee</strong></td><td><strong>Maximum Total Users</strong></td></tr><tr><td>RADIUSaaS (M/Y) 50</td><td>50</td><td>249</td></tr><tr><td>RADIUSaaS (M/Y) 250</td><td>250</td><td>999</td></tr><tr><td>RADIUSaaS (M/Y) 1000</td><td>1,000</td><td>4,999</td></tr><tr><td>RADIUSaaS (M/Y) 5000</td><td>5,000</td><td>9,999</td></tr><tr><td>RADIUSaaS (M/Y) 10000</td><td>10,000</td><td>unlimited</td></tr></tbody></table>

For prices in Euro (EUR), please check out our [website](https://www.radius-as-a-service.com/pricing/). For prices in *your* currency, please directly refer to the **Marketplace** in the [Azure Portal](https://portal.azure.com/).

## Solution Bundles

{% hint style="info" %}
The information provided throughout this article is analogously applicable for solution bundle subscriptions.
{% endhint %}

{% hint style="success" %}
Please refer to our [SCEPman Edition Comparison](/overview#scepman-edition-comparison) for details on the differences between SCEPman Enterprise and SCEPman SaaS.
{% endhint %}

#### RADIUSaaS & SCEPman Enterprise Bundle

We offer RADIUSaaS as well as our cloud-CA solution **for** **in-customer tenant deployment** [SCEPman Enterprise](https://www.scepman.com/) in a subscription bundle that is discounted by 25% in comparison to the individual solutions. The bundle plans are available with monthly or annual renewal as well as the same [User Segments](#user-segments).

Furthermore, the plans allow the **one-time** purchase of the [SCEPman Setup Support](https://docs.scepman.com/licensing#optional-scepman-setup-support).

#### RADIUSaaS & SCEPman SaaS Bundle

If you'd prefer to use our cloud-based PKI SCEPman **without having to deploy infrastructure in your Azure tenant**, you can opt for the RADIUSaaS & SCEPman SaaS Bundle, that allows you to leverage SCEPman SaaS, built righ into your RADIUSaaS instance. The bundle plans are available with monthly or annual renewal as well as the same [User Segments](#user-segments).

## Subscription Management

### User Upgrades

* If you would like to upgrade your user count, you can do that any time during the current subscription cycle by navigating to your **RADIUSaaS subscription** in the [Azure SaaS portal](https://portal.azure.com/#blade/HubsExtension/BrowseResourceBlade/resourceType/Microsoft.SaaS%2Fresources) and by clicking "Open SaaS Account on publisher's site" (see screenshot below). This will re-direct you to our platform where the amount of users can be upgraded.

![](https://content.gitbook.com/content/SWU1DQ4UGkqER7uGNUOm/blobs/501YsNPIaZTyXtp029CM/Screenshot%202022-02-18%20at%2012.32.27%202.png)

* Our platform will inform you about the new fees you to expect for a **complete** subscription cycle.
* For the current cycle, we will bill the additional users for remaining days only.
* After confirming your choice and once we have updated the license in our backend, you will receive a confirmation email from us.

### User Downgrades

* You can **pre-register a reduction** of your licensed users for the **next renewal**, by navigating to your **RADIUSaaS subscription** in the [Azure SaaS portal](https://portal.azure.com/#blade/HubsExtension/BrowseResourceBlade/resourceType/Microsoft.SaaS%2Fresources) and by clicking "Open SaaS Account on publisher's site" (see screenshot below). This will re-direct you to our platform where the amount of users can be downgraded.

![](https://content.gitbook.com/content/SWU1DQ4UGkqER7uGNUOm/blobs/501YsNPIaZTyXtp029CM/Screenshot%202022-02-18%20at%2012.32.27%202.png)

* The downgrade will become effective upon the next regular renewal of your subscription.
* In case you change your mind and would like to change the user quantity or cancel the downgrade altogether, navigate back to your **RADIUSaaS subscription** and click **Cancel downgrade**.

<figure><img src="https://1222554226-files.gitbook.io/~/files/v0/b/gitbook-x-prod.appspot.com/o/spaces%2FSWU1DQ4UGkqER7uGNUOm%2Fuploads%2FQAQbxzdsGfIxLF7JigGF%2Fimage.png?alt=media&amp;token=1b2a926c-ce64-49ef-a59b-2f9265cbc76b" alt=""><figcaption></figcaption></figure>

### Change Plan

If available on Azure Portal, the **Change Plan** action allows you to change your current outdated plan to the most recent version of the plan with the same subscription cycle (annually or monthly).

### **Recurring Billing**

If you decide to disable **Recurring billing**, your subscription will not renew automatically. Instead, Microsoft will (irreversibly) cancel the subscription towards the end of the current subscription cycle. This means, the service will be terminated automatically on that date as well. While the subscription has not expired yet, you can opt to enable **Recurring billing** at any time.

### Cancellation

* If you would like to (irreversibly) cancel your subscription, navigate to your **RADIUSaaS subscription** in the [Azure SaaS portal](https://portal.azure.com/#blade/HubsExtension/BrowseResourceBlade/resourceType/Microsoft.SaaS%2Fresources) and click **Cancel subscription**.

<figure><img src="https://content.gitbook.com/content/SWU1DQ4UGkqER7uGNUOm/blobs/GpLbkFAHX683ua7Xh5N7/Screenshot%202022-02-18%20at%2012.29.47%20copy.png" alt=""><figcaption></figcaption></figure>

* If you cancel within the grace period, the service will be stopped immediately.
* If you cancel after the grace period, the service will remain active until the end of the current subscription cycle.

## **Trials**

In case you would like to test RADIUSaaS, please [request a trial via our website](https://support.radiusaas.com/support/tickets/new?ticket_form=trial_request_%28radiusaas%29) or send us an email to <sales@radiusaas.com>.

## FAQs

### Why is my "Plan no longer available for purchase"?

In case you see hint in your subscription as shown in below screenshot, **there is no need to worry**!

<figure><img src="https://content.gitbook.com/content/SWU1DQ4UGkqER7uGNUOm/blobs/BwuAQANJXUdP9xYkqwmw/azure-saas-plan-no-longer-available-for-purchase%20copy.png" alt=""><figcaption></figcaption></figure>

The reasons for this hint is that - from time to time - we might have to deprecate plans for technical reasons.

**Important:**

* As an existing customer, you may continue to use the deprecated plan indefinitely (until the subscription is cancelled).
* In case a newer plan gives you better pricing or other advantages, we will inform you about this.
* You can change to the most recent version of the plan by leveraging the [Change Plan](#change-plan) action.

### Why is my Microsoft Marketplace purchase not working?

You may encounter problems when purchasing through Microsoft Marketplace. Here is a list of reasons, why buying through Microsoft Marketplace may fail:

1. You do not have permissions in your Azure tenant to purchase through Microsoft Marketplace. You must be assigned the role of Owner or Contributor in the Azure subscription you want to pay with.
2. The subscription belongs to an Enterprise Agreement (EA) and the EA admin disabled Microsoft Marketplace purchases. Or the EA admin has enabled purchases only for free offers and the offer is a paid offer. Please see [here](https://learn.microsoft.com/en-us/marketplace/purchase-control-options) for details.
3. The subscription you're using belongs to a billing account in a region where the offer isn't available.\
   Our Marketplace offers are available in the following countries/regions:

   Armenia, Australia, Austria, Bulgaria, Belgium, Canada, Chile, Colombia, Croatia, Cyprus, Czechia, Denmark, Estonia, Finland, France, Germany, Greece, Hungary, Iceland, India, Indonesia, Ireland, Italy, Kenya, Latvia, Liechtenstein, Lithuania, Luxembourg, Malaysia, Malta, Monaco, Netherlands, New Zealand, Nigeria, Norway, Poland, Portugal, Puerto Rico, Romania, Saudi Arabia, Serbia, Singapore, Slovakia, Slovenia, South Africa, South Korea, Spain, Sweden, Switzerland, Taiwan, Thailand, Türkiye, United Arab Emirates, United Kingdom, United States, Vietnam
4. The subscription/billing account isn't associated with a valid payment instrument (such as a valid credit card).
5. Private Marketplace is enabled for the subscription and the offer isn't in the list of allowed offers.
6. Purchases are not permitted for subscriptions with a spending cap, including Free subscriptions, Sponsorships, and similar types.

### Does RADIUSaaS or the Solution Bundles count towards my Microsoft Azure Consumption Commitment (MACC)?

Currently (March 2025), this is the case. Since Microsoft may change their policy on what counts towards MACC in the future, please always [confirm](https://learn.microsoft.com/en-us/marketplace/azure-consumption-commitment-benefit#find-and-purchase-azure-benefit-eligible-offers-in-azure-marketplace) eligibility first.


# cleverbridge

## Prerequisites & Vendor Onboarding <a href="#prerequisites" id="prerequisites"></a>

In order to purchase RADIUSaaS from our merchant of record, cleverbride GmbH (headquartered in Germany), no special prerequisites have to be met, except for accepting their terms and conditions.

Depending on your sourcing and purchasing requirements, you might have to set up cleverbridge as a vendor in your system. cleverbridge provides all relevant onboarding information [via their website](https://support.cleverbridge.com/hc/en-us/articles/4405420244243-How-do-I-register-Cleverbridge-as-a-vendor).

Should you have any questions during the onboarding process, especially in regards to legal or taxation aspects, please [contact cleverbridge directly](#for-what-inquiries-should-i-contact-cleverbridge-directly).

{% hint style="info" %}
**For US-based customers only**.

Since cleverbridge operates a local entity in the US, cleverbridge Inc., certain tax implications may arise from this. As part of their vendor [onboarding information](https://support.cleverbridge.com/hc/en-us/articles/4405449389587-I-m-a-vendor-looking-to-place-an-order-from-the-U-S-What-documents-do-I-need), they also provide a W-9 form.
{% endhint %}

## Pricing Model

RADIUSaaS is offered as a **monthly or** **annual subscription plan** with different [User Segments](#user-segments). The correct **user segment** is either&#x20;

* pre-selected in case we provide a quotation or order link to you, or
* must be manually selected during checkout:<br>

  <figure><img src="https://1222554226-files.gitbook.io/~/files/v0/b/gitbook-x-prod.appspot.com/o/spaces%2FSWU1DQ4UGkqER7uGNUOm%2Fuploads%2FHVfpBObSKi7GjW1wEWJM%2Fimage.png?alt=media&amp;token=205178c9-cf2d-4913-ab6c-00ab0d844f0e" alt=""><figcaption></figcaption></figure>

## Payment Options

cleverbridge provides a range of payment options (credit card, PayPal, Wire Transfer), where availability might depend on the country you are ordering from.

### Invoice-based Payments

If you require invoice-based payments, please [contact us](mailto:sales@radiusaas.com) so we can provide you with a quotation or order link that provides invoice-based payments. The payment term is **30 days** **net**.

### Currencies

cleverbridge allows you to transact in a variety of currencies. The currency is automatically selected based on the location of your browser's IP address. If you would like to transact in a different currency, you can do so by selecting your preferred currency in the top right corner of the quotation or checkout site.

{% hint style="info" %}
The reference currency for RADIUSaaS is Euro (EUR). The forex rate cleverbridge applies when converting to other currencies is not in our control. Please note, that once an order for a subscription is placed **and** as long as **automatic renewal** is **enabled**, the forex rate is guaranteed for future renewals, i.e. cleverbridge absorbs the forex risk.&#x20;
{% endhint %}

## Plan Overview

Subscriptions for RADIUSaaS are available based on a **monthly** or **annual** renewal interval.

{% hint style="info" %}
The annual plan is discounted by 10% in comparison to the monthly plan (calculated over the period of 12 months).
{% endhint %}

| **Plan**      | **Renewal Interval** |
| ------------- | -------------------- |
| RADIUSaaS (M) | Monthly              |
| RADIUSaaS (Y) | Annually             |

### User Segments

The following user segments are available for both, monthly and annual plans.

<table data-header-hidden><thead><tr><th width="286.83723958333337"></th><th></th><th></th></tr></thead><tbody><tr><td><strong>User Segment</strong></td><td><strong>Minimum Total Users</strong></td><td><strong>Maximum Total Users</strong></td></tr><tr><td>RADIUSaaS 50 (M/Y)</td><td>50</td><td>249</td></tr><tr><td>RADIUSaaS 250 (M/Y)</td><td>250</td><td>999</td></tr><tr><td>RADIUSaaS 1000 (M/Y)</td><td>1,000</td><td>4,999</td></tr><tr><td>RADIUSaaS 5000 (M/Y)</td><td>5,000</td><td>9,999</td></tr><tr><td>RADIUSaaS 10000 (M/Y)</td><td>10,000</td><td>unlimited</td></tr></tbody></table>

### Solution Bundles

{% hint style="info" %}
The information provided throughout this article is analogously applicable for solution bundle subscriptions.
{% endhint %}

{% hint style="success" %}
Please refer to our [SCEPman Edition Comparison](/overview#scepman-edition-comparison) for details on the differences between SCEPman Enterprise and SCEPman SaaS.
{% endhint %}

#### RADIUSaaS & SCEPman Enterprise Bundle

We offer RADIUSaaS as well as our cloud-CA solution **for** **in-customer tenant deployment** [SCEPman Enterprise](https://www.scepman.com/) in a subscription bundle that is discounted by 25% in comparison to the individual solutions. The bundle plans are available with monthly or annual renewal as well as the same [User Segments](#user-segments).&#x20;

#### RADIUSaaS & SCEPman SaaS Bundle

If you'd prefer to use our cloud-based PKI SCEPman **without having to deploy infrastructure in your Azure tenant**, you can opt for the RADIUSaaS & SCEPman SaaS Bundle, that allows you to leverage SCEPman SaaS, built righ into your RADIUSaaS instance. The bundle plans are available with monthly or annual renewal as well as the same [User Segments](#user-segments). <br>

<figure><img src="https://1222554226-files.gitbook.io/~/files/v0/b/gitbook-x-prod.appspot.com/o/spaces%2FSWU1DQ4UGkqER7uGNUOm%2Fuploads%2F33t3wQNOFar7uyczQCJL%2Fimage.png?alt=media&amp;token=4cf20c2d-077d-43d5-a430-4b603d84f20a" alt=""><figcaption></figcaption></figure>

## Subscription Management

### Self-management Portal

Cleverbridge allows you to manage any aspect of your subscription via their self-management portal, including but not limited to:

* Contact data changes
* Payment method changes
* Downloading previous invoices
* Performing user upgrades and downgrades
* Cancelling your subscription

To access the self management portal, please refer to the initial delivery / order confirmation email that was sent to you by cleverbridge at the time your order was placed. Within that email, locate the button saying **Manage Your Subscription For "\<SKU>"** and click it.

<figure><img src="https://1222554226-files.gitbook.io/~/files/v0/b/gitbook-x-prod.appspot.com/o/spaces%2FSWU1DQ4UGkqER7uGNUOm%2Fuploads%2FmCCc3Q2Ubx16YWuhTGBY%2Fimage.png?alt=media&amp;token=2929da48-bba5-468c-a0e9-c5738b49722a" alt=""><figcaption></figcaption></figure>

This will either navigate you to the self-management portal directly or you might have to re-generate the link (they might expire after a while) first.

{% hint style="info" %}
In case you are having difficulties accessing the self-management portal as described above, feel free to [contact cleverbridge directly](#for-what-inquiries-should-i-contact-cleverbridge-directly) for assistance by referencing your **Cleverbridge reference number**.
{% endhint %}

### User Upgrades

{% hint style="info" %}
User upgrades are only available if all previous amounts / invoices have been paid. In case you cannot pay a previous invoice before performing the upgrade, please [contact us](mailto:sales@radiusaas.com).
{% endhint %}

#### Mid-term Upgrade

{% hint style="info" %}
The Mid-term Upgrade option is **available until 15 days before** your subscription is set to renew. Afterwards it will be replace by the [Early Renewal Upgrade](#early-renewal-upgrade).
{% endhint %}

If you would like to upgrade your user count, you can do so any time during the current subscription cycle by navigating to the subscription's [self-management portal](#self-management-portal) leveraging the mid-term upgrade option.

With the mid-term upgrade, additional users will be&#x20;

* billed **Pro Rata Temporis**, and
* **co-termed** with the existing users,

which means you only pay for the delta in users pro-rated for the remaining subscription cycle.

To perform a mid-term upgrade,

* Navigate to the subscription's [self-management portal](#self-management-portal).
* Click **Manage products**.

<figure><img src="https://1222554226-files.gitbook.io/~/files/v0/b/gitbook-x-prod.appspot.com/o/spaces%2FSWU1DQ4UGkqER7uGNUOm%2Fuploads%2FOkEJ5zuVjApPW7JILfgf%2Fimage.png?alt=media&amp;token=4c8b9a17-2457-44f2-af94-82a1d23c99f9" alt=""><figcaption></figcaption></figure>

* Select the correct [user segment](#user-segments), and provide the new **total** number of users. The website will display the&#x20;

  * upgrade price (**Upgrade price today**), and
  * the next regular renewal price assuming the new total user count (**Renewal price on ...**)

  both **including VAT**.

<figure><img src="https://1222554226-files.gitbook.io/~/files/v0/b/gitbook-x-prod.appspot.com/o/spaces%2FSWU1DQ4UGkqER7uGNUOm%2Fuploads%2F8L5wcMHVYNTG7ov5mhMv%2Fimage.png?alt=media&amp;token=9bfa6fa4-4e9a-48e9-8d05-2de411c72adc" alt=""><figcaption></figcaption></figure>

* Click **Next**, review your **Payment method** and confirm the purchase by clicking **Buy now**.

<figure><img src="https://1222554226-files.gitbook.io/~/files/v0/b/gitbook-x-prod.appspot.com/o/spaces%2FSWU1DQ4UGkqER7uGNUOm%2Fuploads%2FAxle8t52eVMC8rMzE5kA%2Fimage.png?alt=media&amp;token=a4384677-55b3-410d-b8ad-487e9cdf948e" alt=""><figcaption></figcaption></figure>

* The additional users will be added to your **existing RADIUSaaS instance** automatically.

#### Early Renewal Upgrade

{% hint style="info" %}
The Early Renewal Upgrade flow is **available from 15 days before** your subscription is set to renew.&#x20;
{% endhint %}

If you would like to upgrade your user count as part of the next regular renewal, you can do so by navigating to the subscription's [self-management portal](#self-management-portal) leveraging the early renewal upgrade flow.

With the early renewal upgrade flow, additional users are **pre-registered** for the next regular renewal. However, you may start using the additional users immediately.

To perform an early renewal upgrade,

* Navigate to the subscription's [self-management portal](#self-management-portal).
* Click **Renew subscription**.

<figure><img src="https://1222554226-files.gitbook.io/~/files/v0/b/gitbook-x-prod.appspot.com/o/spaces%2FSWU1DQ4UGkqER7uGNUOm%2Fuploads%2FTFkKbWREOOlPiSMoMM4u%2Fimage.png?alt=media&amp;token=2d66fd2d-c4bc-4041-ade2-71538f270551" alt=""><figcaption></figcaption></figure>

* Select the correct [user segment](#user-segments), and provide the new **total** number of users. The website will display the renewal price considering the additional users.

<figure><img src="https://1222554226-files.gitbook.io/~/files/v0/b/gitbook-x-prod.appspot.com/o/spaces%2FSWU1DQ4UGkqER7uGNUOm%2Fuploads%2FG7TZPQ4q5anb0zAPoY7K%2Fimage.png?alt=media&amp;token=17c4a0c4-ccb3-4e6f-b549-19fd4d12b9c7" alt=""><figcaption></figcaption></figure>

* Click **Next**, review your **Payment method** and confirm the purchase by clicking **Buy now**.

<figure><img src="https://1222554226-files.gitbook.io/~/files/v0/b/gitbook-x-prod.appspot.com/o/spaces%2FSWU1DQ4UGkqER7uGNUOm%2Fuploads%2FyogsS8KeiHKjZk0Pi5lj%2Fimage.png?alt=media&amp;token=99170f7e-498b-4b7d-aa73-2724a3eae1dd" alt=""><figcaption></figcaption></figure>

* The additional users will be added to your **existing RADIUSaaS instance** automatically.

### User Downgrades

You can pre-register a reduction of your user count for the next regular renewal by leveraging the [early renewal upgrade](#early-renewal-upgrade), too. However instead of adding users, you may reduce the number of users.

### **Automatic Renewal**

{% hint style="warning" %}
Only relevant for customers buying in non-Euro currency.

By disabling Automatic Renewal you **are opting out of the perpetual forex rate** guarantee. This means the forex risk is transferred from cleverbridge to the customer.
{% endhint %}

If you decide to disable **Automatic Renewal**, your subscription will not renew automatically. Instead, cleverbridge will (irreversibly) cancel the subscription towards the end of the current subscription cycle. This means, the service will be terminated automatically on that date as well. While the subscription has not expired yet, you can opt to enable **Automatic Renewal** at any time by navigating to your subscription's [self-management portal](#self-management-portal).

<figure><img src="https://1222554226-files.gitbook.io/~/files/v0/b/gitbook-x-prod.appspot.com/o/spaces%2FSWU1DQ4UGkqER7uGNUOm%2Fuploads%2FTVLChrRpK3cTyIxjdGEJ%2Fimage.png?alt=media&amp;token=fc20df9c-e60f-4315-aadf-94df52988b38" alt=""><figcaption></figcaption></figure>

### Cancellation

* If you would like to (irreversibly) cancel your subscription, navigate to your subscription's [self-management portal](#self-management-portal) and disable **Automatic Renewal**.
* You subscription will expire towards the end of the current cycle.
* There is **no cancellation notice period**.

## **For Partners**

Partners can leverage the same tools to manage subscriptions on behalf of their customers. To access a subscription self-management portal for a particular subscription, follow these steps:

* Sign-on to the [Partner Portal](https://www.cleverbridge.com/306/?scope=pplogin) using your partner account credentials.
* Click **History**, select **All transactions** and locate the relevant customer.
* Click the icon highlighted in below screenshot, which will re-direct you to the initial confirmation / order confirmation page:<br>

  <figure><img src="https://1222554226-files.gitbook.io/~/files/v0/b/gitbook-x-prod.appspot.com/o/spaces%2FSWU1DQ4UGkqER7uGNUOm%2Fuploads%2FI1FXT4h5o8Io1zGguMgA%2Fimage.png?alt=media&amp;token=d177bb4f-6b8d-444d-9775-a1e8d5c8798e" alt=""><figcaption></figcaption></figure>
* On that page, locate the button saying **Manage Your Subscription For "\<SKU>"** and click it.

  <figure><img src="https://1222554226-files.gitbook.io/~/files/v0/b/gitbook-x-prod.appspot.com/o/spaces%2FSWU1DQ4UGkqER7uGNUOm%2Fuploads%2FmCCc3Q2Ubx16YWuhTGBY%2Fimage.png?alt=media&amp;token=2929da48-bba5-468c-a0e9-c5738b49722a" alt=""><figcaption></figcaption></figure>
* This will either navigate you to the self-management portal directly or you might have to re-generate the link (they might expire after a while) first.

{% hint style="info" %}
In case you are having difficulties accessing the self-management portal as described above, feel free to [contact cleverbridge directly](#for-what-inquiries-should-i-contact-cleverbridge-directly) for assistance by referencing your **Cleverbridge reference number**.
{% endhint %}

## **Trials**

In case you would like to test RADIUSaaS, please [request a trial via our website](https://support.radiusaas.com/support/tickets/new?ticket_form=trial_request_%28radiusaas%29) or send us an email to <sales@radiusaas.com>.

## FAQs

### How to request a quote for RADIUSaaS or a Solution Bundle?

{% hint style="info" %}
Quotes are valid for 14 days.
{% endhint %}

To request a quote for RADIUSaaS,&#x20;

* Get in [contact with us](mailto:sales@radiusaas.com) and request a quote link.
* Once we have sent the quote link to you,
  * Click it.
  * Select the correct user segment, user quantity and fill our your company information.
  * Click **Next**, review your data and click **Request price quote**.

### Why is the VAT not removed from my quote?

Cleverbridge will automatically remove the VAT if you provide a valid European VAT ID (and are not located in Germany) or a valid business registration number in countries where a VAT exemption applies (e.g. ABN in Australia).

If the VAT is not removed but you believe that you are entitled to a VAT exemption, please [contact cleverbridge directly](#for-which-inquiries-should-i-contact-cleverbridge-directly).

### How do I convert a quote into an order?

{% hint style="info" %}
Cleverbridge does not require a Purchase Order (PO) to be provided when converting a quote into an order.
{% endhint %}

To convert a quote into an order

* Locate the email that was sent you when requesting a quote
* Scroll down and locate the **Place order** button. Click it.
* Choose your preferred payment method amongst the available **Payment Options**.
* Click **Next**, review your data and confirm the purchase by clicking **Buy now**.
* We will contact you afterwards to query additional information that is required for the provision of your RADIUSaaS instance.

### For what inquiries should I contact cleverbridge directly?

You should contact cleverbridge customer support directly, for the following inquiries:

* Taxation / VAT
* Correction of an invoice
* Issues with your payment method
* Change your contact details in the cleverbridge system

{% embed url="<https://support.cleverbridge.com/hc/en-us>" %}


# Support & Service Level

## Support

### Eligibility

Customers, who have an active subscription of RADIUSaaS are eligible for our support services. The support is included in the subscription fee of RADIUSaaS.

### Scope

Our support services cover technical assistance for administrators:

* Technical questions about features of RADIUSaaS
* Support for incidents regarding RADIUSaaS

### Access

You can access our support in the tab "Help" on our main product web-site (<https://www.radius-as-a-service.com/>).

Using the support website will generate a ticket in our ticket system, which will be the basis for the support process. Communication will happen in written form via e-mail or web-interface of our ticket-system. Depending on the support case, our support-engineers may decide to offer Microsoft Teams meetings to work on issues together with customers.

Alternatively, raise a support ticket by clicking on the help button in [your RADIUSaaS portal](/admin-portal/home#help).

### Language

Our engineers are happy to support you in these languages:

* English
* German

### Support hours

* Monday-Friday
* 08:00-18:00 CET / CEST
* Except from public holidays for Hesse / Germany, Christmas Eve and New Year's Eve

### Support response time

Typical < 4 hours for incidents

Response time is defined as the duration between the report of the incident and the start of incident or problem handling through one of our support engineers. The response time is to be calculated within the support hours.

## Service level

### Services in scope

The services in scope for the service level are:

* RADIUSaaS
* SCEPman SaaS

### Service hours

Our service is operated 24x7

### Service availability

The service availability goal is 99,5%. It is calculated by using the following formula:&#x20;

`service availability` = (`service period` - `downtime`) / `service period`&#x20;

where

* `Service period` is the corresponding calendar month\
  and&#x20;
* `Downtime` is the accumulated amount of time where the service is unavailable. The service is considered unavailable, when there is no connectivity between the service and the internet.

Service outages must be reported by customers to our support as soon as possible and at the latest within 24 hours after occurrence.

In the event of a reported service outage, affected customers are entitled to apply within one week for the following credits for the affected calendar month:

* service availability < 99.5% => 10%
* service availability < 99.0% => 25%

### Data loss

#### Scope

This section applies to all services operated by glueckkanja on behalf of the customer, including RADIUSaaS and SCEPman SaaS.

#### Risk of data loss

Despite careful operation and maintenance of our services, the possibility of customer data loss cannot be fully excluded. This includes, but is not limited to, the potential loss of the private key of the Certificate Authority (CA) managed by glueckkanja as part of the SCEPman SaaS service.

#### Compensation for data loss

Customers affected by the loss of the CA private key are entitled to apply within one week after occurrence of the loss for a credit of six (6) months of their subscription.

Beyond the credit described above, glueckkanja accepts no further liability and is under no obligation to pay any additional compensation for damages arising from data loss. This exclusion applies to all forms of damage, including but not limited to:

* Loss of business or revenue
* Operational disruption or downtime
* Cost of rebuilding the PKI environment and redistributing certificates
* Indirect, incidental, or consequential damages of any kind

### Credits

Credits are appended as additional free months as an extension to the current subscription term.