Trusted Certificates
Types of Trusted Certificates
Trusted CAs for Client Authentication
Trusted CAs for client authentication establish the trust between the CAs that issue client authentication certificates to your endpoint devices and RADIUSaaS.
Trusted RadSec Connection Certificates
RadSec itself works with mutual certificate authentication (mTLS). This means, on the one hand your authenticators must trust RADIUSaaS and on the other hand RADIUSaaS must know which authenticators to trust so that a valid RadSec connection can be established. The trusted RadSec connection certificates ensure RADIUSaaS only trusts those authenticators that you specify.
Pre-installed trusted RadSec certificate
Due to the above, you will always see at least one RadSec trusted certificate that establishes the trust with your RADIUS proxies (effectively acting as RadSec clients). To ensure that your proxies are able to start up properly and are able to establish a connection to your instance, you cannot delete it.
Add
If you have a tiered PKI infrastructure (e.g. a Microsoft legacy PKI), please consider this.
To add a new trusted certificate, follow these steps:
Click Add
Select if you want to import to trusted certificate
from SCEPman (by providing the URL to your SCEPman instance), or
from any other CA (by uploading a PEM or DER-encoded certificate file)
Select the type of trusted certificate under Use for:
Both (helpful if the same CA is issuing your client authentication certificates as well as your RadSec client certificates)
Upload the certificate file by drag & drop (alternatively you can click in the blue area and select your file)
Select the certificate verification option:
OCSP Autodetect: RADIUSaaS will try to infer the OCSP responder URL from the client certificate's Authority Information Access (AIA) extension that is used for the network authentication. In case no OCSP responder URL is found or the OCSP responder is unavailable, RADIUSaaS will consider the Soft fail configuration.
OCSP: Manually specify which OCSP responder URL will be used for any certificate that was issued by the trusted CA. If the OCSP responder is unavailable, RADIUSaaS will consider the Soft fail configuration.
CRL: If selected, RADIUSaaS will use a CRL instead of OCSP to verify certificate issued by the CA. Specify the CRL encoding (DER or PEM) and the CRL distribution points.
None: If your CA supports neither OCSP nor CRL, select None to skip the verification.
Click Save
Delete
To delete a certificate, expand the corresponding row, click Delete and confirm your choice.

OCSP Soft-fail
This setting determines how RADIUSaaS behaves, when the OCSP responder of your trusted CA cannot be reached.
If you disable this setting, authentication requests will be rejected when your CA's OCSP responder cannot be reached.
Please check OCSP Soft-fail Consequences to make sure you understand the implications of this setting.
Note that this setting is only available when OCSP Autodetect or OCSP is selected for certificate verification.
By default, we recommend enabling OCSP Soft fail to increase the availability of the service by allowing authentication requests to be accepted even if the OCSP responder cannot be reached. With this soft fail mechanism, and in case OCSP is not reachable, RADIUSaaS will only check if the incoming certificate was signed by one of the trusted CAs and processes any optional Rules.

Tiered PKI hierarchy
In a tiered CA environment with multiple issuing CAs configured, certificates issued from the root CA or any issuing CA will get access regardless of whether the certificate was issued from the root or issuing CA. This means that trusting the root will automatically trust certificates issued by any of the issuing CAs. If access needs to be controlled based on the issuing CAs, this can be achieved by configuring respective rules.
Considerations
When uploading root and issuing CAs of a tiered PKI, please consider the following:
The root CA must be uploaded first, before uploading any issuing CAs derived from this root CA.
Root and issuing CAs must be uploaded in separate files. Uploading certificate chains from a single file may result in unexpected behaviour.
Optional settings
Intune ID
It is possible to use the certificate which every Windows 10 machine receives from Intune when joining Microsoft Entra ID (Azure AD).
This setting is optional. In case you are not familiar with Intune Certificates, please do not configure them!
Why are we not recommending using Intune certificates for authentication purposes?
Intune certificates are not supported by Microsoft for other purposes than management with Intune.
Validity time for the Intune certificates is 1 year.
There is no mechanism to revoke certificates (like OCSP).
Instead of using Intune certificates, we recommend using certificates from a PKI like SCEPman.
Configure Intune IDs
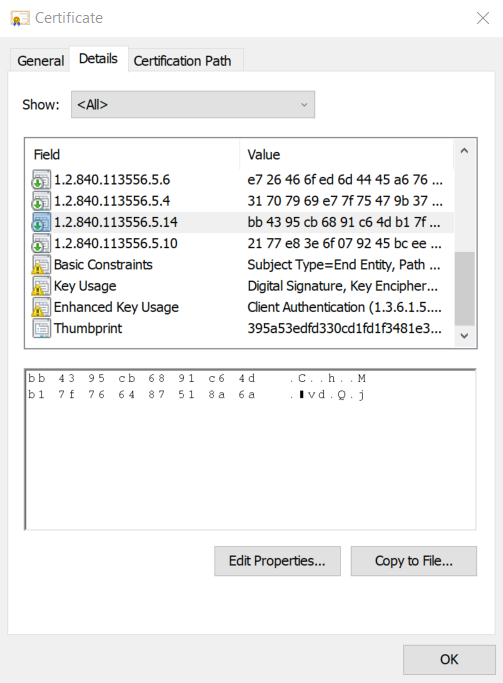
Use this setting with care. One of the following IDs must exist in the certificate extension 1.2.840.113556.5.14. All other certificates will be rejected.
To get your Intune Tenant ID, follow these steps:
Press Windows + R and enter certlm.msc
Go to your personal certificates. There will be a certificate from one of the following issuers
SC Online Issuing
MDM Device Authority
Open this certificate, go to Details and search for the extension
1.2.840.113556.5.14
The printed HEX value is your Intune Tenant ID.
Example:
The Tenant ID of the following certificate is: bb4397cb6891c64db17f766487518a6a

XML
The XML profile generated by RADIUSaaS will enable PMK caching.
Today, most MDM platforms provide a wizard-based method to deploy networking profiles (WiFi and LAN). If this is not possible, or if the wizard provides only limited configuration options, you may generate a raw-XML profile directly on the RADIUSaaS platform.
To generate your WiFi XML profile:
Expand the XML menu,
select the desired security protocol (WPA2 or WPA3),
enter your SSID,
and click Download.
To generate your Wired XML profile, click Download.

Last updated
Was this helpful?